解决方案

修改package.json安装最新的hexo-baidu-url-submit插件

进入站点根目录,打开package.json,把hexo-baidu-url-submit配置项改为:

1
2
3
"dependencies": {
"hexo": "^3.7.0",
"hexo-baidu-url-submit": "https://github.com/huiwang/hexo-baidu-url-submit",

然后在站点目录下,输入npm install命令安装最新的hexo-baidu-url-submit插件。安装需要一段过程,中途不要管它。安装成功:

1
2
3
4
5
6
7
$ npm install
npm WARN registry Unexpected warning for https://registry.npmjs.org/: Miscellaneous Warning ETIMEDOUT: request to https://registry.npmjs.org/xmlhttprequest failed, reason: connect ETIMEDOUT 104.16.17.35:443
npm WARN registry Using stale package data from https://registry.npmjs.org/ due to a request error during revalidation.
npm WARN optional SKIPPING OPTIONAL DEPENDENCY: fsevents@1.2.4 (node_modules\fsevents):
npm WARN notsup SKIPPING OPTIONAL DEPENDENCY: Unsupported platform for fsevents@1.2.4: wanted {"os":"darwin","arch":"any"} (current: {"os":"win32","arch":"x64"})

updated 1 package in 266.405s

然后在站点配置文件中添加下面两个配置:

配置站点配置文件

baidu_url_submit 配置

1
2
3
4
5
6
7
8
baidu_url_submit:
count: 1000 ## 提交最新的一个链接
host: alili.tech ## 在百度站长平台中注册的域名
token: xxxxx ## 请注意这是您的秘钥, 所以请不要把博客源代码发布在公众仓库里!
path: baidu_urls.txt ## 文本文档的地址, 新链接会保存在此文本文档里
xz_appid: 'xxxxxx' ## 你的熊掌号 appid
xz_token: 'xxxxxx' ## 你的熊掌号 token
xz_count: 10 ## 从所有的提交的数据当中选取最新的10条,该数量跟你的熊掌号而定

注意熊掌号的appid,支架填在单引号中就行了。不要去掉单引号。

deploy 配置

1
2
3
4
5
6
7
8
deploy:
- type: git
repo:
coding: git@git.coding.net:你的coding/你的coding.coding.me.git #coding地址
github: git@github.com:你的Github用户名/你的Github用户名.github.io.git # Github pages地址
branch: master
- type: baidu_url_submitter #百度主动推送
- type: baidu_xz_url_submitter #百度熊掌号

部署

输入hexo clean&&hexo g&&hexo d部署即可,部署时结束后插件会自动向百度提交,成功推送到熊账号的命令输出:

1
2
3
4
5
6
7
8
9
10
INFO  Deploying: baidu_xz_url_submitter
INFO new urls
......
{"success_realtime":10,"remain_realtime":0}
INFO 最新数据提交完成
INFO all urls
......
{"success_batch":20,"remain_batch":4999980}
INFO 历史数据提交完成
INFO Deploy done: baidu_xz_url_submitter

登录熊掌号查看提交效果

提交完毕后当了百度熊掌号的链接提页面,可以看到今日的10条额度已经用完了:

好了,事情到这里就靠一段落了,过几天再来看效果吧。

参考链接

参考文章:https://alili.tech/archive/9d64fe09/
hexo-baidu-url-submit插件官方位置:https://github.com/huiwang/hexo-baidu-url-submit

返回文本文件中最后一行的起始位置

重载方法1 使用File参数表示的文件

1
2
3
4
5
6
7
8
9
10
11
12
13
14
15
16
17
18
19
20
21
22
23
24
25
26
27
28
29
30
31
32
33
34
35
36
37
38
39
40
41
/**
* 返回文本文件的最后一行的起始位置。
* @param file 文本文件
* @return 最后一行的下标
*/
public static long getLastLinePos(File file)
{
long lastLinePos = 0L;
RandomAccessFile raf;
try
{
raf = new RandomAccessFile(file, "r");

// 获取文件占用字节数
long len = raf.length();
if (len > 0L)
{
// 向前走一个字节
long pos = len - 1;
while (pos > 0)
{
pos--;
// 移动指针
raf.seek(pos);
// 判断这个字节是不是回车符
if (raf.readByte() == '\n')
{
lastLinePos = pos;// 记录下位置
break;// 前移到会第一个回车符后结束
// return pos;
}
}
}
} catch (IOException e)
{
// TODO Auto-generated catch block
e.printStackTrace();
}

return lastLinePos;
}

重载方法2 使用RandomAccessFile参数表示的文件

返回最后一行的起始位置,并移动文件指针到最后一行的起始位置,这个方法适合于其他方法一起使用,以重用RandomAccessFile对象。

1
2
3
4
5
6
7
8
9
10
11
12
13
14
15
16
17
18
19
20
21
22
23
24
25
26
27
28
29
30
31
32
/**
* 返回最后一行的起始位置,并移动文件指针到最后一行的起始位置。
* @param raf RandomAccessFile对象
* @return 最后一行的起始位置
* @throws IOException
*/
private static long getLastLinePos(RandomAccessFile raf) throws IOException
{
long lastLinePos = 0L;
// 获取文件占用字节数
long len = raf.length();
if (len > 0L)
{
// 向前走一个字节
long pos = len - 1;
while (pos > 0)
{
pos--;
// 移动指针
raf.seek(pos);
// 判断这个字节是不是回车符
if (raf.readByte() == '\n')
{
// lastLinePos = pos;// 记录下位置
// break;// 前移到会第一个回车符后结束
return pos;
}

}
}
return lastLinePos;
}

获取到最后一行的位置后就可以获取最后一行的文本了。如下所示:

获取文本文件中最后一行文本

1
2
3
4
5
6
7
8
9
10
11
12
13
14
15
16
17
18
19
20
21
22
23
24
25
26
27
28
29
30
31
32
33
34
35
36
37
38
39
40
41
42
/**
* 获取文本文件最后一行中的字符串。
* @param file
* 目标文件
* @param charset
* 字符编码
* @return 文本文件中最后一行中的字符串。
*/
public static String getLastLineStr(File file, String charset)
{
String lastLine = null;
RandomAccessFile raf = null;
try
{
raf = new RandomAccessFile(file, "rwd");
//获取最后一行的起始位置,并移动指针到指定位置。
long lastLinePos = getLastLinePos(raf);
//获取文件的大小:也就是占用的字节数
long length = raf.length();
byte[] bytes = new byte[(int) ((length - 1) - lastLinePos)];
//上面的getLastLinePos(raf);方法已经移动文件指针到最后一行的起始位置了,所以这里只需要读取即可。
raf.read(bytes);

if (charset == null)
{
lastLine = (new String(bytes));
} else
{
lastLine = (new String(bytes, charset));
}

} catch (FileNotFoundException e)
{
// TODO Auto-generated catch block
e.printStackTrace();
} catch (IOException e)
{
// TODO Auto-generated catch block
e.printStackTrace();
}
return lastLine;
}

在文本文件最后一行追加文本

重载方法1 使用File参数表示的文件

这个方法在最后一行后面追加文本,不会另起一行。

1
2
3
4
5
6
7
8
9
10
11
12
13
14
15
16
17
18
19
20
21
22
23
24
25
26
27
28
29
30
31
32
33
34
35
36
37
/**
* 在文本文件最后一行末尾插入文本。
*
* @param file
* 目标文件
* @param newLastLine
* 要插入的文本
* @param charset
* 字符编码名称
*/
public static void insertInLastLine(File file, String newLastLine,
String charset)
{
RandomAccessFile raf = null;
try
{
raf = new RandomAccessFile(file, "rwd");
// 移动指针到最后一行
raf.seek(raf.length());
raf.write(newLastLine.getBytes(charset));
} catch (IOException e)
{
// TODO Auto-generated catch block
e.printStackTrace();
} finally
{
if (raf != null)
{
try
{
raf.close();
} catch (IOException e)
{
}
}
}
}

重载方法2 使用RandomAccessFile参数表示的文件

这个方法适合于其他方法一起使用,以重用RandomAccessFile对象。

1
2
3
4
5
6
7
8
9
10
11
12
13
14
15
16
17
/**
* 在文本文件最后一行末尾追加文本。
*
* @param newLastLine 要追加的文本
* @param charset 字符编码名称
* @param raf RandomAccessFile表示的文件
* @throws IOException
* @throws UnsupportedEncodingException
*/
private static void insertInLastLine(String newLastLine, String charset,
RandomAccessFile raf)
throws IOException, UnsupportedEncodingException
{
// 移动指针到最后一行
raf.seek(raf.length());
raf.write(newLastLine.getBytes(charset));
}

在文本文件最后一行后插入另一行文本

那么怎么在最后一行后面插入另一行文本呢,只需要在前面添加一个换行符就行了。

1
2
3
4
5
6
7
8
9
10
11
12
13
14
15
16
/**
* 在最后一行中末尾中插入文本。
*
* @param file
* 目标文件
* @param newLastLine
* 即将插入的文本
* @param charset
* 字符编码名称
*/
public static void insertAfterLastLine(File file, String newLastLine,
String charset)
{
newLastLine = "\n" + newLastLine;
insertInLastLine(file, newLastLine, charset);
}

删除文本文件最后一行

重载方法1 使用File参数表示的文件

1
2
3
4
5
6
7
8
9
10
11
12
13
14
15
16
17
18
19
20
21
22
23
24
25
26
27
28
29
30
31
32
33
/**
* 删除本文文件最后一行。
* @param file
*/
public static void deleteLastLine(File file)
{
RandomAccessFile raf = null;
try
{
raf = new RandomAccessFile(file, "rwd");
// 获取最后一行的位置
long lastLinePos = getLastLinePos(raf);
// 删除最后一行
raf.setLength(lastLinePos);
} catch (IOException e)
{
// TODO Auto-generated catch block
e.printStackTrace();
} finally
{
if (raf != null)
{
try
{
raf.close();
} catch (IOException e)
{
e.printStackTrace();
}
}
}

}

重载方法2 使用RandomAccessFile参数表示的文件

这个方法适合于其他方法一起使用,以重用RandomAccessFile对象。

1
2
3
4
5
6
7
8
9
10
11
12
/**
* 删除本文文件最后一行。
* @param raf
* @throws IOException
*/
private static void deleteLastLine(RandomAccessFile raf) throws IOException
{
// 获取最后一行的位置
long lastLinePos = getLastLinePos(raf);
// 删除最后一行
raf.setLength(lastLinePos);
}

更新文本文件最后一行

更新的思想是:先删除最后一行,然后再在文件后面追加就行了。

1
2
3
4
5
6
7
8
9
10
11
12
13
14
15
16
17
18
19
20
21
22
23
24
25
26
27
28
29
30
31
32
33
34
35
36
37
38
/**
* 更新最后一行文本。
*
* @param file
* 目标文件
* @param newLastLine
* 替换文本
* @param charset
* 字符编码名称
*/
public static void updateLastLine(File file, String newLastLine,
String charset)
{
RandomAccessFile raf = null;
try
{
raf = new RandomAccessFile(file, "rwd");
// 删除最后一行文本
deleteLastLine(raf);
// 在最后一行插入新的一行文本
insertInLastLine(newLastLine, charset, raf);
} catch (IOException e)
{
// TODO Auto-generated catch block
e.printStackTrace();
} finally
{
if (raf != null)
{
try
{
raf.close();
} catch (IOException e)
{
}
}
}
}

整个类的代码

1
2
3
4
5
6
7
8
9
10
11
12
13
14
15
16
17
18
19
20
21
22
23
24
25
26
27
28
29
30
31
32
33
34
35
36
37
38
39
40
41
42
43
44
45
46
47
48
49
50
51
52
53
54
55
56
57
58
59
60
61
62
63
64
65
66
67
68
69
70
71
72
73
74
75
76
77
78
79
80
81
82
83
84
85
86
87
88
89
90
91
92
93
94
95
96
97
98
99
100
101
102
103
104
105
106
107
108
109
110
111
112
113
114
115
116
117
118
119
120
121
122
123
124
125
126
127
128
129
130
131
132
133
134
135
136
137
138
139
140
141
142
143
144
145
146
147
148
149
150
151
152
153
154
155
156
157
158
159
160
161
162
163
164
165
166
167
168
169
170
171
172
173
174
175
176
177
178
179
180
181
182
183
184
185
186
187
188
189
190
191
192
193
194
195
196
197
198
199
200
201
202
203
204
205
206
207
208
209
210
211
212
213
214
215
216
217
218
219
220
221
222
223
224
225
226
227
228
229
230
231
232
233
234
235
236
237
238
239
240
241
242
243
244
245
246
247
248
249
250
251
252
253
254
255
256
257
258
259
260
261
262
263
264
265
266
267
268
269
270
271
272
273
274
275
276
277
278
import java.io.File;
import java.io.FileNotFoundException;
import java.io.IOException;
import java.io.RandomAccessFile;
import java.io.UnsupportedEncodingException;

public class LastLineInFileTools
{
/**
* 获取文本文件最后一行中的字符串。
*
* @param file
* 目标文件
* @param charset
* 字符编码
* @return 文本文件中最后一行中的字符串。
*/
public static String getLastLineStr(File file, String charset)
{
String lastLine = null;
RandomAccessFile raf = null;
try
{
raf = new RandomAccessFile(file, "rwd");
long lastLinePos = getLastLinePos(raf);
long length = raf.length();
byte[] bytes = new byte[(int) ((length - 1) - lastLinePos)];
raf.read(bytes);

if (charset == null)
{
// return new String(bytes);
lastLine = (new String(bytes));
} else
{
// return new String(bytes, charset);
lastLine = (new String(bytes, charset));
}

} catch (FileNotFoundException e)
{
// TODO Auto-generated catch block
e.printStackTrace();
} catch (IOException e)
{
// TODO Auto-generated catch block
e.printStackTrace();
}
return lastLine;
}
/**
* 在最后一行中末尾中插入文本。
*
* @param file
* 目标文件
* @param newLastLine
* 即将插入的文本
* @param charset
* 字符编码名称
*/
public static void insertAfterLastLine(File file, String newLastLine,
String charset)
{
newLastLine = "\n" + newLastLine;
insertInLastLine(file, newLastLine, charset);
}
/**
* 更新最后一行文本。
*
* @param file
* 目标文件
* @param newLastLine
* 替换文本
* @param charset
* 字符编码名称
*/
public static void updateLastLine(File file, String newLastLine,
String charset)
{
RandomAccessFile raf = null;
try
{
raf = new RandomAccessFile(file, "rwd");
// 删除最后一行文本
deleteLastLine(raf);
// 在最后一行插入新的一行文本
insertInLastLine(newLastLine, charset, raf);
} catch (IOException e)
{
// TODO Auto-generated catch block
e.printStackTrace();
} finally
{
if (raf != null)
{
try
{
raf.close();
} catch (IOException e)
{
}
}
}
}
/**
* 在文本文件最后一行末尾追加文本。
*
* @param newLastLine 要追加的文本
* @param charset 字符编码名称
* @param raf RandomAccessFile表示的文件
* @throws IOException
* @throws UnsupportedEncodingException
*/
private static void insertInLastLine(String newLastLine, String charset,
RandomAccessFile raf)
throws IOException, UnsupportedEncodingException
{
// 移动指针到最后一行
raf.seek(raf.length());
raf.write(newLastLine.getBytes(charset));
}
/**
* 在文本文件最后一行末尾插入文本。
*
* @param file
* 目标文件
* @param newLastLine
* 要插入的文本
* @param charset
* 字符编码名称
*/
public static void insertInLastLine(File file, String newLastLine,
String charset)
{
RandomAccessFile raf = null;
try
{
raf = new RandomAccessFile(file, "rwd");
// 移动指针到最后一行
raf.seek(raf.length());
raf.write(newLastLine.getBytes(charset));
} catch (IOException e)
{
// TODO Auto-generated catch block
e.printStackTrace();
} finally
{
if (raf != null)
{
try
{
raf.close();
} catch (IOException e)
{
}
}
}
}
/**
* 删除本文文件最后一行。
* @param raf
* @throws IOException
*/
private static void deleteLastLine(RandomAccessFile raf) throws IOException
{
// 获取最后一行的位置
long lastLinePos = getLastLinePos(raf);
// 删除最后一行
raf.setLength(lastLinePos);
}

/**
* 删除本文文件最后一行。
* @param file
*/
public static void deleteLastLine(File file)
{
RandomAccessFile raf = null;
try
{
raf = new RandomAccessFile(file, "rwd");
// 获取最后一行的位置
long lastLinePos = getLastLinePos(raf);
// 删除最后一行
raf.setLength(lastLinePos);
} catch (IOException e)
{
// TODO Auto-generated catch block
e.printStackTrace();
} finally
{
if (raf != null)
{
try
{
raf.close();
} catch (IOException e)
{
e.printStackTrace();
}
}
}

}
/**
* 返回最后一行的起始位置,并移动文件指针到最后一行的起始位置。
* @param raf RandomAccessFile对象
* @return 最后一行的起始位置
* @throws IOException
*/
private static long getLastLinePos(RandomAccessFile raf) throws IOException
{
long lastLinePos = 0L;
// 获取文件占用字节数
long len = raf.length();
if (len > 0L)
{
// 向前走一个字节
long pos = len - 1;
while (pos > 0)
{
pos--;
// 移动指针
raf.seek(pos);
// 判断这个字节是不是回车符
if (raf.readByte() == '\n')
{
// lastLinePos = pos;// 记录下位置
// break;// 前移到会第一个回车符后结束
return pos;
}

}
}
return lastLinePos;
}
/**
* 返回文本文件的最后一行的起始位置。
* @param file 文本文件
* @return 最后一行的下标
*/
public static long getLastLinePos(File file)
{
long lastLinePos = 0L;
RandomAccessFile raf;
try
{
raf = new RandomAccessFile(file, "r");

// 获取文件占用字节数
long len = raf.length();
if (len > 0L)
{
// 向前走一个字节
long pos = len - 1;
while (pos > 0)
{
pos--;
// 移动指针
raf.seek(pos);
// 判断这个字节是不是回车符
if (raf.readByte() == '\n')
{
lastLinePos = pos;// 记录下位置
break;// 前移到会第一个回车符后结束
// return pos;
}
}
}
} catch (IOException e)
{
// TODO Auto-generated catch block
e.printStackTrace();
}

return lastLinePos;
}
}

先写到这里,后续审核通过了我在再增加,注册这个只是为了,让我的博客站点在百度搜索中的排名靠前点。SEO还真心不容易啊。

Hexo安装插件支持百度熊掌号自动推送

具体参照我的这篇文章:ERROR Deployer not found:baidu_xz_url_submitter
我不想再重复写一次了。

返回文本文件最后一行java代码

1
2
3
4
5
6
7
8
9
10
11
12
13
14
15
16
17
18
19
20
21
22
23
24
25
26
27
28
29
30
31
32
33
34
35
36
37
38
39
40
41
42
43
44
45
46
47
48
49
50
51
52
53
54
55
56
57
58
59
60
61
62
63
64
65
public static String readLastLine(File file, String charset)
throws IOException
{
if (!file.exists() || file.isDirectory() || !file.canRead())
{
return null;
}
RandomAccessFile raf = null;
try
{
raf = new RandomAccessFile(file, "r");
//获取文件占用字节数
long len = raf.length();
if (len == 0L)
{
return "";
} else
{
//向前走一个字节
long pos = len - 1;
while (pos > 0)
{
pos--;
//移动指针
raf.seek(pos);
//判断这个字节是不是回车符
if (raf.readByte() == '\n')
{
break;//前移到会第一个回车符后结束
}
}
if (pos == 0)
{
raf.seek(0);
}

//记录下当前位置

byte[] bytes = new byte[(int) (len - pos)];
//读取从回车符位置到文件结尾的所有字节
raf.read(bytes);
if (charset == null)
{
return new String(bytes);
} else
{
return new String(bytes, charset);
}
}
} catch (FileNotFoundException e)
{
} finally
{
if (raf != null)
{
try
{
raf.close();
} catch (Exception e2)
{
}
}
}
return null;
}

参考:https://blog.csdn.net/q_linchao/article/details/79630906

读取本文文件最后一行,并记下最后一行的位置

如果文本文件最后一行也有特殊的意义,需要动态的更新最后一行,单单读取最后一行是远远不够的,所以我在上面代码的基础上进一步封装成一个工具类,把文本文件的最后一行,以及最后一行的位置。保存在内部成员属性中,源代码如下:

1
2
3
4
5
6
7
8
9
10
11
12
13
14
15
16
17
18
19
20
21
22
23
24
25
26
27
28
29
30
31
32
33
34
35
36
37
38
39
40
41
42
43
44
45
46
47
48
49
50
51
52
53
54
55
56
57
58
59
60
61
62
63
64
65
66
67
68
69
70
71
72
73
74
75
76
77
78
79
80
81
82
83
84
85
86
87
88
89
90
91
92
import java.io.File;
import java.io.FileNotFoundException;
import java.io.IOException;
import java.io.RandomAccessFile;

public class LastLineInFile
{
private long lastlinestart;
private String lastLine;
public LastLineInFile()
{
this.lastlinestart=0;
this.lastLine=null;
}
public long getLastlinestart()
{
return lastlinestart;
}
public String getLastLine()
{
return lastLine;
}
private void setLastlinestart(long pos)
{
this.lastlinestart = pos;
}
private void setLastLine(String lastLine)
{
this.lastLine = lastLine;
}
public void readLastLine(File file, String charset)
throws IOException
{
RandomAccessFile raf = null;
try
{
raf = new RandomAccessFile(file, "r");
//获取文件占用字节数
long len = raf.length();
if (len == 0L)
{
setLastLine("");
} else
{
//向前走一个字节
long pos = len - 1;
while (pos > 0)
{
pos--;
//移动指针
raf.seek(pos);
//判断这个字节是不是回车符
if (raf.readByte() == '\n')
{
break;//前移到会第一个回车符后结束
}
}
if (pos == 0)
{
raf.seek(0);
}

//记录下当前位置
setLastlinestart(pos);
byte[] bytes = new byte[(int) (len - pos)];
//读取从回车符位置到文件结尾的所有字节
raf.read(bytes);
if (charset == null)
{
setLastLine(new String(bytes));
} else
{
setLastLine(new String(bytes,charset));
}
}
} catch (FileNotFoundException e)
{
} finally
{
if (raf != null)
{
try
{
raf.close();
} catch (Exception e2)
{
}
}
}
}
}

这样我记下了最后一行的位置之后,就可以动态的更新最后一行了,使用代码片段如下所示:

1
2
3
4
5
6
7
8
9
10
11
12
13
14
15
16
17
18
19
20
21
22
LastLineInFile lastLineInFile=new LastLineInFile();
File localFile=new File(localPath);
//读取最后一行,得到最后一行的位置,和最后一行的字符串
lastLineInFile.readLastLine(localFile, "utf-8");
//获取最后一行的字符串
String lastLine=lastLineInFile.getLastLine();

//更新文章最后一行。
//以读写方式打开,同时要求每个更新都写入底层设备
RandomAccessFile rf=new RandomAccessFile(localFile, "rwd");
//获取最后一行的位置
long filelastpos=lastLineInFile.getLastlinestart();
System.out.println("最后一行位置:"+filelastpos);
//截取文件,是最后一行被截走,相当于删除掉最后一行
rf.setLength(filelastpos);
//指针移动到文件末尾
rf.seek(filelastpos);
//写入新的信息
rf.write(hyperLinks.getBytes("utf-8"));
//关闭文件
rf.close();

分支相关

查询分支

git branch

创建分支

1
git checkout -b dev

git checkout命令加上-b参数表示创建并切换,相当于以下两条命令:

1
2
git branch dev
git checkout dev

查看当前分支

git branch命令查看当前分支:

1
2
3
4
lan@DESKTOP-8ISAT6B MINGW64 /D/dev/workspace/HexoTools (dev)
$ git branch
* dev
master

git branch命令会列出所有分支,当前分支前面会标一个*号。

切换分支

在dev分支的工作完成后,我们就可以切换回master分支:

1
2
3
4
lan@DESKTOP-8ISAT6B MINGW64 /D/dev/workspace/HexoTools (dev)
$ git checkout master
Switched to branch 'master'
lan@DESKTOP-8ISAT6B MINGW64 /D/dev/workspace/HexoTools (master)

合并分支

使用git merge 指定分支命令合并指定分支到当前分支。现在,把dev分支的工作成果合并到master分支上,

1
2
3
4
5
6
7
8
9
10
11
12
13
lan@DESKTOP-8ISAT6B MINGW64 /D/dev/workspace/HexoTools (master)
$ git merge dev
Updating ec6d299..616432d
Fast-forward
src/front/matter/tools/AddFrontMatter.java | 198 ---------
......
.../to/this_article/CurrentArticlesHyperlinks.java | 194 ++++++++
25 files changed, 1842 insertions(+), 1446 deletions(-)
delete mode 100644 src/front/matter/tools/AddFrontMatter.java
......
delete mode 100644 src/markdown/add/horizontal/line/AddHorizontalLine.java
......
create mode 100644 src/useless/generate/links/to/this_article/CurrentArticlesHyperlinks.java

注意到上面的Fast-forward信息,Git告诉我们,这次合并是“快进模式”,也就是直接把master指向dev的当前提交,所以合并速度非常快。

删除分支

和并到主分支后,就可以删除dev分支了:

1
2
3
lan@DESKTOP-8ISAT6B MINGW64 /D/dev/workspace/HexoTools (master)
$ git branch -d dev
Deleted branch dev (was 616432d).

删除后,查看branch,就只剩下master分支了:

1
2
3
4
lan@DESKTOP-8ISAT6B MINGW64 /D/dev/workspace/HexoTools (master)
$ git branch
* master

忽略文件

忽略文件的便捷写法

.gitignore文件中,写入想要忽略的文件或者目录的相对地址即可。下面介绍一个快速写.gitignore文件的技巧:
打开git-bash,输入touch .gitignore创建.gitignore文件。然后输入:ls -ah >.gitignore命令把当前目录下所有的文件以及目录都写入到.gitignore文件中。这表示忽略项目中所有的目录以及文件。可以输入cat .gitignore命令所有忽略的文件或目录,如下所示:

1
2
3
4
5
6
7
8
9
10
11
12
lan@DESKTOP-8ISAT6B MINGW64 /d/dev/workspace/Coding (master)
$ cat .gitignore
./
../
.classpath
.git/
.gitignore
.project
.settings/
bin/
res/
src/

最后使用vim .gitigonre命令编辑文件,删除(按下dd)你要加入版本管理的文件以及目录,想要忽略的就保留。这样比我们手动的往里面写要快的多:

忽略已加入版本控制的文件

问题描述

.gitignore中已经标明忽略某个文件或目录,但是这个文件还是默认加到版本库中.

原因

如果某些文件已经被纳入了版本管理中,就算是在.gitignore中已经声明了忽略路径也是不起作用的,因为.gitignore只对还没有加入版本库的文件有效.
这个使用使用git rm命令可以从版本库中删除文件.

查看要从版本库中删除的文件

1
git rm -n --cached 文件

查看要从版本库中删除的目录

1
git rm -r -n --cached 目录

注意不要使用git rm -r --cached .这个命令很危险,有可能把IDE的配置文件给删掉,免得到时候打不开又得重新建工程。

实例:从版本库中移除一个文件

1
2
3
4
5
6
7
8
9
10
11
12
13
14
15
16
lan@DESKTOP-8ISAT6B MINGW64 /e/workspace/HexoTools (dev)
$ cat .gitignore
bin/
.settings/
*.txt
.project
.classpath
lan@DESKTOP-8ISAT6B MINGW64 /e/workspace/HexoTools (dev)
$ git status
On branch dev
...
Changes not staged for commit:
(use "git add <file>..." to update what will be committed)
(use "git checkout -- <file>..." to discard changes in working directory)
modified: HexoFrontMatter.txt
...

1.清除该文件的缓存

1
2
3
4
5
6
7
8
9
10
11
12
13
lan@DESKTOP-8ISAT6B MINGW64 /e/workspace/HexoTools (dev)
$ git rm -n --cached HexoFrontMatter.txt
rm 'HexoFrontMatter.txt'
lan@DESKTOP-8ISAT6B MINGW64 /e/workspace/HexoTools (dev)
$ git rm --cached HexoFrontMatter.txt
rm 'HexoFrontMatter.txt'
lan@DESKTOP-8ISAT6B MINGW64 /e/workspace/HexoTools (dev)
$ git status
On branch dev
Changes to be committed:
(use "git reset HEAD <file>..." to unstage)
deleted: HexoFrontMatter.txt
......

加上-n参数表示显示要即将要删除的文件,并不会真正则删除.这个参数用来验证自己删除的对不对,以免误删。

2.重新添加提交

1
2
3
4
5
6
7
8
9
10
11
12
13
14
15
16
17
18
19
20
21
22
23
lan@DESKTOP-8ISAT6B MINGW64 /e/workspace/HexoTools (dev)
$ git add .
lan@DESKTOP-8ISAT6B MINGW64 /e/workspace/HexoTools (dev)
$ git status
On branch dev
Changes to be committed:
(use "git reset HEAD <file>..." to unstage)
deleted: HexoFrontMatter.txt
......
lan@DESKTOP-8ISAT6B MINGW64 /e/workspace/HexoTools (dev)
$ git commit -m '
> 从版本库中移除日志文件(txt)'
[dev 191c3cd] 从版本库中移除日志文件(txt)
8 files changed, 134 insertions(+), 28 deletions(-)
delete mode 100644 HexoFrontMatter.txt
create mode 100644 src/find/not/fm/FindNotFM.java
rename src/tools/readlastlineinbigfile/{LastLineInFileTools.java => LastLineReader.java} (94%)
lan@DESKTOP-8ISAT6B MINGW64 /e/workspace/HexoTools (dev)
$ git status
On branch dev
nothing to commit, working tree clean

lan@DESKTOP-8ISAT6B MINGW64 /e/workspace/HexoTools (dev)

这个时候该txt文件已经从版本库中删除掉了,不过并不会删除工作区的文件,可以用ls命令查看:

1
2
$ ls
bin/ HexoFrontMatter.txt lib/ README.md res/ runable/ src/

实例:从版本库中移除目录

1
2
3
4
5
6
7
8
9
10
11
12
13
14
15
16
17
18
19
20
21
22
23
24
25
26
lan@DESKTOP-8ISAT6B MINGW64 /e/workspace/XunFeiTTS (dev)
$ git status
On branch dev
Changes not staged for commit:
(use "git add <file>..." to update what will be committed)
(use "git checkout -- <file>..." to discard changes in working directory)
modified: .settings/org.eclipse.core.resources.prefs
.......
no changes added to commit (use "git add" and/or "git commit -a")
lan@DESKTOP-8ISAT6B MINGW64 /e/workspace/XunFeiTTS (dev)
$ git rm -r -n --cached .settings/
rm '.settings/org.eclipse.core.resources.prefs'
lan@DESKTOP-8ISAT6B MINGW64 /e/workspace/XunFeiTTS (dev)
$ git rm -r --cached .settings/
rm '.settings/org.eclipse.core.resources.prefs'
lan@DESKTOP-8ISAT6B MINGW64 /e/workspace/XunFeiTTS (dev)
$ git add .
lan@DESKTOP-8ISAT6B MINGW64 /e/workspace/XunFeiTTS (dev)
$ git commit -m '
> 1.支持输入字符串合成音频
> 2.从版本库中移除IDE的配置文件目录.
> '
[dev bfd69df] 1.支持输入字符串合成音频 2.从版本库中移除IDE的配置文件目录.
5 files changed, 28 insertions(+), 28 deletions(-)
delete mode 100644 .settings/org.eclipse.core.resources.prefs
lan@DESKTOP-8ISAT6B MINGW64 /e/workspace/XunFeiTTS (dev)

克隆的仓库中 忽略已经加入文件的更新

问题描述

经过上一步,我已经从本地仓库中把一个文件彻底移除了,然后我用git push命令推送到远程仓库中,这样远程仓库也没有了该文件.

但是我之间在另一个目录中已经克隆了这个仓库,现在我叫这个仓库为克隆的仓库
我想在克隆的仓库中使用git pull进行更新,但是更新之后,克隆的仓库中还是存在这个文件(这是因为在克隆仓库中我修改了这个文件),那又怎么删除呢?
我这里不知道其他方法,最后我现在先删除本地克隆仓库,然后再从远程仓库中克隆。这样克隆的仓库中也就没有了这个文件了。

删除本地仓库

1
rm -rf MD/

重新克隆

现在重新克隆到本地仓库中,并重名为MD

1
git clone git@github.com:lanlan2017/markdown-command-line-generator.git MD

远程仓库

添加远程仓库

语法:git remote add 远程仓库别名 远程仓库地址
如下所示:

1
git remote add origin git@github.com:lanlan2017/GetWiFiPassWord.git

查看远程仓库

1
git remote -v

推送到远程仓库

推送到master分支:

1
git push origin master

如果是远程仓库是空的,第一次推送master分支时,则在push后面加上参数-u:

1
git push -u origin master

版本回退

查看版本日志

1
git log --pretty=oneline

显示效果如下:

1
2
3
4
5
$ git log --pretty=oneline
c8f251788d8cc9dd69b8622dd1bba0384f2a6d48 (HEAD -> master) 修改README.md文件
8304fffa30f0fd96d317244daaa327ada7f1af6d (origin/master, origin/HEAD) 修改代码输出文件使用相对路径
8f3abbee855216adfd92e7727e4c91204fd451c2 获取所有连接过的wifi密码.
931319f6d7f157fef8558662c5a23693cbf8178c Initial commit

这里可以看到远程仓库和本地仓库的信息。

撤销添加

使用git add命令之后,可以输入:

1
git reset HEAD

撤销本次添加,也可以输入:

1
git reset HEAD filename

撤销添加某个文件,例如要撤销添加src/mainclass/MMD.java这个文件可以输入:

1
git reset HEAD src/mainclass/MMD.java

回退到某次commit

1
git reset --hard commit_id  

撤销修改###

有时候会把代码写蹦了,这个时候就要撤销这次的修改。

撤销一个文件的修改

1
git checkout -- filename

撤销所有修改

有时候,可能修改了不止一个文件,一个个的修改比较麻烦,所以要,撤销所有的修改:

1
git checkout .

删除新增文件

上面的撤销修改只能对已经修改的文件有效,但是如果你新创建了一些新的文件的话,这些文件没有添加到版本库中,是不会自动删除掉的,使用如下命令删除这些新增的文件:

1
git clean -df

冲突

产生冲突的情况

两个分支``都分别有新的提交的时候,在合并的时候就会出现冲突.

查找冲突的文件

使用git status可以看到发生冲突的文件:

1
2
3
4
5
6
7
8
9
10
11
lan@DESKTOP-8ISAT6B MINGW64 /d/dev/workspace/MarkdownTools (master|MERGING)
$ git status
On branch master
Your branch is up to date with 'origin/master'.
You have unmerged paths.
(fix conflicts and run "git commit")
(use "git merge --abort" to abort the merge)
Unmerged paths:
(use "git add <file>..." to mark resolution)
both modified: src/delete/Delete.java
no changes added to commit (use "git add" and/or "git commit -a")

注意其中的这两个提示:

1
both modified:   src/delete/Delete.java

这说明src/delete/Delete.java这个文件冲突了。

修改冲突的文件

首先不要慌张.git已经合并了没有冲突的地方,我们只需要修改上面两个文件中发生冲突的地方即可.现在打开冲突的文件src/delete/Delete.java然后修改git提示的有冲突的地方,如下所示:

1
2
3
4
5
6
7
8
9
10
11
12
13
    public static String deleteSpacesBetweenChinese(String text)
{
// 删除英文空格
text = text.replaceAll("([\\u4e00-\\u9fa5])\\s+([\\u4e00-\\u9fa5])",
"$1$2");
// 删除中文空格
text = text.replaceAll("[ ]+", "");
<<<<<<< HEAD
=======
text = text.replaceAll(" ", "");
>>>>>>> dev
return text;
}

Git用<<<<<<<=======>>>>>>>标记出不同分支的中有冲突的地方如下所示:

1
2
3
4
<<<<<<< HEAD
=======
text = text.replaceAll(" ", "");
>>>>>>> dev

等号分割了两个分支,上面的是HEAD分支的新内容,这里为空,等号下面的是dev分支上的新内容。修改这部分内容,然后删掉<<<<<<< HEAD这些提示符就行了。这步叫做手动解决冲突

再次提交

然后再次添加,然后再次提交.

1
2
3
4
5
6
7
lan@DESKTOP-8ISAT6B MINGW64 /d/dev/workspace/MarkdownTools (master|MERGING)
$ git add .
lan@DESKTOP-8ISAT6B MINGW64 /d/dev/workspace/MarkdownTools (master|MERGING)
$ git commit -m '
> 合并冲突'
[master 7d0e456] 合并冲突
lan@DESKTOP-8ISAT6B MINGW64 /d/dev/workspace/MarkdownTools (master)

切换分支合并修改

这样master分支上就没有冲突了,接着切换到dev分支,然后dev分支合并没有冲突的master分支,这样两者就都没有冲突了。

1
2
3
4
5
6
7
8
9
10
11
12
13
14
15
16
17
lan@DESKTOP-8ISAT6B MINGW64 /d/dev/workspace/MarkdownTools (master)
$ git checkout dev
Switched to branch 'dev'
lan@DESKTOP-8ISAT6B MINGW64 /d/dev/workspace/MarkdownTools (dev)
$ git merge master
Updating 9d7c83e..7d0e456
Fast-forward
M.jar | Bin 25388 -> 25372 bytes
src/add/Add.java | 2 +-
src/delete/Delete.java | 2 +-
3 files changed, 2 insertions(+), 2 deletions(-)

lan@DESKTOP-8ISAT6B MINGW64 /d/dev/workspace/MarkdownTools (dev)
$ git status
On branch dev
nothing to commit, working tree clean

显示分支的合并情况

1
git log --graph --pretty=oneline --abbrev-commit

如果提交过多的,可以加上-n参数指定显示提交的次数.例如下面指定显示提交最近8个分支.

1
2
3
4
5
6
7
8
9
10
11
12
13
14
15
lan@DESKTOP-8ISAT6B MINGW64 /d/dev/workspace/MarkdownTools (dev)
$ git log -8 --graph --pretty=oneline --abbrev-commit
* 7d0e456 (HEAD -> dev, master) 合并冲突
|\
| * 9d7c83e `dsbc`参数对应的方法中加入移除中文全角空格的功能.
* | 87ef36d (origin/master) 修改`dsbc`参数对应方法中匹配中文空格的正则表达式,支持匹配多个中文空格.
|\ \
| |/
| * cfef0c2 在dsbc参数对应的方法中,添加删除中文空格的功能.^
* | d5527e8 修改参数 enhl对应的方法.\r\n支持\xxxx格式的linux格式路径.
|/
* c51cc3b 修改 enhl参数方法,支持后缀名.xxx以及路径/xxxx的高亮.
* 1c18026 update .gitignore
* bd63151 update .gitignore

git rebase 进行 git 压缩

压缩最近的分支

这个命令不是很熟悉,后面再了解了解.

强制覆盖远程仓库

1
git push origin master --force

查看分支时间

1
git reflog show --date=iso <branch name>

运行效果:

1
2
3
4
$ git reflog show --date=iso master
bfd69df (HEAD -> dev, origin/master, origin/HEAD, master) master@{2019-05-25 00:24:04 +0800}: merge dev: Fast-forward
0dab55b master@{2019-05-23 13:49:04 +0800}: merge dev: Fast-forward
...

参考链接

Pro Git
创建与合并分支|廖雪峰的官方网站
.gitignore忽略已加入版本控制的文件
添加远程库
Git 合并多次 commit 、 删除某次 commit
git如何移除某文件夹的版本控制

问题描述

原本的markdown表格语法是没有这个功能的,只能通过html代码来实现,在表格和图片外面再套上一个表格,外表格的第一个单元格放内表格,第二个单元格中放图片标签。这样图片和内表格就能显示在一行中了。具体html代码如下:

1
2
3
4
5
6
7
8
9
10
11
12
13
14
15
16
17
18
19
20
21
22
23
24
25
26
27
<table>
<tr>
<td width="80%">
<table>
<tr>
<td align="right">姓名</td>
<td align="left">xxx</td>
</tr>
<tr>
<td align="right">性别</td>
<td align="left">xxx</td>
</tr>
<tr>
<td align="right">电话</td>
<td align="left">xxxx</td>
</tr>
<tr>
<td align="right">邮箱</td>
<td align="left">xxxxxxx@xxx</td>
</tr>
</table>
</td>
<td width="20%" height="100%">
<img src="url" alt="我的照片" />
</td>
</tr>
</table>

还有就是markdown中html表格标签中不要有换行符,显示的时候回出现好多空白行。删除上面的表格标签中的空白符后显示自效果如下:

效果

安装插件

在站点目录下,打开git-bash,输入下面的命令安装插件。

1
2
npm install hexo-generator-sitemap --save
npm install hexo-generator-baidu-sitemap --save

配置站点配置文件_config.yml

站点配置文件_config.yml中添加如下配置,我之前就没有在站点配置文件中填写下面的配置项。

1
2
3
4
5
6
7
8
Plugins:
- hexo-generator-baidu-sitemap
- hexo-generator-sitemap

baidusitemap:
path: baidusitemap.xml
sitemap:
path: sitemap.xml

部署

输入命令:

1
hexo clean&&hexo g&&hexo d

部署到github和coding。

查看本地生成的baidusitemap.xml文件

部署后打开本地站点镜像目录:

可以看到站点目录下生成了baidusitemap.xml文件,把这个文件提交给百度即可。

确认浏览器中可以打开baidusitemap.xml文件

在这之前先来确认浏览器能不能打开baidusitemap.xml文件:
输入地址:https://www.lansheng.net.cn/baidusitemap.xml是可以访问到baidusitemap.xml的:

复制浏览器中的地址提价给百度

那么剩下的就是提交到百度的链接不对了:复制浏览器上面baidusitemap.xml地址栏的地址:https://www.lansheng.net.cn/baidusitemap.xml填写到百度sitemap提交位置即可。注意要写全url,不要写成www.lansheng.net.cn/baidusitemap.xml,我之前就是没有写https://百度抓取的是http://www.lansheng.net.cn/baidusitemap.xml,这样就抓取失败了。抓取成功显示如下:

等过两天后再查看提交量,应该就可以看到sitemap提交的数目了:

其他配置可以点击的下面的参考链接查看:需要注意的是它这里的提交的百度链接不正确。
参考:https://www.jianshu.com/p/9c2d6db2f855

首先介绍怎么把资源文件打包到可执行jar包中

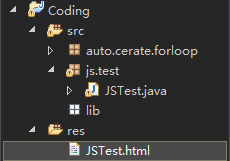
打开eclipse,在你Java项目下建立一个资源文件夹res,然后在里面放入要打包到可执行jar包中的文件(我这里是JSTest.html),如下图所示:


这样等我们打包成可执行jar包时,JSTest.html被放到jar包里面的根目录下:

读取jar包中的文件

那么我们怎么在JSTest类中读取jar包中的这个JSTest.html文件呢,使用下面的代码即可获取包内文件的InputStream实例。后面就跟读取普通文件一样了。

1
InputStream inputStream = JSTest.class.getResourceAsStream("/JSTest.html");

完整代码:

1
2
3
4
5
6
7
8
9
10
11
12
13
14
15
16
17
18
19
20
21
22
23
24
25
26
27
28
29
30
31
32
33
34
35
36
37
38
39
40
package js.test;

import java.io.BufferedReader;
import java.io.FileNotFoundException;
import java.io.IOException;
import java.io.InputStream;
import java.io.InputStreamReader;

public class JSTest
{
public static void main(String[] args)
{
InputStream inputStream = JSTest.class.getResourceAsStream("/JSTest.html");

try
{
BufferedReader reader = new BufferedReader(
new InputStreamReader(inputStream, "UTF-8"));
StringBuilder builder = new StringBuilder();
char[] charArray = new char[200];
int number = -1;
while ((number = reader.read(charArray)) != -1)
{
builder.append(charArray,0,number);
}
System.out.println(builder.toString());

} catch (FileNotFoundException e)
{
// TODO Auto-generated catch block
e.printStackTrace();
} catch (IOException e)
{
// TODO Auto-generated catch block
e.printStackTrace();
}

}

}

JSTest.html文件内容:

1
2
3
4
5
6
7
8
<html>
<head>
<meta charset="utf-8">
</head>
<body>

</body>
</html>

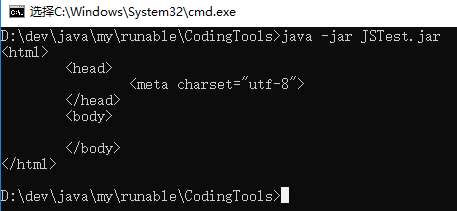
然后我们打包成可执行jar包,运行该可执行jar包即可读取它自己包内的JSTest.html文件:

可以看到,已经成功把JSTest.html中的内容输出到控制台了。

读取jar包中资源文件子目录中的文件

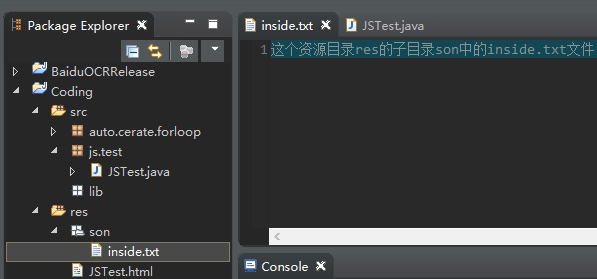
如下图所示,如果想读取资源目录res下的子目录son中的文件inside.txt。

只需要把上面的代码改成即可:

1
InputStream inputStream = JSTest.class.getResourceAsStream("/son/inside.txt");

其他的代码不用改动。打包成可执行jar包红,inside.txt在jar包中的位置:

运行可执行jar包:

同样运行成功。

实例

删除下面多余的空行:

1
2
3
4
5
6
7
8
9
10
11
12
13

定义和用法

<kbd> 标签定义键盘文本。

说到技术概念上的特殊样式时,就要提到 <kbd> 标签。正如你已经猜到的,它用来表示文本是从键盘上键入的。

浏览器通常用等宽字体来显示该标签中包含的文本。

<kbd> 标签经常用在于计算机相关的文档和手册中。例如:

键入 <kbd>quit</kbd> 来退出程序,或者键入 <kbd>menu</kbd> 来返回主菜单。

在notepad++使用按下Ctrl+H打开替换,勾选上正则表达式功能,然后使用上面的正则表达式进行替换:

替换结果:

1
2
3
4
5
6
定义和用法
<kbd> 标签定义键盘文本。
说到技术概念上的特殊样式时,就要提到 <kbd> 标签。正如你已经猜到的,它用来表示文本是从键盘上键入的。
浏览器通常用等宽字体来显示该标签中包含的文本。
<kbd> 标签经常用在于计算机相关的文档和手册中。例如:
键入 <kbd>quit</kbd> 来退出程序,或者键入 <kbd>menu</kbd> 来返回主菜单。

在Java中使用,添加反斜杠注释即可。

1
string.replaceAll("(?m)^\\s*$(\\n|\\r\\n)", "");

键盘键

markdown中可以插入html标签来实现更加丰富的显示效果。例如<kbd>标签来插入键盘按键:Ctrl+H

定义和用法
<kbd>标签定义键盘文本。
说到技术概念上的特殊样式时,就要提到 <kbd>标签。
正如你已经猜到的,它用来表示文本是从键盘上键入的。
浏览器通常用等宽字体来显示该标签中包含的文本。<kbd>标签经常用在于计算机相关的文档和手册中。例如:
键入<kbd>quit</kbd>来退出程序,或者键入<kbd>menu</kbd>来返回主菜单。

1
<kbd>Ctrl</kbd>+<kbd>H</kbd>

显示效果:
Ctrl+H
参考:http://www.w3school.com.cn/tags/tag_kbd.asp