5.2.3 CookieLocaleResolver 基于Cookie的国际化
5.2 Spring MVC的国际化处理 5.2.2 基于Cookie的国际化实现
CookieLocaleResolver不是默认的语言区域解析器,需要显式对其进行配置。使用它,Spring MVC会从Cookie中获取用户所设置的语言区域,来确定使用哪个语言区域.
实例 基于Cookie的国际化实现
springmvc-config.xml
1 |
|
加载国际化资源文件
指定国际化资源文件的路径,以及文件的编码。
1 | <!-- 国际化 --> |
国际化拦截器
使用Cookie来实现国际化,必须设置国际化操作拦截器:
1 | <mvc:interceptors> |
创建CookieLocaleResolver
注意,此处将默认配置的localeResolver换成了CookieLocaleResolver
1 | <bean |
UserController.java
1 |
|
UserController的loginForm方法根据提交的request_locale参数值,创建CookieLocaleResolver对象并调用CookieLocaleResolver对象的setLocale方法将语言环境设置在Cookie中,从而进行语言环境切换.
loginForm.jsp
1 | <%@ page language="java" contentType="text/html; charset=UTF-8" pageEncoding="UTF-8"%> |
loginForm.jsp中通过<spring:message code="国际化文本" />的形式来填写相应的国际化文本.
success.jsp
1 | <%@ page language="java" contentType="text/html; charset=UTF-8" pageEncoding="UTF-8"%> |
success.jsp页面中通过spring:message表单来显示格式化文本,该文本的名称为welcome,并且该welcome文本带有参数.使用参数可以创建动态的格式化文本。
1 | welcome = 欢迎 {0} |
测试
默认

中文环境

5.2.2 SessionLocaleResolver 基于HttpSession的国际化
5.2 Spring MVC的国际化处理 5.2.2 基于 Httpsession的国际化
SessionLocaleResolver
SessionLocaleResolver不是默认的语言区琙解析器,需要对其进行显式配置。如果使用它,Spring MVC会从HttpSession作用域中获取用户所设置的语言区域,来确定使用哪个语言区域。
实例 基于Httpsession的国际化实现
loginForm.jsp
1 | <%@ page language="java" contentType="text/html; charset=UTF-8" pageEncoding="UTF-8"%> |
在loginForm.jsp页面的最上面增加了两个超链接,分别用于切换中文和英文语言环境。注意请求后面的参数request_locale,如果请求中文环境则传递的值是”zh_CN“,如果请求英文环境则传递的值是”en_US“.
springmvc-config.xml
1 | <beans |
国际化配置
1 | <!-- p:basenames属性指定国际化资源文件的路径 --> |
UserController.java
1 |
|
loginForm方法根据提交的 request_ locale参数值,获取 Session对象,并调用setAttribute方法进行语言环境切换。
测试
进入登陆表单,默认显示英文.如下图所示: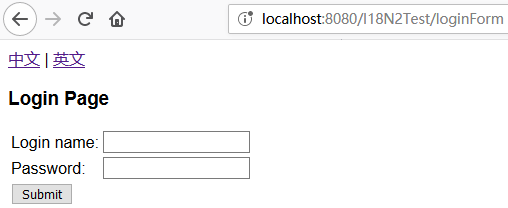
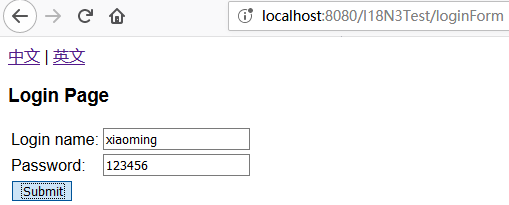
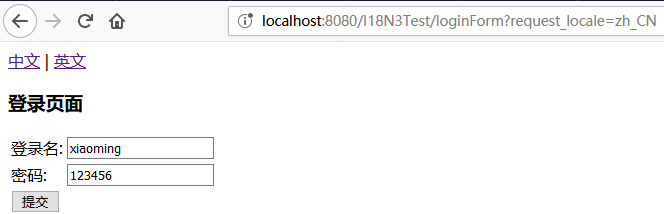
切换中文环境
点击中文链接,切换中文环境.如下图所示: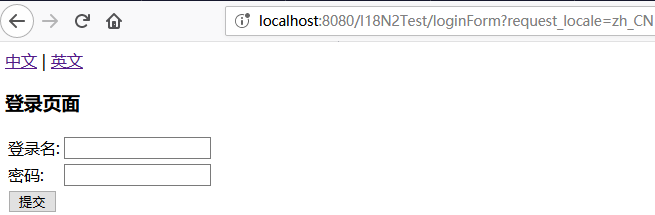
填写账户密码,登陆,效果如下图:
切换英文环境
填写表单: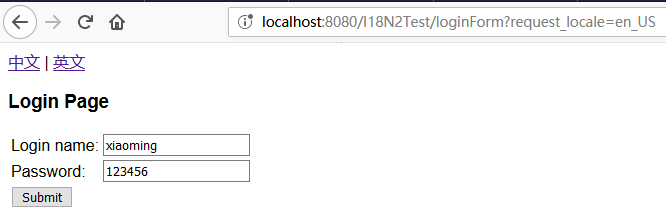
登陆效果:
5.2.1 AcceptHeaderLocaleResolver 基于浏览器请求的国际化
5.2 Spring MVC的国际化处理
5.2.1 AcceptHeaderLocaleResolver
AcceptHeaderLocaleResolver是默认的,也是最容易使用的语言区域解析器。使用它,Spring MVC会读取浏览器的accept-language标题,来确定使用哪个语言区域。AcceptHeaderLocaleResolver可以不用显式配置,当然也可以显式配置。
示例:基于浏览器请求的国际化实现
首先,准备两个资源文件
message_enUs.properties
第一个资源文件是message_enUs.properties,该文件内容如
1 | loginname= Login name: |
message_zh_CN.properties
第二个资源文件的内容如下:
1 | loginname=登录名: |
将上面两个国际化资源文件保存为UTF-8编码.接下来在JSP页面中通过<spring:message/>标签来输出国际化消息。
loginForm.jsp
1 | <%@ page language="java" contentType="text/html; charset=UTF-8" pageEncoding="UTF-8"%> |
springmvc-config.xml
接下来在Spring MVC配置文件中加载国际化资源文件。
1 |
|
国际化配置
国际化配置如下:
1 | <!-- 国际化 p:basenames属性用于指定国际化资源文件名 --> |
指定国际化资源文件路径
其中p:basenames属性用于指定国际化文件的路径,这个路径是相对于src目录的路径,例如这里对应的路径为:src/message_en_US.properties和message_zh_CN.properties,指定国际化路径的时候只需要指定文件的前缀就行类,后面的语言,地区以及文件名后缀不需要指出.也就是对于:
1 | message_zh_CN.properties |
指定国际化资源文件编码
p:defaultEncoding="UTF-8"这个属性用于指定这些国际化文件使用的编码,默认编码是ISO-8859-1,这样中文将会变成unicode代码,不方便我们阅读修改.所以我这里使用UTF-8编码
这组国际化资源文件,只需要指定message即可
UserController.java
1 |
|
login()方法接收请求,如果验证通过,则使用RequestContext对象的getMessage()方法来获取国际化消息,并跳转到success.jsp页面。
success.jsp
1 | <%@ page language="java" contentType="text/html; charset=UTF-8" pageEncoding="UTF-8"%> |
在success.Jjsp页面中,使用message标签读取资源文件中名为welcome的消息,并设置了一个参数,参数值为user对象的username属性
测试
正确填写登陆名xiaoming,密码123456,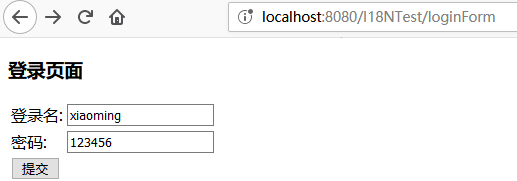
将会成功跳转到成功界面如下图所示:
测试国际化
设置浏览器语言
点击火狐浏览器右边的菜单按钮,然后选中选项: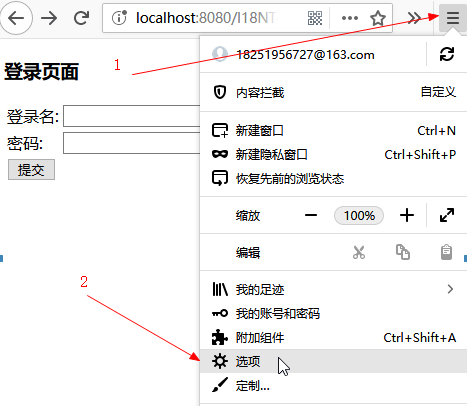
找到语言,点击右边的选择按钮: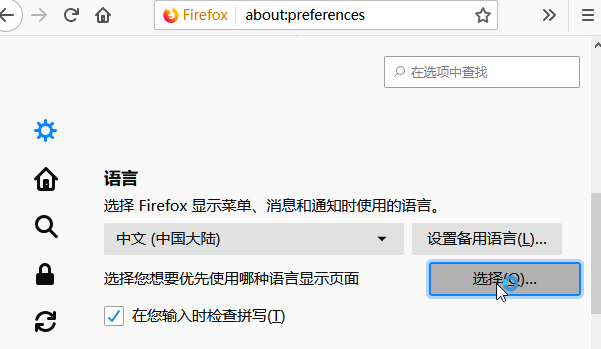
把英语(美国)移动到最上面: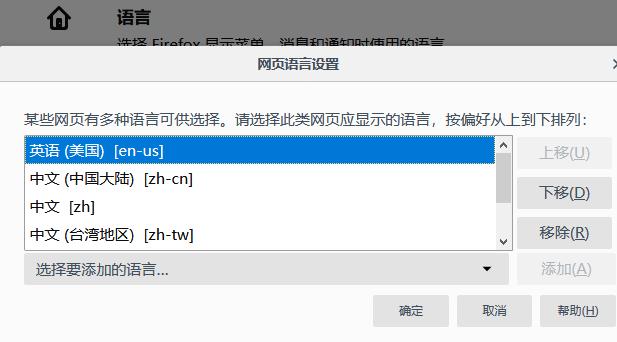
显示效果
刷新登陆表单,即可看到提示信息变成英文的了: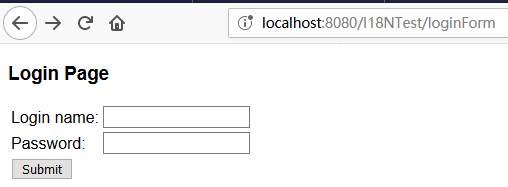

5.1 Spring MVC国际化的相关知识
5.1 Spring MVC国际化的相关知识
5.1.1 messageSource接口
在Spring MVC中,不直接使用java.util.ResourceBundle,而是使用名为messageSource的Bean告诉Spring MVC国际化的属性文件保存在哪里。配置信息代码如下所示:
1 | <!-- 国际化配置 --> |
上面的配置使用了ResourceBundleMessageSource类作为messageSourceBean的实现。basenames属性用来指定国际化的属性文件名称。如果项目中只有一组属性文件,则可以使用baseman来指定国际化的属性文件名称,实例代码如下
1 | <!-- 国际化 p:basenames属性用于指定国际化资源文件名 --> |
5.1.2 localResolver接口
如何知道用户使用的语言
为用户选择语言区域时,最常用的方法是通过读取用户浏览器的accept-language标题值, accept- language标题提供了关于用户浏览器语言的信息。选择语言区域的其他方法还包括读取 HttpSession或者 Cookie。
语言区域解析器
在Spring MVC中选择语言区域,可以使用语言区域解析器。Spring MVC提供了一个语言区域解析器接口LocaleResolver,该接口的常用实现类都在org.springframework.web.servlet.i18n包下面,包括:
AcceptHeaderLocaleResolverSessionLocaleResolverCookieLocaleResolver
其中,AcceptHeaderLocaleResolver是默认的,也是最容易使用的语言区域解析器。使用它,Spring MVC会读取浏览器的accept-language标题,来确定使用哪个语言区域。默认的AcceptHeaderLocaleResolver可以不用显式配置,而Sessionlocaleresolver和Cookielocale-Resolver需要手动显式配置
5.1.3 message标签
在Spring MVC中显示本地化消息通常使用Spring的message标签。使用message标签需要在JSP页面最前面使用taglib指令导入Spring的标签库,如下所示:
1 | <% prefix="spring" uri="http://www.springframework.org/tags"%> |
message标签的属性如表5.1所示,所有属性都是可选的
| 属性 | 描述 |
|---|---|
arguments |
标签的参数,可以是一个字符串、数组或对象 |
argumentSeparator |
用来分隔该标签参数的字符 |
code |
获取消息的key |
htmlEscape |
boolean值,表示被渲染的值是否应该进行HTM转义 |
javaScriptEscape |
boolean值,表示被渲染的值是否应该进行 JavaScript转义 |
message |
MessageSourceResolvable参数 |
scope |
保存var属性中定义的变量的作用域 |
text |
如果code属性不存在,所显示的默认文本 |
var |
用于保存消息的变量 |
5.0 第5章 Spring MVC的国际化
第5章 Spring MVC的国际化
本章要点
messageSource接口localeResolver接口message标签AcceptHeaderLocaleResolver国际化SessionLocaleResolver国际化CookieLocaleResolver国际化
程序国际化是商业系统的一个基本要求, 今天的软件系统不再是简单的单机程序, 往往都是一个开放的系统, 需要面对来自全世界各个地方的访问者, 因此, 国际化成为商业系统必不可少的一部分。
Spring MVC的国际化是建立在Java国际化的基础之上的, 一样也是首先提供不同国家/语言环境的消息资源, 然后通过ResourceBundle加载指定Locale对应的资源文件, 再取得该资源文件中指定key对应的消息。 这整个过程与Java程序的国际化完全相同, 只是Spring MVC框架对Java程序国际化进行了进一步的封装, 从而简化了应用程序的国际化。
国际化步骤
Spring MVC的国际化的步骤与Java国际化的步骤基本相似,只是实现起来更加简单。Spring MVC的国际化可按如下步骤进行
- 给系统加载国际化资源文件
- 输出国际化消息。
SpringMVC输出国际化消息有两种方式:- 在视图页面上输出国际化消息,需要使用
SpringMVC的标签库。 - 在
Controller的处理方法中输出国际化消息,需要使用org.springframework.web.servlet.support.RequestContext的getMessage()方法来完成。
- 在视图页面上输出国际化消息,需要使用
6.4.2 JSR 303校验
6.4 数据校验 6.4.2 JSR 303校验
JSR 303是Java为Bean数据合法性校验所提供的一个标准规范,叫作Bean Validation。2009年12月Java EE6发布**,Bean Validation作为一个重要特性被包含其中,用于对JavaBean中的字段值进行验证。官方参考实现是Hibernate Validation。Bean Validation为 JavaBean验证定义了相应的元数据类型和API。在应用程序中通过在Bean属性上标注类似于@NotNull、@Max等标准的注解指定校验规则,并通过标注的验证接口对Bean进行验证。Bean Validation是一个运行时的数据验证框架,在验证之后验证的错误信息会被马上返回。
可以通过http://jcp.org/en/jsr/detail?id=303了解JSR 303的详细内容。JSR 303是一个规范,它的核心接口是Javax.validation.Validator**,该接口根据目标对象类中所标注的校验注解进行数据校验,并得到校验结果。
下载JSR 303
JSR 303目前有两个实现第一个实现是 Hibernate Validator,可以从以下网站下载:
https://sourceforge.net/projects/hibernate/files/hibernate-validator/
第二个实现是Apache bval,可以从以下网站下载:
http://bval.apache.org/downloads.html
JSR 303注解
JSR 303中定义了一套可标注在成员变量、属性方法上的校验注解
| 注解 | 功能 | 范例 |
|---|---|---|
@Null |
验证对象是否为null |
@Null |
@NotNull |
验证对象是否不为null,无法检查长度为0的字符串,用于验证基本数据类型 |
@NotNull |
@NotBlank |
检查约束字符串是不是null,被Trim的长度是否大于0,只作用于字符串,且会去掉前后空格 | @NotBlank |
@AssertTrue |
验证Boolean对象是否为true |
@AssertTrue |
@AssertFalse |
验证Boolean对象是否为false |
@AssertTrue |
@Max(value) |
验证Number和String对象是否小于或者等于指定的值 |
@Max(0) |
@Min(value) |
验证Number和String对象是否大于或者等于指定的值 |
@Min(160) |
@DecimalMax(value) |
被标注的值必须不大于约束中指定的最大值.。这个约束的参数是一个通过BigDecimal定义的最大值的字符串表示,小数存在精度 |
@DecimalMax(1.1) |
@DecimalMin(value) |
被标注的值必须不小于约束中指定的最小值.。这个约束的参数是一个通过BigDecimal定义的最小值的字符串表小数存在精度 |
@DecimalMax(0.5) |
@Digits(integer,fraction) |
验证字符串是否是符合指定格式的数字,Integer指定整数精度,fraction指定小数精度 |
@Digits(integer=5, fraction=2) |
@Size(min,max) |
验证对象(Array、Collection、Map、String)长度是否在给定的范围之内 |
@Size(min=15, max=60) |
@Email |
验证是否是合法的邮件地址 | @Email |
@Past |
验证Date和Calendar对象是否在当前时间之前 |
@Past |
@Future |
验证Date和Calendar对象是否在当前时间之后 |
@FutureDate |
@Pattern |
验证String对象是否符合正则表达式的规则 |
Pattern(regexp="[1][3,8][3,6,9][0-9]{8}") |
Hibernate Validator扩展注解
Hibernate Validator是JSR 303的一个参考实现,除了支持所有标准的校验注解之外,它还扩展了如下表所示的注解.
| 注解 | 功能 | 实例 |
|---|---|---|
@URL |
验证是否是合法的URL |
@URL |
@CreditCardNumber |
验证是否是合法的信用卡号码 | @CreditCardNumber |
@Length(min,max) |
验证字符串的长度必须在指定的范围内 | @Length(min=6, max=8) |
@NotEmpty |
检查元素是否为Null或者 Empty。用于Array,Collection,Map,String |
@NotEmpty |
@Range(min,max,message) |
验证属性值必须在合适的范围内 | @Range(min=18, max=60, message="学生的年龄必须在18岁到60岁之间") |
示例 测试JSR 303校验
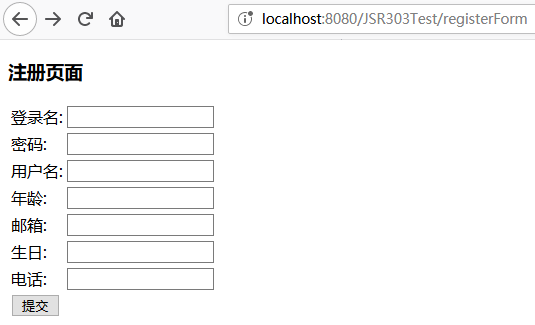
registerForm.jsp
1 | <%@ page language="java" contentType="text/html; charset=UTF-8" pageEncoding="UTF-8"%> |
registerForm.jsp是一个注册页面,用于提交用户注册信息,注册信息包括用户名、密码、邮箱、电话等。之后将在后台使用JSR 303进行验证。
User.java
1 | public class User |
User类使用了Hibernate Validator的注解对前台提交的数据进行验证。
UserController.java
1 |
|
在UserController中的login方法使用@Valid注解对提交的数据进行校验,后面跟着Errors对象保存校验信息。如果errors中有错误信息,则返回registerForm页面,验证通过则跳转到success页面.
success.jsp
1 | <%@ page language="java" contentType="text/html; charset=UTF-8" pageEncoding="UTF-8"%> |
由于<mvc:annotation-driven/>会默认装配好一个LocalValidatorFactoryBean,因此springmvc-config.xml配置文件中只是基本配置,不需要增加其他的配置。
国际化错误提示信息
而在实际项目中,我们希望错误信息更加人性化、更具可读性,同时还希望显示国际化的错误信息。接下来我们就为项目加入国际化的错误信息。Spring MVC支持国际化显示数据校验的错误信息。每个属性在数据绑定和数据校验发生错误时,都会生成一个对应的FieldError对象,FieldError对象实现了org.springframework.context.MessageSourceResolvable接口,顾名思义MessageSourceResolvable是可用国际化资源进行解析的对象MessageSourceResolvable接口有如下3个方法:
| 方法 | 描述 |
|---|---|
Object[] getArguments() |
返回一组参数对象。 |
String[] getCodes() |
返回一组消息代码,每一个代码对应一个属性资源,可以使用getArguments()返回的参数对资源属性值进行参数替换。 |
String getDefaultEessage() |
默认的消息,如果没有装配相应的国际化资源那么显示的所有错误信息都是默认的. |
错误消息代码
当一个属性校验失败后,校验框架会为该属性生成4个消息代码,这些代码以校验注解类名为前缀,结合类名、属性名以及属性类型名生成多个对应的消息代码。
例如之前的User类的loginname属性上标注了一个@NotBlank注解,当该属性的值不满足@NotBlank所定义的限制规则时,就会产生以下4种错误代码:
| 错误代码 | 描述 |
|---|---|
NotBlank.user.loginname |
根据类名、属性名产生的错误代码。 |
NotBlank.loginname |
根据属性名产生的错误代码。 |
NotBlank.java.lang.String |
根据属性类型产生的错误代码 |
NotBlank |
根据验证注解名产生的错误代码。 |
当使用 Spring MVC标签显示错误信息时, Spring MVC会查看Web上下文是否装配了对应的国际化消息,如果没有,则显示默认的错误消息,否则使用国际化消息对错误代码进行显示。 |
知道错误对象的错误码是对应国际化消息的键名称后,接下来就非常简单了,定义两个国际化资源文件,在国际化资源文件中为错误代码定义相应的本地化消息内容。
message_en_US.properties
1 | NotBlank.user.loginname= Loginname is not null |
message_zh_CN.properties
1 | NotBlank.user.loginname=登录名不能为空 |
接下来还需要在springmvc-config.xml配置文件中增加国际化的配置,如下所示:
1 | <!-- 国际化配置 --> |
springmvc-config.xml
1 |
|
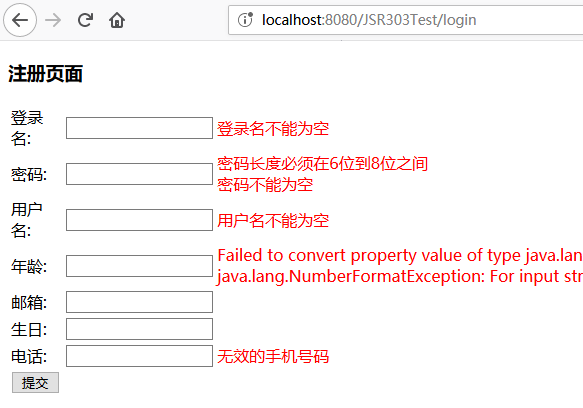
测试
乱填表单
错误提示
6.4.1 Spring的Validation校验框架
6.4 数据校验
输入校验
遇到非法输入时应用程序直接返回,提用户必须重新输入,也就是将那些非法输入过滤掉。这种对非法输入的过滤,就是输入校验,也称为数据校验”
输入校验分为客户端校验和服务器端校验,
- 客户端校验主要是过滤正常用户的误操作通常通过
JavaScript代码完成; - 服务器端校验是整个应用阻止非法数据的最后防线,主要通过在应用中编程实现
Spring MVC提供了强大的数据校验功能,其中有两种方法可以验证输入:
- 一种是利用
Spring自带的Validation校验框架; - 另一种是利用
JSR303(Java验证规范)实现校验功能。
6.4.1 Spring的Validation校验框架
Spring拥有自己独立的数据校验框架。Spring在进行数据绑定时,可同时调用校验框架来完成数据校验工作。Spring的校验框架在org.springframework.validation包中,其中重要的接口和类如下
Validator接口
Validator。最重要的接口。该接口有两个方法:
| 方法 | 描述 |
|---|---|
boolean supports(Class<?> clazz) |
该校验器能够对clazz类型的对象进行校验 |
void validate(Object target,Errors errors) |
对目标类target进行校验,并将校验错误记录在errors当中。 |
Errors接口
Errors是Spring用来存放错误信息的接口。Spring MVC框架在将请求数据绑定到入参对象后,就会调用校验框架实施校验,而校验结果保存在处理方法的入参对象之后的参数对象当中。这个保存校验结果的参数对象必须是Errors或者BindingResult类型。一个Errors对象中包含了一系列的FieldError和ObjectError对象。FieldError表示与被校验的对象中的某个属性相关的一个错误。BindingResult扩展了Errors接口,同时可以获取数据绑定结果对象的信息.
ValidationUtils工具类
ValidationUtils是Spring提供的一个关于校验的工具类。它提供了多个为 Errors对象保存错误的方法。
LocalValidatorFactoryBean类
LocalValidatorFactoryBean位于org.springframework.validation.beanvalidation包中,该类既实现了Spring的Validator接口,也实现了JSR303的Validator接口。只要在Spring容器中定义一个LocalValidatorFactoryBean,即可将其注入到需要数据校验的Bean中。定义一个LocalValidatorFactoryBean的Bean非常简单,如下代码所示:
<mvc:annotation-driven/>会默认装配好一个LocalValidatorFactoryBean,所以在实际开发中不需要手动配置LocalValidatorFactoryBean。需要注意的是,Spring本身没有提供JSR303的实现,如果要使用JSR303完成验证,则必须将JSR303的实现(注入Hibernate Validator)jar文件加入到应用程序的类路径下,这样Spring会自动加载并配好JSR303的实现.
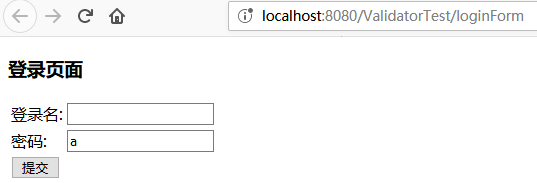
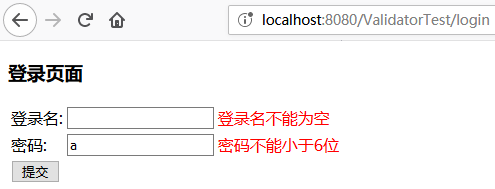
实例 表单输入校验
loginForm.jsp
1 | <%@ page language="java" contentType="text/html; charset=UTF-8" pageEncoding="UTF-8"%> |
页面使用<form: errors>标签显示属性的错误信息。
User.java
1 | // 域对象,实现序列化接口 |
UserValidator.java
1 | // 实现Spring的Validator接口 |
UserValidator实现了Spring的Validator接口,其可以对User对象进行数据校验,并分别使用ValidationUtils的rejectIfEmpty方法和Errors的rejectValue方法对User进行数据校验。
写在类定义上面的@Repository("userValidator")注解将该对象声明为Spring容器中的一个Bean,名字为”userValidator“。
UserController.java
1 |
|
login方法对传进来的参数进行校验,注意方法的最后一个参数errors,该参数是个Spring校验框架的Errors对象。在该方法中调用了之前写的userValidator类进行数据校验,如果校验失败,则跳转到”loginForm“视图.
测试
错误填写
显示效果
最后说一句
由于早期Spring就提供了Validation框架,所以之前的很多应用都使用Validation框架进行数据校验。由于Validation框架通过硬编码完成数据校验,在实际开发中会显得比较麻烦,因此现代开发更加推荐使用JSR 303完成数据校验。
3.使用AnnotationFormatterFactory格式化数据
6.3 数据格式化 3.使用AnnotationFormatterFactory格式化数据
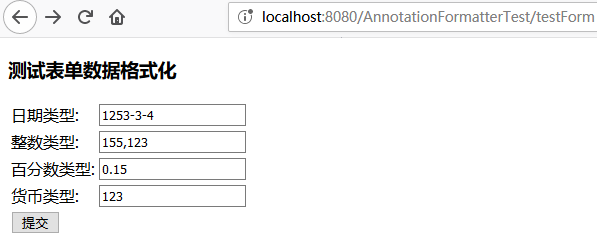
testForm.jsp
1 | <%@ page language="java" contentType="text/html; charset=UTF-8" |
User.java
1 | // 域对象,实现序列化接口 |
User类的多个属性使用了@DateTimeFormat和@NumberFormat注解,用于将页面传递的String转换成对应的格式化数据。
FormatterController.java
1 |
|
success.jsp
如果希望在视图页面中将模型属性数据以格式化的方式进行渲染,则需要使用Spring的页面标签显示模型数据。所以form:form标签,并且绑定了User对象.
1 | <%@ page language="java" contentType="text/html; charset=UTF-8" |
springmvc-config.xml
1 |
|
在配置文件中只是使用了默认装配方案: mvc:annotation-driven标签,而该标签内部默认创建的 Conversionservice实例就是一个FormattingConversionServiceFactoryBean,这样就可以支持注解驱动的格式化功能了,不需要过多的配置.
测试
填写表单
转换效果
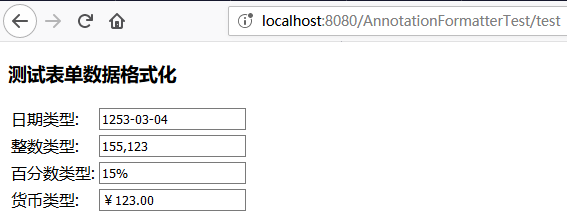
控制台输出
1 | User [birthday=Tue Mar 04 00:00:00 CST 1253, total=155123, discount=0.15, money=123.0] |