10.2 MyBatis动态SQL

在实际项目开发中,经常需要根据不同条件拼接SQL语句,拼接时一定不能忘了必要的空格,有时候还要注意省略掉列名列表最后的逗号,等等。在使用JDBC或其他类似持久层框架操作数据库时,处理这种情况是非常麻烦的,甚至可以用痛苦来形容,而在MyBatis中利用动态SQL这一特性可以很简单地解决这个问题.
动态SQL元素和使用JSTL或其他类似基于XML的文本处理器相似,MyBatis采用功能强大的基于OGNL的表达式来完成动态SQLOGNL的表达式可以用在任意的SQL映射语句.
常用的动态SQL元素包括:

  • if
  • choose (when, otherwise)、
  • where
  • set
  • foreach
  • bind

下面我们就用一个简单示例来看看在MyBatis中怎么使用动态SQL.

创建测试项目

项目结构

展开/折叠
G:\workspace_web2\MyDynamicSQLTest
├─src\
│ ├─db.properties
│ ├─domain\
│ │ ├─Employee.java
│ │ └─tb_employee.sql
│ ├─fractory\
│ │ └─SqlSessionFratoryTools.java
│ ├─log4j.xml
│ ├─log4j2.xml
│ ├─mapper\
│ │ ├─EmployeeMapper.java
│ │ └─EmployeeMapper.xml
│ ├─mybatis-config.xml
│ ├─tb_employee.sql
│ └─test\
│   ├─BindTest.java
│   ├─ChooseTest.java
│   ├─DoubleIfTest.java
│   ├─ForEachTest.java
│   ├─OneIfTest.java
│   ├─SetTest.java
│   └─WhereTest.java
└─WebContent\
  ├─META-INF\
  │ └─MANIFEST.MF
  └─WEB-INF\
    └─lib\
      ├─ant-1.9.6.jar
      ├─ant-launcher-1.9.6.jar
      ├─asm-5.2.jar
      ├─cglib-3.2.5.jar
      ├─commons-logging-1.2.jar
      ├─javassist-3.22.0-CR2.jar
      ├─log4j-1.2.17.jar
      ├─log4j-api-2.3.jar
      ├─log4j-core-2.3.jar
      ├─mybatis-3.4.5.jar
      ├─mysql-connector-java-5.1.44-bin.jar
      ├─ognl-3.1.15.jar
      ├─slf4j-api-1.7.25.jar
      └─slf4j-log4j12-1.7.25.jar

创建数据库表

首先,给之前创建的mybatis数据库创建一个表tb_employee,并插入测试数据:

1
2
3
4
5
6
7
8
9
10
11
12
13
14
15
16
17
18
19
# 创建数据表
DROP TABLE IF EXISTS `tb_employee`;
CREATE TABLE `tb_employee` (
`id` int(11) NOT NULL AUTO_INCREMENT,
`loginname` varchar(18) DEFAULT NULL,
`password` varchar(18) DEFAULT NULL,
`name` varchar(18) DEFAULT NULL,
`sex` char(2) DEFAULT NULL,
`age` int(11) DEFAULT NULL,
`phone` varchar(21) DEFAULT NULL,
`sal` double DEFAULT NULL,
`state` varchar(255) DEFAULT NULL,
PRIMARY KEY (`id`)
) ENGINE=InnoDB DEFAULT CHARSET=utf8mb4;
# 插入数据
INSERT INTO `tb_employee` VALUES ('1', 'xiaoming', 'xiaoming', '小明', '男', '19', '123456789123', '9800', 'active');
INSERT INTO `tb_employee` VALUES ('2', 'xiaowang', 'xiaowang', '小王', '男', '21', '123456789123', '6800', 'active');
INSERT INTO `tb_employee` VALUES ('3', 'xiaoli', 'xiaoli', '小丽', '女', '23', '123456789123', '7800', 'active');
INSERT INTO `tb_employee` VALUES ('4', 'xiaofang', 'xiaofang', '小芳', '女', '22', '123456789123', '8800', 'active');

创建持久化对象

接下来,创建一个Employee对象映射tb_emp1oyee表。

/DynamicSQLTest/src/org/fkit/domain/Employee.java
1
2
3
4
5
6
7
8
9
10
11
12
13
14
15
16
17
18
19
20
21
22
23
24
25
package domain;
public class Employee {
private Integer id;
private String loginname;
private String password;
private String name;
private String sex;
private Integer age;
private String phone;
private double sal;
private String state;
// 构造方法
public Employee()
{
super();
}
// 此处省略getter和setter方法,请自己补上
@Override
public String toString()
{
return "Employee [id=" + id + ", loginname=" + loginname + ", password=" + password
+ ", name=" + name + ", sex=" + sex + ", age=" + age + ", phone=" + phone + ", sal="
+ sal + ", state=" + state + "]";
}
}

创建Mapper.xml映射文件

/DynamicSQLTest/src/org/fkit/mapper/EmployeeMapper.xml
1
2
3
4
5
<?xml version="1.0" encoding="UTF-8"?>
<!DOCTYPE mapper PUBLIC "-//mybatis.org//DTD Mapper 3.0//EN" "http://mybatis.org/dtd/mybatis-3-mapper.dtd" >
<mapper namespace="mapper.EmployeeMapper">

</mapper>

这个是个空的映射文件,后面用到的标签再往里面添加.

创建mapper接口

/DynamicSQLTest/src/org/fkit/mapper/EmployeeMapper.java
1
2
3
package mapper;
public interface EmployeeMapper {
}

这个接口是个空接口,后面有用到的方法再往接口中添加.

10.1.3 多对多

在实际项目开发中,多对多关系也是非常常见的关系,比如,一个购物系统中,一个用户可以有多个订单,这是一对多的关系;一个订单中可以购买多种商品,一种商品也可以属于多个不同的订单,订单和商品之间就是多对多的关系
对于数据库中多对多的关系建议使用一个中间表来维护关系,中间表中的订单id作为外键参照订单表的id,商品id作为外键参照商品表的id下面我们就用一个示例来看看MyBatis怎么处理多对多关系。

示例: ManyToManyTest

项目结构

展开/折叠
D:\Desktop\书籍\Java\Java EE\随书源码\Spring+Mybatis企业应用实战(第2版)\codes\10\ManyToManyTest
├─src\
│ ├─db.properties
│ ├─log4j.xml
│ ├─mybatis-config.xml
│ └─org\
│   └─fkit\
│     ├─domain\
│     │ ├─Article.java
│     │ ├─Order.java
│     │ └─User.java
│     ├─factory\
│     ├─mapper\
│     │ ├─ArticleMapper.xml
│     │ ├─OrderMapper.java
│     │ ├─OrderMapper.xml
│     │ ├─UserMapper.java
│     │ └─UserMapper.xml
│     └─test\
│       └─ManyToManyTest.java
└─WebContent\
  ├─META-INF\
  │ └─MANIFEST.MF
  └─WEB-INF\
    ├─lib\
    │ ├─ant-1.9.6.jar
    │ ├─ant-launcher-1.9.6.jar
    │ ├─asm-5.2.jar
    │ ├─cglib-3.2.5.jar
    │ ├─commons-logging-1.2.jar
    │ ├─javassist-3.22.0-CR2.jar
    │ ├─log4j-1.2.17.jar
    │ ├─log4j-api-2.3.jar
    │ ├─log4j-core-2.3.jar
    │ ├─mybatis-3.4.5.jar
    │ ├─mysql-connector-java-5.1.44-bin.jar
    │ ├─ognl-3.1.15.jar
    │ ├─slf4j-api-1.7.25.jar
    │ └─slf4j-log4j12-1.7.25.jar
    └─web.xml

创建数据库表

首先,给之前创建的mybatis数据库创建三个表tb_usertb_articletb_order,再创建一个中间表tb_item维护tb_articletb_order的关系,并插入测试数据。SQL脚本如下:

1
2
3
4
5
6
7
8
9
10
11
12
13
14
15
16
17
18
19
20
21
22
23
24
25
26
27
28
29
30
31
32
33
34
35
36
37
38
39
40
41
42
43
44
45
46
47
48
49
50
51
52
53
54
55
56
57
58
59
60
61
62
63
64
65
use mybatis;
-- 创建用户表
DROP TABLE IF EXISTS `tb_user`;
CREATE TABLE `tb_user` (
`id` int(11) NOT NULL AUTO_INCREMENT,
`username` varchar(18) DEFAULT NULL,
`loginname` varchar(18) NOT NULL,
`password` varchar(18) NOT NULL,
`phone` varchar(18) DEFAULT NULL,
`address` varchar(18) DEFAULT NULL,
PRIMARY KEY (`id`)
) ENGINE=InnoDB DEFAULT CHARSET=utf8mb4;

-- 插入用户
INSERT INTO `tb_user` VALUES ('1', '小明', 'xiaoming', 'xiaoming', '123456789123', '北京');

-- 创建商品表
DROP TABLE IF EXISTS `tb_article`;
CREATE TABLE `tb_article` (
`id` int(11) NOT NULL AUTO_INCREMENT,
`name` varchar(18) DEFAULT NULL,
`price` double DEFAULT NULL,
`remark` varchar(18) DEFAULT NULL,
PRIMARY KEY (`id`)
) ENGINE=InnoDB DEFAULT CHARSET=utf8mb4;

-- 插入商品
INSERT INTO `tb_article` VALUES ('1', '商品1', '123.12', 'xxx的伟大著作');
INSERT INTO `tb_article` VALUES ('2', '商品2', '12.3', 'yyy的伟大著作');
INSERT INTO `tb_article` VALUES ('3', '商品3', '34.22', 'zzz的著作');

-- 创建订单表
DROP TABLE IF EXISTS `tb_order`;
CREATE TABLE `tb_order` (
`id` int(11) NOT NULL AUTO_INCREMENT,
`code` varchar(32) DEFAULT NULL,
`total` double DEFAULT NULL,
`user_id` int(11) DEFAULT NULL,
PRIMARY KEY (`id`),
KEY `user_id` (`user_id`),
CONSTRAINT `tb_order_ibfk_1` FOREIGN KEY (`user_id`) REFERENCES `tb_user` (`id`) ON DELETE CASCADE ON UPDATE CASCADE
) ENGINE=InnoDB DEFAULT CHARSET=utf8mb4;

-- 插入订单
INSERT INTO `tb_order` VALUES ('1', 'abcseeeahoaugoeijgiej', '223.33', '1');
INSERT INTO `tb_order` VALUES ('2', 'sfaofosfhodsfuefie', '111.22', '1');

-- 创建订单-商品关系表
DROP TABLE IF EXISTS `tb_item`;
CREATE TABLE `tb_item` (
`order_id` int(11) NOT NULL DEFAULT '0',
`article_id` int(11) NOT NULL DEFAULT '0',
`amount` int(11) DEFAULT NULL,
PRIMARY KEY (`order_id`,`article_id`),
KEY `article_id` (`article_id`),
CONSTRAINT `tb_item_ibfk_1` FOREIGN KEY (`order_id`) REFERENCES `tb_order` (`id`) ON DELETE CASCADE ON UPDATE CASCADE,
CONSTRAINT `tb_item_ibfk_2` FOREIGN KEY (`article_id`) REFERENCES `tb_article` (`id`) ON DELETE CASCADE ON UPDATE CASCADE
) ENGINE=InnoDB DEFAULT CHARSET=utf8mb4;

-- 插入商品-订单关系
INSERT INTO `tb_item` VALUES ('1', '1', '1');
INSERT INTO `tb_item` VALUES ('1', '2', '1');
INSERT INTO `tb_item` VALUES ('1', '3', '3');
INSERT INTO `tb_item` VALUES ('2', '1', '2');
INSERT INTO `tb_item` VALUES ('2', '2', '3');
  • tb_order表的user_id作为外键参照tb_user表的主键id
  • tb_item表作为中间表,用来维护tb_articletb_order的多对多关系,
    • tb_item表的
      • order_id作为外键参照tb_order表的主键id,
      • article_id作为外键参照tb_artic1e表的主键id

mybatis数据库中执行SQL脚本,完成创建数据库和表的操作。

创建持久化类

接下来,创建一个User对象、一个Article对象和一个Order对象分别映射tb_user,tb_articletb_order表。

创建持久化类User.java

1
2
3
4
5
6
7
8
9
10
11
12
13
14
15
16
17
18
19
20
21
22
23
24
25
26
27
28
29
30
31
32
33
34
public class User
implements Serializable
{
private static final long serialVersionUID = 1L;
private Integer id; // 用户id,主键
private String username; // 用户名
private String loginname; // 登录名
private String password; // 密码
private String phone; // 联系电话
private String address; // 收货地址
// 用户和订单是一对多的关系,即一个用户可以有多个订单
private List<Order> orders;
public User()
{
super();
// TODO Auto-generated constructor stub
}
public User(String username, String loginname, String password, String phone, String address)
{
super();
this.username = username;
this.loginname = loginname;
this.password = password;
this.phone = phone;
this.address = address;
}
// 此处省略getter和setter方法,请自己补上
@Override
public String toString()
{
return "User [id=" + id + ", username=" + username + ", loginname=" + loginname
+ ", password=" + password + ", phone=" + phone + ", address=" + address + "]";
}
}

用户和订单之间是一对多的关系,即一个用户可以有多个订单。在User类中定义了个orders属性,该属性是一个List集合,用来映射一对多的关联关系,表示一个用户有多个订单。

创建持久化类Order.java

1
2
3
4
5
6
7
8
9
10
11
12
13
14
15
16
17
18
19
20
21
22
23
24
25
26
27
28
29
public class Order
implements Serializable
{
private static final long serialVersionUID = 1L;
private Integer id; // 订单id,主键
private String code; // 订单编号
private Double total; // 订单总金额
// 订单和用户是多对一的关系,即一个订单只属于一个用户
private User user;
// 订单和商品是多对多的关系,即一个订单可以包含多种商品
private List<Article> articles;
public Order()
{
super();
// TODO Auto-generated constructor stub
}
public Order(String code, Double total)
{
super();
this.code = code;
this.total = total;
}
// 此处省略getter和setter方法,请自己补上
@Override
public String toString()
{
return "Order [id=" + id + ", code=" + code + ", total=" + total + "]";
}
}
  • 订单和用户之间是多对一的关系,一个订单只属于一个用户,在Order类中定义了一个user属性,用来映射多对一的关联关系,表示该订单的用户;
  • 订单和商品之间是多对多的关系,即一个订单中可以包含多种商品,在Order类中定义了一个articles属性该属性是一个List集合,用来映射多对多的关联关系,表示一个订单中包含多种商品。

创建持久化类Article.java

1
2
3
4
5
6
7
8
9
10
11
12
13
14
15
16
17
18
19
20
21
22
23
24
25
26
27
28
29
30
public class Article
implements Serializable
{
private static final long serialVersionUID = 1L;
private Integer id; // 商品id,主键
private String name; // 商品名称
private Double price; // 商品价格
private String remark; // 商品描述
// 商品和订单是多对多的关系,即一种商品可以包含在多个订单中
private List<Order> orders;
public Article()
{
super();
// TODO Auto-generated constructor stub
}
public Article(String name, Double price, String remark)
{
super();
this.name = name;
this.price = price;
this.remark = remark;
}
// 此处省略getter和setter方法,请自己补上
@Override
public String toString()
{
return "Article [id=" + id + ", name=" + name + ", price=" + price + ", remark=" + remark
+ "]";
}
}

商品和订单之间是多对多的关系,即一种商品可以出现在多个订单中。在Article类中定义了一个orders属性,该属性是一个List集合,用来映射多对多的关联关系,表示该商品关联的多个订单。

创建XML映射文件

再接下来是XML映射文件。

UserMapper.xml

1
2
3
4
5
6
7
8
9
10
11
12
13
14
15
16
17
18
19
20
21
22
23
24
25
26
27
28
29
30
31
32
33
34
35
36
37
38
39
40
41
42
43
44
45
46
47
48
49
50
51
<?xml version="1.0" encoding="UTF-8"?>
<!DOCTYPE mapper PUBLIC "-//mybatis.org//DTD Mapper 3.0//EN"
"http://mybatis.org/dtd/mybatis-3-mapper.dtd">
<!-- namespace指用户自定义的命名空间。 -->
<mapper namespace="org.fkit.mapper.UserMapper">
<select
id="selectUserById"
parameterType="int"
resultMap="userResultMap"> SELECT * FROM tb_user WHERE id = #{id}
</select>
<resultMap
type="org.fkit.domain.User"
id="userResultMap">
<id
property="id"
column="id"/>
<result
property="username"
column="username"/>
<result
property="loginname"
column="loginname"/>
<result
property="password"
column="password"/>
<result
property="phone"
column="phone"/>
<result
property="address"
column="address"/>
<!-- 一对多关联映射:collection -->
<collection
property="orders"
javaType="ArrayList"
column="id"
ofType="org.fkit.domain.User"
select="org.fkit.mapper.OrderMapper.selectOrderByUserId"
fetchType="lazy">
<id
property="id"
column="id"/>
<result
property="code"
column="code"/>
<result
property="total"
column="total"/>
</collection>
</resultMap>
</mapper>

UserMapper.xml中定义了一个select标签,该标签根据id查询用户信息。由于User类除了简单的属性idusernameloginnamepasswordphoneaddress之外,还有关联对象orders,所以返回的是一个名为userResultMapresultMap。由于orders是一个List集合,因此userResultMap中使用了collection元素映射一对多的关联关系。
collection元素说明如下:

  • select属性表示会使用column属性的id值作为参数执行OrderMapper中定义的selectOrderByUserId标签,以查询该用户下的所有订单,
  • 查询出的数据将被封装到property表示的orders对象当中。注意,一对多使用的都是lazy(懒加载)。

OrderMapper.xml

1
2
3
4
5
6
7
8
9
10
11
12
13
14
15
16
17
18
19
20
21
22
23
24
25
26
27
28
29
30
31
32
33
34
35
36
37
38
39
40
41
42
43
44
45
46
47
48
49
50
51
52
53
54
55
56
57
58
59
60
61
62
63
64
65
66
67
68
69
70
71
72
73
74
75
76
<?xml version="1.0" encoding="UTF-8"?>
<!DOCTYPE mapper PUBLIC "-//mybatis.org//DTD Mapper 3.0//EN"
"http://mybatis.org/dtd/mybatis-3-mapper.dtd">
<!-- namespace指用户自定义的命名空间。 -->
<mapper namespace="org.fkit.mapper.OrderMapper">
<!-- 注意,如果查询出来的列同名,例如tb_user表的id和tb_order表的id都是id,同名,需要使用别名区分 -->
<select
id="selectOrderById"
parameterType="int"
resultMap="orderResultMap"> SELECT u.*,o.id AS oid,CODE,total,user_id FROM tb_user
u,tb_order o WHERE u.id = o.user_id AND o.id = #{id}
</select>
<!-- 根据userid查询订单 -->
<select
id="selectOrderByUserId"
parameterType="int"
resultType="org.fkit.domain.Order"> SELECT * FROM tb_order WHERE user_id = #{id}
</select>
<resultMap
type="org.fkit.domain.Order"
id="orderResultMap">
<id
property="id"
column="oid"/>
<result
property="code"
column="code"/>
<result
property="total"
column="total"/>
<!-- 多对一关联映射:association -->
<association
property="user"
javaType="org.fkit.domain.User">
<id
property="id"
column="id"/>
<result
property="username"
column="username"/>
<result
property="loginname"
column="loginname"/>
<result
property="password"
column="password"/>
<result
property="phone"
column="phone"/>
<result
property="address"
column="address"/>
</association>
<!-- 多对多映射的关键:collection -->
<collection
property="articles"
javaType="ArrayList"
column="oid"
ofType="org.fkit.domain.Article"
select="org.fkit.mapper.ArticleMapper.selectArticleByOrderId"
fetchType="lazy">
<id
property="id"
column="id"/>
<result
property="name"
column="name"/>
<result
property="price"
column="price"/>
<result
property="remark"
column="remark"/>
</collection>
</resultMap>
</mapper>

selectOrderByUserId

OrderMapper.xml中定义了一个id="selectOrderByUserId"的select标签.其根据用户id查询订单信息,返回的是简单的Order对象。

1
2
3
4
5
6
<!-- 根据userid查询订单 -->
<select
id="selectOrderByUserId"
parameterType="int"
resultType="org.fkit.domain.Order"> SELECT * FROM tb_order WHERE user_id = #{id}
</select>

selectOrderById

同时定义了一个id="selectOrderById"的select标签,其根据订单id查询订单信息,由于Order类和用户是多对一关系,和商品是多对多关系,而多对一通常都是立即加载,因此SQL语句是一条关联了tb_usertb_order的多表查询语句。查询结果返回个名为orderResultMapresultMap

orderResultMap中使用了association元素映射多对一的关联关系,其将查询到的用户信息装载到Order对象的user属性当中。

1
2
3
4
5
6
<select
id="selectOrderById"
parameterType="int"
resultMap="orderResultMap"> SELECT u.*,o.id AS oid,CODE,total,user_id FROM tb_user
u,tb_order o WHERE u.id = o.user_id AND o.id = #{id}
</select>

orderResultMap中还使用了collection元素映射多对多的关联关系,select属性表示会使用column属性的oid值作为参数执行ArticleMapper中定义的selectArticleByOrderId查询该订单中的所有商品,查询出的数据将被封装到property属性表示的articles对象当中。注意,**一对多使用的都是lazy(懒加载)**。

提示

因为多表查询返回的结果集中tb_user有个id列,tb_order也有个id列,当列同名时MyBatis使用的元素中的colum属性如果是id,则MyBatis会默认使用査询出的第一个id列。为了区分同名的列,最好的方法是给列取一个别名SQL语句中的o.id As oid,resultMap中的column="oid"就是指使用的是tb_order表的id值。

ArticleMapper.xml

1
2
3
4
5
6
7
8
9
10
11
12
<?xml version="1.0" encoding="UTF-8"?>
<!DOCTYPE mapper PUBLIC "-//mybatis.org//DTD Mapper 3.0//EN"
"http://mybatis.org/dtd/mybatis-3-mapper.dtd">
<!-- namespace指用户自定义的命名空间。 -->
<mapper namespace="org.fkit.mapper.ArticleMapper">
<select
id="selectArticleByOrderId"
parameterType="int"
resultType="org.fkit.domain.Article"> SELECT * FROM tb_article WHERE id IN ( SELECT article_id
FROM tb_item WHERE order_id = #{id} )
</select>
</mapper>

ArticleMapper.xml中定义了一个id="selectArticleByOrderId"的select标签,其根据订单id查询订单关联的所有商品,由于订单和商品是多对多的关系,数据库使用了一个中间表tb_item维护多对多的关系,故此处使用了一个子查询,首先根据订单id到中间表中査询出所有的商品,之后根据所有商品的id查询出所有的商品信息,并将这些信息封装到Article对象当中。

编写Mapper接口

再接下来是mapper接口对象。

UserMapper接口

1
2
3
public interface UserMapper {
User selectUserById(int id);
}

OrderMapper接口

1
2
3
public interface OrderMapper {
Order selectOrderById(int id);
}

编写测试类

1
2
3
4
5
6
7
8
9
10
11
12
13
14
15
16
17
18
19
20
21
22
23
24
25
26
27
28
29
30
31
32
33
34
35
36
37
38
39
40
41
42
43
44
45
46
47
48
49
50
51
52
53
54
55
56
57
58
public class ManyToManyTest {
public static void main(String[] args)
{
// 定义SqlSession变量
SqlSession sqlSession = null;
try
{
// 创建SqlSession实例
sqlSession = FKSqlSessionFactory.getSqlSession();
ManyToManyTest t = new ManyToManyTest();
// 根据用户id查询用户,测试一对多
// t.testSelectUserById(sqlSession);
// 根据订单id查询订单,测试多对多
t.testSelectOrderById(sqlSession);
// 提交事务
sqlSession.commit();
} catch (Exception e)
{
// 回滚事务
sqlSession.rollback();
e.printStackTrace();
} finally
{
// 关闭SqlSession
if (sqlSession != null)
sqlSession.close();
}
}
// 测试一对多,查询班级User(一)的时候级联查询订单Order(多)
public void testSelectUserById(SqlSession sqlSession)
{
// 获得UserMapper接口的代理对象
UserMapper um = sqlSession.getMapper(UserMapper.class);
// 调用selectUserById方法
User user = um.selectUserById(1);
// 查看查询到的user对象信息
System.out.println(user.getId() + " " + user.getUsername());
// 查看user对象关联的订单信息
List<Order> orders = user.getOrders();
orders.forEach(order -> System.out.println(order));
}
// 测试多对多,查询订单Order(多)的时候级联查询订单的商品Article(多)
public void testSelectOrderById(SqlSession sqlSession)
{
// 获得OrderMapper接口的代理对象
OrderMapper om = sqlSession.getMapper(OrderMapper.class);
// 调用selectOrderById方法
Order order = om.selectOrderById(2);
// 查看查询到的order对象信息
System.out.println(order.getId() + " " + order.getCode() + " " + order.getTotal());
// 查看order对象关联的用户信息
User user = order.getUser();
System.out.println(user);
// // 查看order对象关联的商品信息
// List<Article> articles = order.getArticles();
// articles.forEach(article -> System.out.println(article));
}
}

testSelectUserById

运行ManyToManyTest类的main方法,首先测试testSelectUserById()方法,根据用户id查询用户。控制台显示如下:

控制台输出
1
2
3
4
5
6
7
8
9
DEBUG [main] ==>  Preparing: SELECT * FROM tb_user WHERE id = ? 
DEBUG [main] ==> Parameters: 1(Integer)
DEBUG [main] <== Total: 1
1 小明
DEBUG [main] ==> Preparing: SELECT * FROM tb_order WHERE user_id = ?
DEBUG [main] ==> Parameters: 1(Integer)
DEBUG [main] <== Total: 2
Order [id=1, code=abcseeeahoaugoeijgiej, total=223.33]
Order [id=2, code=sfaofosfhodsfuefie, total=111.22]

可以看到,MyBatis执行了根据用户id查询用户的SQL语句,查询出了用户信息;
由于在测试方法中立即又获取了用户的订单集合,所以MyBatis又执行了根据用户id查询订单的SQL语句,查询出了该用户的两个订单。

testSelectOrderById

接下来测试testSelectOrderById()方法,根据订单id查询订单信息。控制台显示:

控制台输出
1
2
3
4
5
DEBUG [main] ==>  Preparing: SELECT u.*,o.id AS oid,CODE,total,user_id FROM tb_user u,tb_order o WHERE u.id = o.user_id AND o.id = ? 
DEBUG [main] ==> Parameters: 2(Integer)
DEBUG [main] <== Total: 1
2 sfaofosfhodsfuefie 111.22
User [id=1, username=小明, loginname=xiaoming, password=xiaoming, phone=123456789123, address=北京]

可以看到,MyBatis执行了一个多表连接查询,同时查询出了订单信息和用户信息,由于测试方法中注释了查询订单中的商品代码,故MyBatis采用了懒加载机制,没有立即查询商品信息。

取消testSelectOrderById()方法中査询订单中的商品的代码注释,再次执行。控制台显示如下:

控制台输出
1
2
3
4
5
6
7
8
9
10
DEBUG [main] ==>  Preparing: SELECT u.*,o.id AS oid,CODE,total,user_id FROM tb_user u,tb_order o WHERE u.id = o.user_id AND o.id = ? 
DEBUG [main] ==> Parameters: 2(Integer)
DEBUG [main] <== Total: 1
2 sfaofosfhodsfuefie 111.22
User [id=1, username=小明, loginname=xiaoming, password=xiaoming, phone=123456789123, address=北京]
DEBUG [main] ==> Preparing: SELECT * FROM tb_article WHERE id IN ( SELECT article_id FROM tb_item WHERE order_id = ? )
DEBUG [main] ==> Parameters: 2(Integer)
DEBUG [main] <== Total: 2
Article [id=1, name=商品1, price=123.12, remark=xxx的伟大著作]
Article [id=2, name=商品2, price=12.3, remark=yyy的伟大著作]

可以看到,MyBatis执行了ArticleMapper.xml中定义的子查询,查询出了订单所关联的所有商品信息。

总结

collection标签

collection标签的属性

  • column属性指定要将哪一列,作为select标签关联的查询语句的参数。
  • select属性指定关联查询的select标签
  • property属性指定接收select结果集的集合的变量名
  • javaType属性指定集合的类型
  • ofType属性指定集合中存放的元素的类型

collection标签的子标签

这些子标签表示集合中元素的各个属性。

association标签

对于多对一,一对一联系,使用多表连接查询即可。

association标签的属性

  • property设置持久化对象的属性
  • javaType设置该属性的类型

association标签的子标签

这些子标签表示关联的持久化对象的各个属性。

10.1.2 一对多

在实际项目开发中,一对多是非常常见的关系,比如,一个班级可以有多个学生,一个学生只能属于一个班级,班级和学生之间是一对多的关系,而学生和班级之间是多对一的关系。

多方维护关系

在数据库中一对多关系通常使用主外键关联,外键列应该在多方,即多方维护关系。下面我们就用一个示例来看看MyBatis怎么处理一对多关系。

示例:OneToManyTest

项目结构

展开/折叠
D:\Desktop\随书源码\Spring+Mybatis企业应用实战(第2版)\codes\10\OneToManyTest
├─src\
│ ├─db.properties
│ ├─log4j.xml
│ ├─mybatis-config.xml
│ ├─org\
│ │ └─fkit\
│ │   ├─domain\
│ │   │ ├─Clazz.java
│ │   │ └─Student.java
│ │   ├─factory\
│ │   │ └─FKSqlSessionFactory.java
│ │   ├─mapper\
│ │   │ ├─ClazzMapper.java
│ │   │ ├─ClazzMapper.xml
│ │   │ ├─StudentMapper.java
│ │   │ └─StudentMapper.xml
│ │   └─test\
│ │     └─OneToManyTest.java
│ └─tb_test.sql
└─WebContent\
  ├─META-INF\
  │ └─MANIFEST.MF
  └─WEB-INF\
    ├─lib\
    │ ├─ant-1.9.6.jar
    │ ├─ant-launcher-1.9.6.jar
    │ ├─asm-5.2.jar
    │ ├─cglib-3.2.5.jar
    │ ├─commons-logging-1.2.jar
    │ ├─javassist-3.22.0-CR2.jar
    │ ├─log4j-1.2.17.jar
    │ ├─log4j-api-2.3.jar
    │ ├─log4j-core-2.3.jar
    │ ├─mybatis-3.4.5.jar
    │ ├─mysql-connector-java-8.0.17.jar
    │ ├─ognl-3.1.15.jar
    │ ├─slf4j-api-1.7.25.jar
    │ └─slf4j-log4j12-1.7.25.jar
    └─web.xml

创建数据库表

首先,给之前创建的mybatis数据库创建两个表tb_clazztb_student,并插入测试数据:

/OneToManyTest/src/tb_test.sql
1
2
3
4
5
6
7
8
9
10
11
12
13
14
15
16
17
18
19
20
21
22
23
24
25
26
27
28
29
30
31
32
33
34
35
36
37
use mybatis;
-- 取消外键检查
SET FOREIGN_KEY_CHECKS=0;

-- 创建tb_clazz表
DROP TABLE IF EXISTS `tb_clazz`;
CREATE TABLE `tb_clazz` (
`id` int(11) NOT NULL AUTO_INCREMENT,
`code` varchar(18) NOT NULL,
`name` varchar(18) NOT NULL,
PRIMARY KEY (`id`)
) ENGINE=InnoDB DEFAULT CHARSET=utf8;

-- 插入数据到tb_clazz表
INSERT INTO `tb_clazz` VALUES ('1', 'B151516', 'Java基础班');

-- 创建tb_student表
DROP TABLE IF EXISTS `tb_student`;
CREATE TABLE `tb_student` (
`id` int(11) NOT NULL AUTO_INCREMENT,
`name` varchar(18) DEFAULT NULL,
`sex` varchar(18) DEFAULT NULL,
`age` int(11) DEFAULT NULL,
`clazz_id` int(11) DEFAULT NULL,
PRIMARY KEY (`id`),
KEY `clazz_id` (`clazz_id`),
CONSTRAINT `tb_student_ibfk_1` FOREIGN KEY (`clazz_id`)
REFERENCES `tb_clazz` (`id`) ON DELETE CASCADE ON UPDATE CASCADE
) ENGINE=InnoDB DEFAULT CHARSET=utf8;

-- 插入数据到tb_student
INSERT INTO `tb_student` VALUES ('1', '小明', '男', '24', '1');
INSERT INTO `tb_student` VALUES ('2', '小王', '男', '23', '1');
INSERT INTO `tb_student` VALUES ('3', '小芳', '女', '22', '1');
INSERT INTO `tb_student` VALUES ('4', '小丽', '女', '22', '1');
-- 恢复外键检查
SET FOREIGN_KEY_CHECKS=1;

tb_student表的clazz_id作为外键参照tb_clazz表的主键id

mybatis数据库中执行SQL脚本,完成创建数据库和表的操作。

接下来,创建一个clazz对象和一个Student对象分别映射tb_clazztb_student表。

创建持久化对象

Student.java

/OneToManyTest/src/org/fkit/domain/Student.java
1
2
3
4
5
6
7
8
9
10
11
12
13
14
15
16
package org.fkit.domain;
import java.io.Serializable;

public class Student implements Serializable
{
private static final long serialVersionUID = -8985198663152992443L;
private Integer id; // 学生id,主键
private String name; // 姓名
private String sex; // 性别
private Integer age; // 年龄
// 学生和班级是多对一的关系,即一个学生只属于一个班级
private Clazz clazz;
// 省略构造方法
// 此处省略getter和setter方法,请自己补上
// 省略toString()方法
}

学生和班级之间是多对一的关系,即一个学生只属于一个班级。在Student类当中定义了一个clazz属性,该属性是一个Clazz类型,用来映射多对一的关联关系,表示该学生所属的班级。

Clazz.java

/OneToManyTest/src/org/fkit/domain/Clazz.java
1
2
3
4
5
6
7
8
9
10
11
12
13
14
15
package org.fkit.domain;
import java.io.Serializable;
import java.util.ArrayList;
public class Clazz implements Serializable
{
private static final long serialVersionUID = 7120329740548835778L;
private Integer id; // 班级id,主键
private String code; // 班级编号
private String name; // 班级名称
// 班级和学生是一对多的关系,即一个班级可以有多个学生
private ArrayList<Student> students;
// 省略构造方法
// 省略getter和setter方法
// 省略toString方法
}

班级和学生之间是一对多的关系,即一个班级可以有多个学生。在Clazz类当中定义了一个students属性,该属性是一个List集合,用来映射一对多的关联关系,表示一个班级有多个学生。

创建XML映射文件

再接下来是XML映射文件。

ClazzMapper.xml

1
2
3
4
5
6
7
8
9
10
11
12
13
14
15
16
17
18
19
20
21
22
23
24
25
26
27
28
29
30
<?xml version="1.0" encoding="UTF-8"?>
<!DOCTYPE mapper PUBLIC "-//mybatis.org//DTD Mapper 3.0//EN" "http://mybatis.org/dtd/mybatis-3-mapper.dtd">
<!-- namespace指用户自定义的命名空间。 -->
<mapper namespace="org.fkit.mapper.ClazzMapper">
<!-- 根据id查询班级信息,返回resultMap -->
<select id="selectClazzById"
parameterType="int"
resultMap="clazzResultMap">
SELECT * FROM tb_clazz WHERE id = #{id}
</select>
<!-- 映射Clazz对象的resultMap -->
<resultMap type="org.fkit.domain.Clazz" id="clazzResultMap">
<id property="id" column="id" />
<result property="code" column="code" />
<result property="name" column="name" />
<!-- 一对多关联映射:collection fetchType="lazy"表示懒加载 -->
<collection
column="id"
select="org.fkit.mapper.StudentMapper.selectStudentByClazzId"
property="students"
javaType="ArrayList"
ofType="org.fkit.domain.Student"
fetchType="lazy">
<id column="id" property="id" />
<result column="name" property="name" />
<result column="sex" property="sex" />
<result column="age" property="age" />
</collection>
</resultMap>
</mapper>

ClazzMapper.xml中定义了一个select标签,其根据id查询班级信息。由于Clazz类除了简单的属性idcodename以外,还有一个关联对象students,所以返回的是一个id为clazzResultMapresultMap。由于students是一个List集合,所以clazzResultMap使用了collection元素映射一对多的关联关系

collection标签详解

属性
  • column属性要查询的数据库表的列名
  • select属性表示会使用column属性值id作为参数执行StudentMapper中定义的idselectStudentByClazzIdselect标签,以便查询该班级对应的所有学生数据,
  • property属性用于指定一个持久化对象的属性,select语句的查询的结果将会封装到这个属性中。
  • javaType属性用于指定属性的类型,也就是students变量的类型是ArrayList类型。
  • ofType属性用于指定属性的位置(也就是指定属性定义的类),ofType="org.fkit.domain.Student"表示students属性是org.fkit.domain.Student的属性。查询出的数据将被封装到property表示的students对象当中。
  • 还使用了一个新的属性fetchType,该属性的取值有eagerlazy,
    • eager表示立即加载,即查询Clazz对象的时候,会立即执行关联的selectStudentByClazzId中定义的SQL语句去査询班级的所有学生;
    • lazy表示懒加载,其不会立即发送SQL语句去查询班级的所有学生,而是等到需要使用到班级的students属性时,才会发送SQL语句去查询班级的所有学生。
    • fetch机制更多的是为了性能考虑,
      • 如果查询班级时确定会访问班级的所有学生则该属性应该被设置为eager;
      • 如果査询班级时只是查询班级信息,有可能不会访问班级的所有学生,则该属性应该被设置为lazy
      • 正常情况下,一对多所关联的集合对象,都应该被设置成lazy

MyBatis根配置文件中 开启懒加载

/OneToManyTest/src/mybatis-config.xml
1
2
3
4
5
6
7
8
9
10
11
12
13
14
15
16
<?xml version="1.0" encoding="UTF-8" ?>
<!DOCTYPE configuration
PUBLIC "-//mybatis.org//DTD Config 3.0//EN"
"http://mybatis.org/dtd/mybatis-3-config.dtd">
<!-- XML 配置文件包含对 MyBatis 系统的核心设置 -->
<configuration>
<!-- 省略其他配置...... -->
<!-- 指定 MyBatis 所用日志的具体实现 -->
<settings>
<!-- 省略其他配置...... -->
<!-- 要使延迟加载生效必须配置下面两个属性 -->
<setting name="lazyLoadingEnabled" value="true" />
<setting name="aggressiveLazyLoading" value="false" />
</settings>
<!-- 省略其他配置...... -->
</configuration>

设置说明

  • lazyLoadingEnabled属性表示延迟加载的全局开关。当开启时,所有关联对象都会延迟加载。默认为false。这里设为true表示延迟加载关联对象。
  • aggressiveLazyLoading属性启用时,会使带有延迟加载属性的对象立即加载;反之,每种属性将会按需加载。默认为true,所以这里需要设置成false,表示按需加载。

StudentMapper.xml

/OneToManyTest/src/org/fkit/mapper/StudentMapper.xml
1
2
3
4
5
6
7
8
9
10
11
12
13
14
15
16
17
18
19
20
21
22
23
24
25
26
27
28
<?xml version="1.0" encoding="UTF-8"?>
<!DOCTYPE mapper PUBLIC "-//mybatis.org//DTD Mapper 3.0//EN" "http://mybatis.org/dtd/mybatis-3-mapper.dtd">
<!-- namespace指用户自定义的命名空间。 -->
<mapper namespace="org.fkit.mapper.StudentMapper">
<!-- 根据id查询学生信息,多表连接,返回resultMap -->
<select id="selectStudentById" parameterType="int" resultMap="studentResultMap">
SELECT * FROM tb_clazz c,tb_student s WHERE c.id =s.clazz_id AND s.id = #{id}
</select>
<!-- 根据班级id查询学生信息,返回resultMap -->
<select id="selectStudentByClazzId" parameterType="int" resultMap="studentResultMap">
SELECT * FROM tb_student WHERE clazz_id = #{id}
</select>
<!-- 映射Student对象的resultMap -->
<resultMap type="org.fkit.domain.Student"
id="studentResultMap">
<id property="id" column="id" />
<result property="name" column="name" />
<result property="sex" column="sex" />
<result property="age" column="age" />
<!-- 多对一关联映射:association -->
<association property="clazz"
javaType="org.fkit.domain.Clazz">
<id property="id" column="id" />
<result property="code" column="code" />
<result property="name" column="name" />
</association>
</resultMap>
</mapper>

StudentMapper.xml中定义了一个id="selectStudentById"select标签,其会根据学生id查询学生信息,由于Student类除了简单的属性idnamesexage之外,还有一个关联对象clazz,所以它返回的是一个名为studentResultMapresultMap

提示

在实际开发中,一对多关系通常映射为集合对象,而由于多方的数据量可能很大,所以通常使用懒加载;而多对一只是关联到一个对象,所以通常使用多表连接直接把数据提取出来。

创建mapper接口对象

ClazzMapper接口

/OneToManyTest/src/org/fkit/mapper/ClazzMapper.java
1
2
3
4
public interface ClazzMapper {
// 根据id查询班级信息
Clazz selectClazzById(Integer id);
}

StudentMapper接口

/OneToManyTest/src/org/fkit/mapper/StudentMapper.java
1
2
3
4
5
6
7
8
public interface StudentMapper {
/**
* 根据id查询学生信息
* @param id
* @return Student对象。
*/
Student selectStudentById(Integer id);
}

测试类

/OneToManyTest/src/org/fkit/test/OneToManyTest.java
1
2
3
4
5
6
7
8
9
10
11
12
13
14
15
16
17
18
19
20
21
22
23
24
25
26
27
28
29
30
31
32
33
34
35
36
37
38
39
40
41
42
43
44
45
46
47
48
49
50
51
52
53
54
55
56
57
58
59
60
61
62
63
64
65
66
package org.fkit.test;

import java.util.List;
import org.apache.ibatis.session.SqlSession;
import org.fkit.domain.Clazz;
import org.fkit.domain.Student;
import org.fkit.factory.FKSqlSessionFactory;
import org.fkit.mapper.ClazzMapper;
import org.fkit.mapper.StudentMapper;

public class OneToManyTest
{
public static void main(String[] args)
{
// 1.定义SqlSession变量
SqlSession sqlSession = null;
try
{
// 2.创建SqlSession实例
sqlSession = FKSqlSessionFactory.getSqlSession();
OneToManyTest t = new OneToManyTest();
t.testSelectClazzById(sqlSession);
// t.testSelectStudentById(sqlSession);
// 提交事务
sqlSession.commit();
} catch (Exception e)
{
// 回滚事务
sqlSession.rollback();
e.printStackTrace();
} finally
{
// 关闭SqlSession
if (sqlSession != null)
sqlSession.close();
}
}

// 测试一对多,查询班级Clazz(一)的时候级联查询学生Student(多)
public void testSelectClazzById(SqlSession sqlSession)
{
// 1.获得ClazzMapper接口的代理对象
ClazzMapper cm = sqlSession.getMapper(ClazzMapper.class);
// 2.调用接口的代理对象的selectClazzById方法
Clazz clazz = cm.selectClazzById(1);
// 查看查询到的clazz对象信息
System.out.println(clazz.getId() + " " + clazz.getCode() + " " + clazz.getName());
// 查看clazz对象关联的学生信息
List<Student> students = clazz.getStudents();
students.forEach(stu -> System.out.println(" " + stu));
}

// 测试多对一,查询学生Student(多)的时候级联查询 班级Clazz(一)
public void testSelectStudentById(SqlSession sqlSession)
{
// 获得StudentMapper接口的代理对象
StudentMapper sm = sqlSession.getMapper(StudentMapper.class);
// 调用selectStudentById方法
Student stu = sm.selectStudentById(1);
// 查看查询到的Student对象信息
System.out.println(stu);
// 查看Student对象关联的班级信息
System.out.println(stu.getClazz());
}

}

OneToManyTest类中定义了一个testSelectClazzById()方法,该方法用于测试一对多关系,查询班级Clazz(一)的时候关联查询学生Student(多)的信息。

运行结果

testSelectStudentById

main方法中运行testSelectStudentById()方法,其通过SqlSessiongetMapper(Class<T> type)方法获得mapper接口的代理对象ClazzMapper,调用selectClazzById方法时会执ClazzMapper.xmlid="selectClazzById"select元素中定义的SQL语可。控制台显示如下:

控制台输出
1
2
3
4
5
DEBUG [main] ==>  Preparing: SELECT * FROM tb_clazz c,tb_student s WHERE c.id =s.clazz_id AND s.id = ? 
DEBUG [main] ==> Parameters: 1(Integer)
DEBUG [main] <== Total: 1
Student [id=1, name=Java基础班, sex=男, age=24]
Clazz [id=1, code=B151516, name=Java基础班]

testSelectClazzById

main方法中运行testSelectClazzById()方法,控制台显示如下:

控制台输出
1
2
3
4
5
6
7
8
9
10
11
DEBUG [main] ==>  Preparing: SELECT * FROM tb_clazz WHERE id = ? 
DEBUG [main] ==> Parameters: 1(Integer)
DEBUG [main] <== Total: 1
1 B151516 Java基础班
DEBUG [main] ==> Preparing: SELECT * FROM tb_student WHERE clazz_id = ?
DEBUG [main] ==> Parameters: 1(Integer)
DEBUG [main] <== Total: 4
Student [id=1, name=小明, sex=男, age=24]
Student [id=2, name=小王, sex=男, age=23]
Student [id=3, name=小芳, sex=女, age=22]
Student [id=4, name=小丽, sex=女, age=22]

可以看到,MyBatis执行了一个多表查询语句,并且将查询到的班级信息封装到了学生对象的关联属性中。

总结

collection标签

collection标签的属性

  • column属性指定要将哪一列,作为select标签关联的查询语句的参数。
  • select属性指定关联查询的select标签
  • property属性指定接收查询结果集的集合的变量名
  • javaType属性指定接收查询结果集的集合的类型
  • ofType属性指定集合中存放的元素的类型

collection标签的子标签

  • id标签
  • result标签

association标签

对于多对一,一对一联系,使用多表连接查询即可。

association标签的属性

  • column属性指定要将哪一列,作为select标签关联的查询语句的参数。
  • select属性指定关联查询的select标签
  • property设置接收查询结果的持久化对象的属性
  • javaType设置该属性的类型

association标签的子标签

  • id标签
  • result标签

10.1 MyBatis关联映射

什么是关联关系

客观世界中的对象很少有孤立存在的,例如班级,往往与班级的学生存在关联关系,如果得到某个班级的实例,那么应该可以直接获取班级对应的全部学生。反过来,如果已经得到一个学生的实例,那么也应该可以访问该学生对应的班级。这种实例之间的互相访问就是关联关系

关联关系分类

关联关系是面向对象分析、面向对象设计最重要的知识,MyBatis完全可以理解这种关联关系,如果映射得当,MyBatis的关联映射将可以大大简化持久层数据的访问。关联关系大致有如下分类。

  • 一对一
  • 一对多
  • 多对多

10.1.1 一对一联系

在实际项目开发中,经常存在一对一关系,比如一个人只能有一个身份证,一个身份证只能给一个人使用,这就是一对一的关系。

一对一关系推荐使用唯一主外键关联,即两张表使用外键关联关系,由于是一对一关联,因此还需要给外键列增加unique唯一约束。下面我们就用一个示例来看看MyBatis怎么处理一对一关系。

示例: OneToOneTest

项目结构

展开/折叠
D:\Desktop\随书源码\Spring+Mybatis企业应用实战(第2版)\codes\10\OneToOneTest
├─lib\
│ └─mysql-connector-java-5.1.44-bin.jar
├─src\
│ ├─db.properties
│ ├─log4j.xml
│ ├─mybatis-config.xml
│ └─org\
│   └─fkit\
│     ├─domain\
│     │ ├─Card.java
│     │ └─Person.java
│     ├─factory\
│     │ └─FKSqlSessionFactory.java
│     ├─mapper\
│     │ ├─CardMapper.xml
│     │ ├─PersonMapper.java
│     │ └─PersonMapper.xml
│     └─test\
│       ├─OneToOneTest.java
│       └─OneToOneTest2.java
└─WebContent\
  ├─META-INF\
  │ └─MANIFEST.MF
  └─WEB-INF\
    ├─lib\
    │ ├─ant-1.9.6.jar
    │ ├─ant-launcher-1.9.6.jar
    │ ├─asm-5.2.jar
    │ ├─cglib-3.2.5.jar
    │ ├─commons-logging-1.2.jar
    │ ├─javassist-3.22.0-CR2.jar
    │ ├─log4j-1.2.17.jar
    │ ├─log4j-api-2.3.jar
    │ ├─log4j-core-2.3.jar
    │ ├─mybatis-3.4.5.jar
    │ ├─mysql-connector-java-8.0.17.jar
    │ ├─ognl-3.1.15.jar
    │ ├─slf4j-api-1.7.25.jar
    │ └─slf4j-log4j12-1.7.25.jar
    └─web.xml

创建数据库表

首先,给之前创建的mybatis数据库创建两个表tb_cardtb_person,并插入测试数据。SQL脚本如下
使用方式:保存成.sql文件,然后使用Navicat导入(设置编码格式utf-8,免得乱码).

1
2
3
4
5
6
7
8
9
10
11
12
13
14
15
16
17
18
19
20
21
22
23
24
25
26
27
28
29
30
31
use mybatis;
-- 取消外键检查
SET FOREIGN_KEY_CHECKS=0;

-- 创建tb_card表
DROP TABLE IF EXISTS `tb_card`;
CREATE TABLE `tb_card` (
`id` int(11) NOT NULL AUTO_INCREMENT,
`code` varchar(18) NOT NULL,
PRIMARY KEY (`id`)
) ENGINE=InnoDB DEFAULT CHARSET=utf8;

-- 插入一条数据
INSERT INTO `tb_card` VALUES ('1', '43280119980091');

-- 创建tb_person表
DROP TABLE IF EXISTS `tb_person`;
CREATE TABLE `tb_person` (
`id` int(11) NOT NULL AUTO_INCREMENT,
`name` varchar(18) NOT NULL,
`sex` varchar(18) NOT NULL,
`age` int(11) DEFAULT NULL,
`card_id` int(11) DEFAULT NULL,
PRIMARY KEY (`id`),
UNIQUE KEY `card_id` (`card_id`),
CONSTRAINT `tb_person_ibfk_1` FOREIGN KEY (`card_id`)
REFERENCES `tb_card` (`id`)
) ENGINE=InnoDB DEFAULT CHARSET=utf8;

-- 插入一条数据
INSERT INTO `tb_person` VALUES ('1', '小明', '男', '22', '1');

tb_person表的card_id作为外键参照tb_card表的主键id,因为是一对一关系,即一个card_id只能让一个person使用,所以把card_id做成了唯一键约束。如此一来,person使用了一个card_id之后,其他的person就不能使用该card_id了.
所以,一对一关系就是外键约束加上唯一约束
mybatis数据库中执行SQL脚本,完成创建数据库和表的操作。

创建持久化类

接下来,创建一个Card对象和一个Person对象分别映射tb_cardtb_Person

Card.java

/OneToOneTest/src/org/fkit/domain/Card.java
1
2
3
4
5
6
7
8
9
10
11
12
13
14
15
16
17
18
19
package org.fkit.domain;
import java.io.Serializable;
public class Card implements Serializable
{
private static final long serialVersionUID = 1164164518527094243L;
private Integer id; // 主键id
private String code; // 身份证编号
public Card() {
super();
// TODO Auto-generated constructor stub
}
// 此处省略getter和setter方法,请自己补上
@Override
public String toString()
{
return "Card [id=" + id + ", code=" + code + "]";
}
}

Person.java

/OneToOneTest/src/org/fkit/domain/Person.java
1
2
3
4
5
6
7
8
9
10
11
12
13
14
15
16
17
18
19
20
21
22
23
24
25
26
27
28
29
30
31
32
33
34
35
36
37
package org.fkit.domain;
import java.io.Serializable;
//# 创建tb_person表
//DROP TABLE IF EXISTS `tb_person`;
//CREATE TABLE `tb_person` (
// `id` int(11) NOT NULL AUTO_INCREMENT,
// `name` varchar(18) NOT NULL,
// `sex` varchar(18) NOT NULL,
// `age` int(11) DEFAULT NULL,
// `card_id` int(11) DEFAULT NULL,
// PRIMARY KEY (`id`),
// UNIQUE KEY `card_id` (`card_id`),
// CONSTRAINT `tb_person_ibfk_1` FOREIGN KEY (`card_id`)
// REFERENCES `tb_card` (`id`)
//) ENGINE=InnoDB DEFAULT CHARSET=utf8;
//# 插入一条数据
//INSERT INTO `tb_person` VALUES ('1', '小明', '男', '22', '1');
public class Person implements Serializable
{
private static final long serialVersionUID = -6685680170973264712L;
private Integer id; // 主键id
private String name; // 姓名
private String sex; // 性别
private Integer age; // 年龄
// 人和身份证是一对一的关系,即一个人只有一个身份证
private Card card;
public Person() {
super();
// TODO Auto-generated constructor stub
}
// 此处省略getter和setter方法,请自己补上
@Override
public String toString()
{
return "Person [id=" + id + ", name=" + name + ", sex=" + sex + ", age=" + age + "]";
}
}

人和身份证号码之间是一对一的关系,即一个人只有一个身份证。在Person类中定义了一个card属性,该属性是一个card类型,用来映射一对一的关联关系,表示这个人的身份证。

XML映射文件

再接下来是XML映射文件。

PersonMapper.xml

/OneToOneTest/src/org/fkit/mapper/PersonMapper.xml
1
2
3
4
5
6
7
8
9
10
11
12
13
14
15
16
17
18
19
20
21
22
23
24
25
26
27
28
29
30
31
32
33
34
35
36
<?xml version="1.0" encoding="UTF-8"?>
<!DOCTYPE mapper PUBLIC "-//mybatis.org//DTD Mapper 3.0//EN"
"http://mybatis.org/dtd/mybatis-3-mapper.dtd">
<!-- namespace指用户自定义的命名空间。 -->
<mapper namespace="org.fkit.mapper.PersonMapper">
<!-- 根据id查询Person,返回resultMap -->
<select
id="selectPersonById"
parameterType="int"
resultMap="personMapper">
SELECT * from tb_person where id = #{id}
</select>
<!-- 映射Person对象的resultMap -->
<resultMap
type="org.fkit.domain.Person"
id="personMapper">
<id
property="id"
column="id"/>
<result
property="name"
column="name"/>
<result
property="sex"
column="sex"/>
<result
property="age"
column="age"/>
<!-- 一对一关联映射:association -->
<association
property="card"
column="card_id"
select="org.fkit.mapper.CardMapper.selectCardById"
javaType="org.fkit.domain.Card"/>
</resultMap>
</mapper>

PersonMapper.xml中定义了一个select标签,其根据id查询Person信息,由于Person类除了简单的属性idnamesexage之外,还有一个关联对象card,所以返回的是一个名为personMapperresultMappersonMapper中使用了association元素映射一对一的关联关系,

  • select属性表示会使用column属性card_id值作为参数执行CardMapper.xml中定义的selectCardById查询对应的card数据.
  • 查询出的数据将被封装到property表示的card对象当中.

CardMapper.xml

/OneToOneTest/src/org/fkit/mapper/CardMapper.xml
1
2
3
4
5
6
7
8
9
10
11
12
13
<?xml version="1.0" encoding="UTF-8"?>
<!DOCTYPE mapper PUBLIC "-//mybatis.org//DTD Mapper 3.0//EN"
"http://mybatis.org/dtd/mybatis-3-mapper.dtd">
<!-- namespace指用户自定义的命名空间。 -->
<mapper namespace="org.fkit.mapper.CardMapper">
<!-- 根据id查询Card,返回Card对象 -->
<select
id="selectCardById"
parameterType="int"
resultType="org.fkit.domain.Card">
SELECT * from tb_card where id = #{id}
</select>
</mapper>

mapper接口

之前的测试都是使用SqlSession对象调用insertupdatedeleteselect方法进行测试。实际上,Mybatis官方手册建议通过mapper接口的代理对象访问Mybatis,该对象关联了SqlSession对象,开发者可以通过mapper接口的代理对象直接调用方法操作数据库

mapper接口类命名规则

下面定义一个mapper接口对象,需要注意的是:

  • mapper接口的类名必须和之前的XML文件中的mappernamespace一致,
  • mapper接口的方法的方法名必须和XML文件中的select元素的id属性值一致
    • 方法的参数名必须和XML文件中的select元素的parameterType属性值一致。

PersonMapper.java

/OneToOneTest/src/org/fkit/mapper/PersonMapper.java
1
2
3
4
5
6
7
8
9
10
11
12
13
package org.fkit.mapper;

import org.fkit.domain.Person;

public interface PersonMapper
{
/**
* 方法名称要和select元素的id属性一致,参数名必须和select元素的parameterType属性一致.
* @param id
* @return Person对象
*/
Person selectPersonById(Integer id);
}

测试 使用mapper接口 OneToOneTest.java

/OneToOneTest/src/org/fkit/test/OneToOneTest.java
1
2
3
4
5
6
7
8
9
10
11
12
13
14
15
16
17
18
19
20
21
22
23
24
25
26
27
28
29
30
31
32
33
34
35
36
37
38
39
40
41
package org.fkit.test;

import org.apache.ibatis.session.SqlSession;
import org.fkit.domain.Person;
import org.fkit.factory.FKSqlSessionFactory;
import org.fkit.mapper.PersonMapper;

public class OneToOneTest {

public static void main(String[] args)
{
// 定义SqlSession变量
SqlSession sqlSession = null;
try
{
// 1.创建SqlSession实例
sqlSession = FKSqlSessionFactory.getSqlSession();
// 2.获得mapper接口的代理对象
PersonMapper pm = sqlSession.getMapper(PersonMapper.class);
// 3.直接调用接口的方法,查询id为1的Peson数据
Person p = pm.selectPersonById(1);
// 4.1打印Peson对象
System.out.println(p);
// 4.2打印Person对象关联的Card对象
System.out.println(p.getCard());
// 5.提交事务
sqlSession.commit();
} catch (Exception e)
{
// 6.回滚事务
sqlSession.rollback();
e.printStackTrace();
} finally
{
// 7.关闭SqlSession
if (sqlSession != null)
sqlSession.close();
}
}

}

运行OneToOneTest类的main方法,通过SqlSessiongetMapper(Class<T> type)方法获得mapper接口的代理对象PersonMapper,调用selectPersonById方法时会执行PersonMapper.xmlid="selectPersonById"select元素中定义的SQL语句。控制台显示如下:

1
2
3
4
5
6
7
8
DEBUG [main] ==>  Preparing: SELECT * from tb_person where id = ? 
DEBUG [main] ==> Parameters: 1(Integer)
DEBUG [main] ====> Preparing: SELECT * from tb_card where id = ?
DEBUG [main] ====> Parameters: 1(Integer)
DEBUG [main] <==== Total: 1
DEBUG [main] <== Total: 1
Person [id=1, name=小明, sex=男, age=22]
Card [id=1, code=43280119980091]

可以看到,查询Person信息时Person对应的Card对象也被查询出来了。

测试 使用mapper文件

/OneToOneTest/src/org/fkit/test/OneToOneTest2.java
1
2
3
4
5
6
7
8
9
10
11
12
13
14
15
16
17
18
19
20
21
22
23
24
25
26
27
28
29
30
package org.fkit.test;

import org.apache.ibatis.session.SqlSession;
import org.fkit.domain.Person;
import org.fkit.factory.FKSqlSessionFactory;

public class OneToOneTest2
{
public static void main(String[] args)
{
// 创建SQLSession实例
SqlSession sqlSession = FKSqlSessionFactory.getSqlSession();
try
{
Person p = sqlSession.selectOne("org.fkit.mapper.PersonMapper.selectPersonById", 1);
System.out.println(p);
System.out.println(p.getCard());
// 提交事务
sqlSession.commit();
} catch (Exception e)
{
e.printStackTrace();
sqlSession.rollback();
} finally
{
sqlSession.close();
}
}

}

运行结果:

1
2
3
4
5
6
7
8
DEBUG [main] ==>  Preparing: SELECT * from tb_person where id = ? 
DEBUG [main] ==> Parameters: 1(Integer)
DEBUG [main] ====> Preparing: SELECT * from tb_card where id = ?
DEBUG [main] ====> Parameters: 1(Integer)
DEBUG [main] <==== Total: 1
DEBUG [main] <== Total: 1
Person [id=1, name=小明, sex=男, age=22]
Card [id=1, code=43280119980091]

可以看到,使用Mapper接口方式时,通过鼠标点击就可以跳转到要调用的方法,这种方式调试起来更方便。

9.5 本章小结

本章首先介绍了MyBatis最重要的两个类SqlSessionFactorySqlSession;
接下来详细介绍了MyBatis的根配置文件mybatis-config.xml中的元素及使用方法,包括MyBatis的日志信息配置;
最后重点介绍了Mapper.xml映射文件的元素使用方法,包括insertdeleteupdateselect及强大的ResultMaps
第10章将深入MyBatis内部,重点介绍MyBatis的一对一、一对多、多对多、动态SQL、调用存储过程和缓存机制.

9.4.5 ResultMaps

resultMap元素是MyBatis中最重要最强大的元素。它的作用是告诉MyBatis将从结果集中取出的数据转换成开发者所需要的对象。

查询结果的每条记录转换成一个Map

下面是最简单的映射语句示例:

1
2
3
<select id="selectUser" resultType="map">
select * from tb_user
</select>
  • selectUserselect元素执行一条查询语句,查询tb_user表的所有数据。
  • resultType="map"表示返回的每条数据是都是一个Map集合(使用这条记录的列名作为key,列值作为value)。

示例: 测试ResultMaps

项目结构

展开/折叠
D:\Desktop\随书源码\Spring+Mybatis企业应用实战(第2版)\codes\09\ResultMapTest
├─src\
│ ├─db.properties
│ ├─log4j.xml
│ ├─mybatis-config.xml
│ └─org\
│   └─fkit\
│     ├─domain\
│     │ ├─Clazz.java
│     │ ├─Student.java
│     │ └─User.java
│     ├─factory\
│     │ └─FKSqlSessionFactory.java
│     ├─mapper\
│     │ └─UserMapper.xml
│     └─test\
│       ├─ResultMapTest.java
│       ├─SelectClazzTest.java
│       ├─SelectMapTest.java
│       └─SelectStudentTest.java
├─tb_user2.sql
└─WebContent\
  ├─META-INF\
  │ └─MANIFEST.MF
  └─WEB-INF\
    ├─lib\
    │ ├─ant-1.9.6.jar
    │ ├─ant-launcher-1.9.6.jar
    │ ├─asm-5.2.jar
    │ ├─cglib-3.2.5.jar
    │ ├─commons-logging-1.2.jar
    │ ├─javassist-3.22.0-CR2.jar
    │ ├─log4j-1.2.17.jar
    │ ├─log4j-api-2.3.jar
    │ ├─log4j-core-2.3.jar
    │ ├─mybatis-3.4.5.jar
    │ ├─mysql-connector-java-8.0.17.jar
    │ ├─ognl-3.1.15.jar
    │ ├─slf4j-api-1.7.25.jar
    │ └─slf4j-log4j12-1.7.25.jar
    └─web.xml

resultType为map

tb_user.sql

D:\Desktop\随书源码\Spring+Mybatis企业应用实战(第2版)\codes\09\ResultMapTest\src\org\fkit\domain\tb_user.sql
1
2
3
4
5
6
7
8
9
10
11
12
13
14
15
16
17
18
19
20
21
22
23
24
SET NAMES utf8mb4;
SET FOREIGN_KEY_CHECKS = 0;

-- ----------------------------
-- Table structure for tb_user
-- ----------------------------
DROP TABLE IF EXISTS `tb_user`;
CREATE TABLE `tb_user` (
`id` int(11) NOT NULL AUTO_INCREMENT,
`name` varchar(18) CHARACTER SET utf8mb4 COLLATE utf8mb4_general_ci NULL DEFAULT NULL,
`sex` char(2) CHARACTER SET utf8mb4 COLLATE utf8mb4_general_ci NULL DEFAULT NULL,
`age` int(11) NULL DEFAULT NULL,
PRIMARY KEY (`id`) USING BTREE
) ENGINE = InnoDB AUTO_INCREMENT = 5 CHARACTER SET = utf8mb4 COLLATE = utf8mb4_general_ci ROW_FORMAT = Compact;

-- ----------------------------
-- Records of tb_user
-- ----------------------------
INSERT INTO `tb_user` VALUES (1, 'admin', '男', 26);
INSERT INTO `tb_user` VALUES (2, '张三', '男', 23);
INSERT INTO `tb_user` VALUES (3, '李四', '男', 23);
INSERT INTO `tb_user` VALUES (4, '王五', '男', 23);

SET FOREIGN_KEY_CHECKS = 1;

SelectMapTest.java

1
2
3
4
5
6
7
8
9
10
11
12
13
14
15
16
17
18
19
20
21
22
23
24
25
26
27
28
29
30
31
32
33
34
35
36
37
38
package org.fkit.test;

import java.util.List;
import java.util.Map;
import org.apache.ibatis.session.SqlSession;
import org.fkit.factory.FKSqlSessionFactory;

public class SelectMapTest
{

public static void main(String[] args)
{
// 1.定义SqlSession变量
SqlSession sqlSession = null;
try
{
// 2.创建SqlSession实例
sqlSession = FKSqlSessionFactory.getSqlSession();
// 3.查询TB_USER表所有记录,每一条记录都封装Map,
// 该记录的属性作为key,属性值作为value
List<Map<String, Object>> list = sqlSession.selectList("org.fkit.mapper.UserMapper.selectUser");
// 遍历List集合,打印每一个Map对象
list.forEach(row -> System.out.println(row));
// 4.提交事务
sqlSession.commit();
} catch (Exception e)
{
// 5.回滚事务
sqlSession.rollback();
e.printStackTrace();
} finally
{
// 关闭SqlSession
if (sqlSession != null)
sqlSession.close();
}
}
}

对应的select标签

D:\Desktop\随书源码\Spring+Mybatis企业应用实战(第2版)\codes\09\ResultMapTest\src\org\fkit\mapper\UserMapper.xml
1
2
3
4
5
6
7
<!-- select操作
resultType="map"返回的每条记录都封装成一个Map
对于每条记录,使用这条记录的列名做key,值做value -->
<select
id="selectUser"
resultType="map"> SELECT * FROM TB_USER
</select>

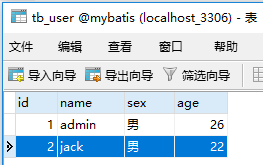
数据库表

此时tb_user表中的数据如下:

1
2
3
4
5
6
7
8
9
10
mysql> select * from tb_user;
+----+-------+-----+-----+
| id | name | sex | age |
+----+-------+-----+-----+
| 1 | admin | 男 | 26 |
| 2 | 张三 | 男 | 23 |
| 3 | 李四 | 男 | 23 |
| 4 | 王五 | 男 | 23 |
+----+-------+-----+-----+
4 rows in set (0.07 sec)

运行结果

运行SelectMapTest类的main方法,控制台显示如下:

1
2
3
4
5
6
7
DEBUG [main] ==>  Preparing: select * from tb_user 
DEBUG [main] ==> Parameters:
DEBUG [main] <== Total: 4
{sex=男, name=admin, id=1, age=26}
{sex=男, name=张三, id=2, age=23}
{sex=男, name=李四, id=3, age=23}
{sex=男, name=王五, id=4, age=23}

可以看到,査询语句返回的每一条记录都被封装成一个Map集合,这条记录的列名作为Map集合的key,而列的值作为Mapvalue

resultType为JavaBean

虽然数据被封装成Map集合返回,但是Map集合并不能很好地描述一个领域模型。在实际项目开发中更加建议使用JavaBeanPOJO(Plain Old Java Object,普通Java对象)作为领域模型描述数据。例如:

1
2
3
<select id="selectUser" resultType="org.fkit.domain.User">
select * from tb_user
</select>

数据表列名和持久化对象属性名不一致的情况 使用resultMap标签

默认情况下,MyBatis会将査询到的记录的列和需要返回的对象(User)的属性逐一进行匹配赋值,但是,如果查询到的记录的列名和需要返回的对象(User)的属性名不一致,则MyBatis就不会自动赋值了,这时,可以使用ResultMap标签进行处理.

创建数据库表tb_user2

进入mybatis数据库,创建一个表tb_user2,并插入几条测试数据:
cmd命令行中输入下面的sql语句进行创建,注意是在cmd命令行,如果使用Navicat的话先保存成sql文件,然后通过导入SQL文件的方式创建,不要使用Navicat的命令行界面,因为直接复制粘贴下面代码插入数据的时候,会出现乱码。

1
2
3
4
5
6
7
8
9
10
11
12
13
14
use mybatis;
DROP TABLE IF EXISTS `tb_user2`;
CREATE TABLE `tb_user2` (
`user_id` int(11) NOT NULL AUTO_INCREMENT,
`user_name` varchar(18) NOT NULL,
`user_sex` varchar(18) NOT NULL,
`user_age` int(11) NOT NULL,
PRIMARY KEY (`user_id`)
) ENGINE=InnoDB DEFAULT CHARSET=utf8mb4;

INSERT INTO tb_user2 VALUES (null, '小明', '男', 24);
INSERT INTO tb_user2 VALUES (null, '小王', '男', 25);
INSERT INTO tb_user2 VALUES (null, '小丽', '女', 22);
INSERT INTO tb_user2 VALUES (null, '小花', '女', 25);

创建持久化对象User.java

接下来创建一个User对象映射tb_user2表:

1
2
3
4
5
6
7
8
9
10
11
12
13
14
15
16
17
18
19
20
21
22
23
24
25
26
27
public class User
implements Serializable
{
private static final long serialVersionUID = 1L;
private Integer id;
private String name;
private String sex;
private Integer age;
public User()
{
super();
// TODO Auto-generated constructor stub
}
public User(String name, String sex, Integer age)
{
super();
this.name = name;
this.sex = sex;
this.age = age;
}
// 此处省略getter和setter方法,请自己补上
@Override
public String toString()
{
return "User [id=" + id + ", name=" + name + ", sex=" + sex + ", age=" + age + "]";
}
}

创建resultMap标签

D:\Desktop\随书源码\Spring+Mybatis企业应用实战(第2版)\codes\09\ResultMapTest\src\org\fkit\mapper\UserMapper.xml
1
2
3
4
5
6
7
8
9
10
11
12
13
14
<!-- 映射数据库表的列名和持久化对象的属性名 -->
<!-- 用在两者不同名的情况 -->
<resultMap id="userResultMap" type="org.fkit.domain.User">
<!-- 结果集的user_name字段的值,映射到User对象的成员变量name上 -->
<result column="user_name" property="name" />
<!-- 结果集的user_sex字段映射User对象的成员变量sex -->
<result column="user_sex" property="sex" />
<result column="user_age" property="age" />
</resultMap>

<!-- 使用自定义的映射 -->
<select id="selectUser2" resultMap="userResultMap">
SELECT * FROM TB_USER2
</select>

resultMap标签的属性

上面使用了一个新的元素resultMap,该元素常用属性如下

  • resultMap元素的id属性,是resultMap的唯一标识符。
  • resultMap元素的type属性,表示resultMap实际返回的类型。

上面还使用了resultMap的两个子元素idresult:

resultMap标签的id子标签
  • id,表示数据库表的主键列,其中,
    • column属性表示数据库表的列名,
    • property表示数据库列映射到返回类型的属性名
resultMap标签的result子标签
  • result,表示数据库表的普通列,其中,
    • column属性表示数据库表的列名,
    • property表示这个数据库列名要映射到的持久化对象的属性名

ResultMapTest.java

1
2
3
4
5
6
7
8
9
10
11
12
13
14
15
16
17
18
19
20
21
22
23
24
25
26
27
28
public class ResultMapTest {
public static void main(String[] args)
{
// 定义SqlSession变量
SqlSession sqlSession = null;
try
{
// 1.创建SqlSession实例
sqlSession = FKSqlSessionFactory.getSqlSession();
//
List<User> user_list = sqlSession.selectList("org.fkit.mapper.UserMapper.selectUser2");
// 遍历List集合,打印每一个Map对象
user_list.forEach(user -> System.out.println(user));
// 提交事务
sqlSession.commit();
} catch (Exception e)
{
// 回滚事务
sqlSession.rollback();
e.printStackTrace();
} finally
{
// 关闭SqlSession
if (sqlSession != null)
sqlSession.close();
}
}
}

运行ResultMapTest类的main方法,控制台显示如下:

1
2
3
4
5
6
7
DEBUG [main] ==>  Preparing: SELECT * FROM TB_USER2 
DEBUG [main] ==> Parameters:
DEBUG [main] <== Total: 4
User [id=1, name=小明, sex=男, age=24]
User [id=2, name=小王, sex=男, age=25]
User [id=3, name=小丽, sex=女, age=22]
User [id=4, name=小花, sex=女, age=25]

可以看到,虽然表TB_USER2的列名和User对象的属性名不一致,但是经过resultMap映射后,数据依然被正确封装到User对象当中

关联映射

在实际项目开发中,还有更加复杂的情况,例如执行的是一个多表查询语句,而返回的对象关联到另一个对象,此时简单地映射已经无法解决问题,必须使用resultMap元素来完成关联映射

创建两个表格 tb_cazz和tb_student

进入mybatis数据库,创建两个表tb_cazztb_student,并分别插入几条测试数据:

1
2
3
4
5
6
7
8
9
10
11
12
13
14
15
16
17
use mybatis;
-- 关闭外键检查
SET FOREIGN_KEY_CHECKS = 0;

-- 如果存在 tb clazz表则删除
drop table if exists tb_clazz;
-- 创建表
create table tb_clazz(
id int primary key auto_increment,
code varchar(18)
);
-- 插入数据
insert into tb_clazz(code) values ('B220203');
insert into tb_clazz(code) values ('B220102');

-- 恢复外键检查
SET FOREIGN_KEY_CHECKS = 1;
1
2
3
4
5
6
7
8
9
10
11
12
13
14
15
16
17
18
19
20
21
22
use mybatis;
-- 关闭外键检查
SET FOREIGN_KEY_CHECKS = 0;
-- 删除旧表
drop table if exists tb_student;
-- 创建新表
create table tb_student(
id int primary key auto_increment,
name varchar(18),
sex char(3),
age int,
clazz_id int,
foreign key(clazz_id) references tb_clazz(id)
);
-- 插入数据
insert into tb_student(name, sex, age, clazz_id) values ('大美','男', 22, 1);
insert into tb_student(name, sex, age, clazz_id) values ('小美','女', 18, 1);
insert into tb_student(name, sex, age, clazz_id) values ('微美','男', 25, 2);
insert into tb_student(name, sex, age, clazz_id) values ('巨美','女', 20, 2);

-- 恢复外键检查
SET FOREIGN_KEY_CHECKS = 1;

以上SQL语句插入了两个班级记录和4个学生记录,两个学生分配在1班,两个学生分配在2班。需要指出的是,tb_student表中的clazz_id列作为外键引用tb_clazz表的id列,表示学生对应的班级。

接下来我们要做的是:
查询出所有的学生信息,同时关联查询出学生对应的班级信息。

创建持久化对象

创建一个Clazz对象和Student对象并分别映射tb_clazz表和tb_student表。

Clazz.java

1
2
3
4
5
6
7
8
9
10
11
12
13
14
15
16
17
18
19
20
21
22
23
24
25
26
27
public class Clazz
implements Serializable
{
private static final long serialVersionUID = 1L;
private Integer id;
private String code;
private List<Student> students;
public Clazz()
{
super();
// TODO Auto-generated constructor stub
}
// 此处省略getter和setter方法,请自己补上
public List<Student> getStudents()
{
return students;
}
public void setStudents(List<Student> students)
{
this.students = students;
}
@Override
public String toString()
{
return "Clazz [id=" + id + ", code=" + code + "]";
}
}

Student.java

1
2
3
4
5
6
7
8
9
10
11
12
13
14
15
16
17
18
19
20
21
22
23
public class Student
implements Serializable
{
private static final long serialVersionUID = 1L;
private Integer id;
private String name;
private String sex;
private Integer age;
// 关联的Clazz对象
private Clazz clazz;
public Student()
{
super();
// TODO Auto-generated constructor stub
}
// 此处省略getter和setter方法,请自己补上
@Override
public String toString()
{
return "Student [id=" + id + ", name=" + name + ", sex=" + sex + ", age=" + age + ", clazz="
+ clazz + "]";
}
}

需要注意的是,Student中的属性clazzClazz类的一个对象,clazz对象的的属性有idcode。这是现代开发中最常用的对象关联方式。

映射配置

1
2
3
4
5
6
7
8
9
10
11
12
13
14
15
16
17
18
19
20
21
22
23
24
25
26
27
28
29
30
<!-- ############################### 关联映射示例 ####################################### -->

<!-- 查询所有学生信息 -->
<select id="selectStudent" resultMap="studentResultMap">
SELECT * FROM TB_STUDENT
</select>

<!-- 映射学生对象的resultMap -->
<resultMap id="studentResultMap" type="org.fkit.domain.Student">
<!-- 结果集的id字段映射Student类id成员变量 -->
<id column="id" property="id" />
<!-- 结果集name字段映射Student类的name成员变量 -->
<result column="name" property="name" />
<!-- 结果集sex字段映射Student类的sex成员变量 -->
<result column="sex" property="sex" />
<!-- 结果集的age字段映射Student类的age成员变量 -->
<result column="age" property="age" />
<!-- 关联映射 执行子查询 -->
<!-- column="clazz_id"表示使用结果集中的clazz_id字段作为子查询语句的参数 -->
<!-- select="selectClazzWithId"表示子查询的位置 -->
<!-- property="clazz"表示 接收子查询结果的成员变量为:Student类的clazz -->
<!-- javaType="org.fkit.domain.Clazz"表示接收子查询结果的成员变量clazz的类型 -->
<association column="clazz_id" select="selectClazzWithId"
property="clazz" javaType="org.fkit.domain.Clazz" />
</resultMap>

<!-- 根据 班级id 查询班级 -->
<select id="selectClazzWithId" resultType="org.fkit.domain.Clazz">
SELECT * FROM TB_CLAZZ where id = #{id}
</select>

上面的映射相对之前复杂了一些,具体解释如下:
①首先执行idselectStudentselect元素,查询所有的学生数据,此时返回的不是简单的Student对象,因为Student对象中还包含了Clazz对象,所以使用resultMap去映射返回类型。
idstudentResultMapresultMap元素返回类型为org.fkit.domain.Student,其中,idnamesexage都是简单的属性映射,而查询的班级idclazz则使用了关联映射association

association元素属性解释

association元素的解释如下

  • column。(子查询的参数)表示执行select语句返回的结果集中表的列名
  • select。(子查询的位置)表示执行一条査询语句,将查询到的记录封装到property所代表的类型对象当中。上面的selectClazzWithId执行一条SQL语句,将学生的clazz_id作为参数查询对应的班级信息
  • property。(接收子查询结果的成员变量)表示返回类型Student的属性名clazz
  • javaType。(接收子查询结果的成员变量的类型)表示该clazz属性对应的类型名称,本示例是一个Clazz类型。

SelectStudentTest.java

1
2
3
4
5
6
7
8
9
10
11
12
13
14
15
16
17
18
19
20
21
22
23
24
25
26
27
28
29
30
31
32
33
34
35
36
37
package org.fkit.test;

import java.util.List;
import org.apache.ibatis.session.SqlSession;
import org.fkit.domain.Student;
import org.fkit.factory.FKSqlSessionFactory;

public class SelectStudentTest
{

public static void main(String[] args)
{
// 定义SqlSession变量
SqlSession sqlSession = null;
try
{
// 创建SqlSession实例
sqlSession = FKSqlSessionFactory.getSqlSession();
// 查询TB_USER表所有数据返回List集合,集合中的每个元素都是一个Student对象
List<Student> student_list = sqlSession.selectList("org.fkit.mapper.UserMapper.selectStudent");
// 遍历List集合,打印每一个Student对象,该对象包含关联的Clazz对象
student_list.forEach(stu -> System.out.println(stu));
// 提交事务
sqlSession.commit();
} catch (Exception e)
{
// 回滚事务
sqlSession.rollback();
e.printStackTrace();
} finally
{
// 关闭SqlSession
if (sqlSession != null)
sqlSession.close();
}
}
}

运行结果

运行SelectStudentTest类的main方法,控制台显示如下:

控制台输出
1
2
3
4
5
6
7
8
9
10
11
12
13
DEBUG [main] ==>  Preparing: SELECT * FROM TB_STUDENT 
DEBUG [main] ==> Parameters:
DEBUG [main] ====> Preparing: SELECT * FROM TB_CLAZZ where id = ?
DEBUG [main] ====> Parameters: 1(Integer)
DEBUG [main] <==== Total: 1
DEBUG [main] ====> Preparing: SELECT * FROM TB_CLAZZ where id = ?
DEBUG [main] ====> Parameters: 2(Integer)
DEBUG [main] <==== Total: 1
DEBUG [main] <== Total: 4
Student [id=1, name=大美, sex=男, age=22, clazz=Clazz [id=1, code=B220203]]
Student [id=2, name=小美, sex=女, age=18, clazz=Clazz [id=1, code=B220203]]
Student [id=3, name=微美, sex=男, age=25, clazz=Clazz [id=2, code=B220102]]
Student [id=4, name=巨美, sex=女, age=20, clazz=Clazz [id=2, code=B220102]]

可以看到,因为使用了关联映射,查询学生信息时学生对应的班级对象也被查询出来了。

集合映射

现在査询所有学生时可以关联查询出班级信息了,那如果反过来,查询所有班级时需要查询出班级中的所有学生对象,应该如何映射呢?
学生通常只对应一个班级,但是班级中会有多个学生存在,所以首先在Clazz.java类中增加一个字段students,该字段是一个List集合,表示班级的多个学生。

1
2
3
4
5
6
7
public class Clazz
implements Serializable
{
//......
private List<Student> students;
//......
}

映射配置

1
2
3
4
5
6
7
8
9
10
11
12
13
14
15
16
17
18
19
20
21
22
23
24
25
26
27
28
<!-- ###################################### 集合映射示例 ############################################ -->
<!-- 查询 所有班级信息 -->
<select id="selectClazz" resultMap="clazzResultMap">
SELECT * FROM TB_CLAZZ
</select>
<!-- 映射班级对象的resultMap -->
<resultMap id="clazzResultMap" type="org.fkit.domain.Clazz">
<!-- 简单映射 -->
<!-- select结果集id字段值 映射到 Clazz对象id成员变量 -->
<id column="id" property="id" />
<!-- 简单映射 -->
<!-- select结果集code字段值 映射到 Clazz对象code成员变量 -->
<result column="code" property="code" />
<!-- 班级的学生属性,因为一个班级有多个学生,所以该属性是一个集合 -->
<!-- 使用结果集中的id字段作为子查询的参数 -->
<!-- select表示子查询的位置 -->
<!-- property表示接收子查询结果的成员变量 -->
<!-- javaType表示接收子查询的成员变量的类型(集合) -->
<!-- 由于接收子查询结果的成员变量是一个集合,ofType集合中保存的是什么类型 -->
<collection column="id" select="selectStudentWithId"
property="students" javaType="ArrayList" ofType="org.fkit.domain.Student" />
</resultMap>

<!-- 根据 班级id 查询学生 -->
<select id="selectStudentWithId" resultType="org.fkit.domain.Student">
SELECT * FROM TB_STUDENT where
clazz_id = #{id}
</select>

上面的映射和查询学生关联班级类似,具体解释如下:
①首先执行idselectClazzselect元素,查询所有的班级数据,此时返回的不是简单的Clazz对象,因为Clazz对象中还包含了学生的集合对象,所以使用resultMap去映射返回类型。
idclazzResultMap素返回类型为org.fkit.domain.Clazz
其中,idcode都是简单的属性映射,而査询班级所有学生时则使用了集合映射collection

collection标签详解

collection元素的解释如下:

  • column。(子查询输入参数)表示使用select语句结果集中的id字段作为参数进行之后的select语句查询。
  • select。(子查询语句位置)表示执行一条查询语句,将查询到的数据封装到property所代表的类型对象当中。上面的selectStudentWithId执行一条SQL语句,将班级的id作为参数查询班级对应的所有学生信息。
  • property。(接收子查询结果的成员变量)表示返回类型Clazz的属性名students
  • javaType。(接收子查询结果的成员变量的类型)表示该属性对应的类型名称,本示例中是一个Arraylist集合。
  • ofType。(接收子查询结果的集合中的元素的类型)表示集合当中的类型,本示例中是Student类型。

SelectClazzTest.java

D:\Desktop\随书源码\Spring+Mybatis企业应用实战(第2版)\codes\09\ResultMapTest\src\org\fkit\test\SelectClazzTest.java
1
2
3
4
5
6
7
8
9
10
11
12
13
14
15
16
17
18
19
20
21
22
23
24
25
26
27
28
29
30
31
32
33
34
35
36
37
38
39
40
41
42
43
package org.fkit.test;

import java.util.List;
import org.apache.ibatis.session.SqlSession;
import org.fkit.domain.Clazz;
import org.fkit.domain.Student;
import org.fkit.factory.FKSqlSessionFactory;

public class SelectClazzTest{

public static void main(String[] args){
// 定义SqlSession变量
SqlSession sqlSession = null;
try{
// 创建SqlSession实例
sqlSession = FKSqlSessionFactory.getSqlSession();
// 查询TB_CLAZZ表所有数据返回List集合,集合中的每个元素都是一个Clazz对象
List<Clazz> clazz_list = sqlSession.selectList("org.fkit.mapper.UserMapper.selectClazz");
// 遍历List集合,打印每一个Clazz对象和该Clazz关联的所有Student对象
for(Clazz clazz:clazz_list){
System.out.println(clazz + ":");
// System.out.println("-----------------");
List<Student> student_list = clazz.getStudents();
for(Student stu:student_list){
System.out.println(" " + stu.getId() + " " + stu.getName() +
" " + stu.getSex() + " " + stu.getAge());
}
System.out.println("-----------------");
System.out.println();
}
// 提交事务
sqlSession.commit();
}catch(Exception e){
// 回滚事务
sqlSession.rollback();
e.printStackTrace();
}finally{
// 关闭SqlSession
if(sqlSession != null)
sqlSession.close();
}
}
}

运行结果

运行SelectClazzTest类的main方法,控制台显示如下

1
2
3
4
5
6
7
8
9
10
11
12
13
14
15
16
17
18
19
DEBUG [main] ==>  Preparing: SELECT * FROM TB_CLAZZ 
DEBUG [main] ==> Parameters:
DEBUG [main] ====> Preparing: SELECT * FROM TB_STUDENT where clazz_id = ?
DEBUG [main] ====> Parameters: 1(Integer)
DEBUG [main] <==== Total: 2
DEBUG [main] ====> Preparing: SELECT * FROM TB_STUDENT where clazz_id = ?
DEBUG [main] ====> Parameters: 2(Integer)
DEBUG [main] <==== Total: 2
DEBUG [main] <== Total: 2
Clazz [id=1, code=B220203]:
1 大美 男 22
2 小美 女 18
-----------------

Clazz [id=2, code=B220102]:
3 微美 男 25
4 巨美 女 20
-----------------

可以看到,因为使用了集合映射,所以査询班级信息时班级对应的所有学生对象也被查询出来了。

9.4 深入Mapper XML映射文件 示例 测试select,insert,update和delete操作

本示例直接使用第8章创建的TB_USER表,数据库脚本,User.javalog4j.xml,具体请参考第8章内容,此处不再赘述。
在实际项目开发中,连接数据库的参数信息不会直接写在mybatis-config.xml中,而是通过一个properties文件来定义连接数据库的参数信息,并在mybatis-config.xml中引用。

项目结构

展开/折叠
D:\Desktop\随书源码\Spring+Mybatis企业应用实战(第2版)\codes\09\DMLTest
├─src\
│ ├─db.properties
│ ├─log4j.xml
│ ├─mybatis-config.xml
│ └─org\
│   └─fkit\
│     ├─domain\
│     │ └─User.java
│     ├─factory\
│     │ └─FKSqlSessionFactory.java
│     ├─mapper\
│     │ └─UserMapper.xml
│     └─test\
│       ├─DeleteTest.java
│       ├─InsertTest.java
│       ├─SelectTest.java
│       └─UpadeTest.java
└─WebContent\
  ├─META-INF\
  │ └─MANIFEST.MF
  └─WEB-INF\
    ├─lib\
    │ ├─ant-1.9.6.jar
    │ ├─ant-launcher-1.9.6.jar
    │ ├─asm-5.2.jar
    │ ├─cglib-3.2.5.jar
    │ ├─commons-logging-1.2.jar
    │ ├─javassist-3.22.0-CR2.jar
    │ ├─log4j-1.2.17.jar
    │ ├─log4j-api-2.3.jar
    │ ├─log4j-core-2.3.jar
    │ ├─mybatis-3.4.5.jar
    │ ├─mysql-connector-java-5.1.44-bin.jar
    │ ├─ognl-3.1.15.jar
    │ ├─slf4j-api-1.7.25.jar
    │ └─slf4j-log4j12-1.7.25.jar
    └─web.xml

db.properties

1
2
3
4
driver=com.mysql.jdbc.Driver
url=jdbc:mysql://127.0.0.1:3306/mybatis
username=root
password=root

mybatis-config.xml

1
2
3
4
5
6
7
8
9
10
11
12
13
14
15
16
17
18
19
20
21
22
23
24
25
26
27
28
29
30
31
32
33
34
35
36
37
38
39
40
41
42
43
44
45
46
47
48
49
50
<?xml version="1.0" encoding="UTF-8" ?>
<!DOCTYPE configuration
PUBLIC "-//mybatis.org//DTD Config 3.0//EN"
"http://mybatis.org/dtd/mybatis-3-config.dtd">
<!-- XML 配置文件包含对 MyBatis 系统的核心设置 -->
<configuration>
<!-- 引入properties资源文件,以便后面使用 -->
<properties resource="db.properties"/>
<!-- 指定 MyBatis 所用日志的具体实现 -->
<settings>
<setting
name="logImpl"
value="LOG4J"/>
</settings>
<!-- 设置别名 -->
<typeAliases>
<typeAlias
alias="user"
type="org.fkit.domain.User"/>
</typeAliases>
<!-- 环境配置,即连接的数据库。 -->
<environments default="mysql">
<environment id="mysql">
<!-- 指定事务管理类型,type="JDBC"指直接简单使用了JDBC的提交和回滚设置 -->
<transactionManager type="JDBC"/>
<dataSource type="POOLED">
<!-- 使用配置文件db.properties中设置的driver属性值给该driver属性赋值 -->
<property
name="driver"
value="${driver}"/>
<!-- 使用配置文件db.properties中设置的url属性值给该url属性赋值 -->
<property
name="url"
value="${url}"/>
<!-- 使用配置文件db.properties中设置的username属性值给该username属性赋值 -->
<property
name="username"
value="${username}"/>
<!-- 使用配置文件db.properties中设置的password属性值给该password属性赋值 -->
<property
name="password"
value="${password}"/>
</dataSource>
</environment>
</environments>
<!-- mappers告诉了MyBatis去哪里找持久化类的映射文件 -->
<mappers>
<mapper resource="org/fkit/mapper/UserMapper.xml"/>
</mappers>
</configuration>

引入properties配置文件

mybatis-config.xml中的

1
<properties resource="db.properties"/>

配置表示引入db.properties资源配置文件,

1
2
3
<property
name="driver"
value="${driver}"/>

引用properties配置文件中的值

表示driver的值引用db.properties文件中的名称为driver的值com.mysql.jdbc.Driver
同理:

1
2
3
${url}
${username}
${password}

引用db.properties文件中对应的url,usernamepassword的值。

UserMapper.xml

1
2
3
4
5
6
7
8
9
10
11
12
13
14
15
16
17
18
19
20
21
22
23
24
25
26
27
28
29
30
31
32
33
34
<?xml version="1.0" encoding="UTF-8"?>
<!DOCTYPE mapper PUBLIC "-//mybatis.org//DTD Mapper 3.0//EN"
"http://mybatis.org/dtd/mybatis-3-mapper.dtd">
<!-- namespace指用户自定义的命名空间。 -->
<mapper namespace="org.fkit.mapper.UserMapper">
<!-- insert操,
parameterType="user"表示该插入语句需要一个user对象作为参数
useGeneratedKeys="true"表示使用自动增长的主键 -->
<insert
id="saveUser"
parameterType="user"
useGeneratedKeys="true"
keyProperty="id"> insert into tb_user(name,sex,age) values(#{name},#{sex},#{age})
</insert>
<!-- select操作
parameterType="int"表示该查询语句需要一个int类型的参数
resultType="user"表示返回的是一个user对象 -->
<select
id="selectUser"
parameterType="int"
resultType="user"> select * from tb_user where id = #{id}
</select>
<!-- update操作
parameterType="user"表示该更新语句需要一个user对象作为参数 -->
<update
id="modifyUser"
parameterType="user"> update tb_user set name = #{name},sex = #{sex},age = #{age} where id = #{id}
</update>
<!-- delete操作 parameterType="int"表示该查询语句需要一个int类型的参数 -->
<delete
id="removeUser"
parameterType="int"> delete from tb_user where id = #{id}
</delete>
</mapper>

UserMapper.xml中定义了insertupdatedeleteselect4个元素,分别对应插入、更新、删除和查询4个数据库操作。

FKSqlSessionFactory.java

因为每次测试都需要读取mybatis-config.xml根配置文件,根据根配置文件信息创建SqlSessionFactory对象,再获取Sqlsession对象,使得该操作比较频繁,所以开发一个FKSqlSessionFactory工厂类封装以上操作的重复代码。

1
2
3
4
5
6
7
8
9
10
11
12
13
14
15
16
17
18
19
20
21
22
23
24
25
26
27
28
29
30
31
32
33
34
35
36
37
38
39
package org.fkit.factory;

import java.io.InputStream;
import org.apache.ibatis.io.Resources;
import org.apache.ibatis.session.SqlSession;
import org.apache.ibatis.session.SqlSessionFactory;
import org.apache.ibatis.session.SqlSessionFactoryBuilder;

public class FKSqlSessionFactory
{
private static SqlSessionFactory sqlSessionFactory = null;

// 初始化创建SqlSessionFactory对象
static
{
try (// 读取mybatis-config.xml文件
InputStream is = Resources
.getResourceAsStream("mybatis-config.xml"))
{
// 创建SqlSessionFactory实例
sqlSessionFactory = new SqlSessionFactoryBuilder().build(is);
} catch (Exception e)
{
e.printStackTrace();
}
}

// 获取SqlSession对象的静态方法
public static SqlSession getSqlSession()
{
return sqlSessionFactory.openSession();
}

// 获取SqlSessionFactory的静态方法
public static SqlSessionFactory getSqlSessionFactory()
{
return sqlSessionFactory;
}
}

测试insert标签

InsertTest.java

1
2
3
4
5
6
7
8
9
10
11
12
13
14
15
16
17
18
19
20
21
22
23
24
25
26
27
28
public class InsertTest {
public static void main(String[] args)
{
// 定义SqlSession变量
SqlSession sqlSession = null;
try
{
// 1.创建SqlSession实例
sqlSession = FKSqlSessionFactory.getSqlSession();
// 2.创建User对象
User user = new User("jack", "男", 22);
// 3.插入数据
sqlSession.insert("org.fkit.mapper.UserMapper.saveUser", user);
// 4.提交事务
sqlSession.commit();
} catch (Exception e)
{
// 回滚事务
sqlSession.rollback();
e.printStackTrace();
} finally
{
// 关闭SqlSession
if (sqlSession != null)
sqlSession.close();
}
}
}

运行InsertTest类的main方法,创建User对象,并将User对象作为参数调sqlSessioninsert方法,

Mybatis如何找到要执行的SQL语句

insert方法的第一个参数是org.fkit.mapper.UserMapper.saveUser,MyBatis会找到org.fkit.mapper.UserMapper命名空间下id="saveUser"元素,执行该元素中的SQL语句。

1
2
3
4
5
6
7
8
9
10
11
<mapper namespace="org.fkit.mapper.UserMapper">
......
<insert
id="saveUser"
parameterType="user"
useGeneratedKeys="true"
keyProperty="id">
insert into tb_user(name,sex,age) values(#{name},#{sex},#{age})
</insert>
......
</mapper>

insert元素属性解释

insert元素的属性:

  • parameterType="user"表示该插入语句需要一个User对象作为参数
  • useGeneratedKeys="true"表示使用数据库的自动增长的主键,该操作需要底层数据库的支持;
  • keyProperty="id"表示将插入数据生成的主键设置到user对象的id当中。

MyBatis表达式

insert元素中的SQL语句是一条标准的insert into语句,需要注意的是,#{name}使用了MyBatis的表达式,其会查找参数user当中的name属性作为值,并将该值设置到SQL语句中;如果传入的参数是一个Map,则会以name作为key查找Map当中的值,并将该值设置到SQL语句中#{sex}#{age}#{name}操作相同.
运行InsertTest类的main方法,将会插入一条数据到数据库当中。控制台结果如下所示:

1
2
3
DEBUG [main] ==>  Preparing: insert into tb_user(name,sex,age) values(?,?,?) 
DEBUG [main] ==> Parameters: jack(String), 男(String), 22(Integer)
DEBUG [main] <== Updates: 1

插入数据后数据库表中的数据如下图所示:
这里有一张图片

测试select标签

SelectTest.java

1
2
3
4
5
6
7
8
9
10
11
12
13
14
15
16
17
18
19
20
21
22
23
24
25
26
27
public class SelectTest {
public static void main(String[] args)
{
// 定义SqlSession变量
SqlSession sqlSession = null;
try
{
// 1.创建SqlSession实例
sqlSession = FKSqlSessionFactory.getSqlSession();
// 2.根据id查询User对象
User user = sqlSession.selectOne("org.fkit.mapper.UserMapper.selectUser", 1);
System.out.println(user);
// 3.提交事务
sqlSession.commit();
} catch (Exception e)
{
// 4.回滚事务
sqlSession.rollback();
e.printStackTrace();
} finally
{
// 5.关闭SqlSession
if (sqlSession != null)
sqlSession.close();
}
}
}

如何找到要执行的SQL语句

运行SelectTest类的main方法,调用SqlSessionselectOne方法, selectOne方法的第个参数是org.fkit.mapper.UserMapper.selectUser, MyBatis会找到org.fkit.mapper.UserMapper命名空间下id="selectUser"的元素,执行该元素中的SQL语句:

1
2
3
4
5
6
7
8
9
10
<mapper namespace="org.fkit.mapper.UserMapper">
......
<select
id="selectUser"
parameterType="int"
resultType="user">
select * from tb_user where id = #{id}
</select>
......
</mapper>

属性解释

select元素中的

  • parameterType="int"表示该插入新语句需要一个int类型的值作为参数;
  • resultType="user"表示该条查询语句需要返回一个User对象。
  • 元素中的SQL语句是一条标准的select语句,该语句需要的参数id的值,就是我们是调用时传入的int值。

运行效果

运行SelectTest类的main方法,程序将会到数据库当中查询id为1的一条数据并封装成User类型的对象返回。控制台结果如下所示:

1
2
3
4
DEBUG [main] ==>  Preparing: select * from tb_user where id = ? 
DEBUG [main] ==> Parameters: 1(Integer)
DEBUG [main] <== Total: 1
User [id=1, name=admin, sex=男, age=26]

测试update元素

UpadeTest.java

1
2
3
4
5
6
7
8
9
10
11
12
13
14
15
16
17
18
19
20
21
22
23
24
25
26
27
28
29
30
31
public class UpadeTest {
public static void main(String[] args)
{
// 定义SqlSession变量
SqlSession sqlSession = null;
try
{
// 1.创建SqlSession实例
sqlSession = FKSqlSessionFactory.getSqlSession();
// 2.根据id查询User对象
User user = sqlSession.selectOne("org.fkit.mapper.UserMapper.selectUser", 1);
// 3.修改User对象的属性值
user.setName("tom");
user.setAge(25);
// 4.修改User对象
sqlSession.update("org.fkit.mapper.UserMapper.modifyUser", user);
// 5.提交事务
sqlSession.commit();
} catch (Exception e)
{
// 6.回滚事务
sqlSession.rollback();
e.printStackTrace();
} finally
{
// 关闭SqlSession
if (sqlSession != null)
sqlSession.close();
}
}
}

运行UpdateTest类的main方法,首先调用SqlSessionselectOne方法,查询出id1的数据返回给User对象。接下来修改该User对象的属性值,最后调用SqlSessionupdate方法修改该User对象。update方法的第一个参数是org.fkit.mapper.UserMapper.modifyUser,MyBatis会找到org.fkit.mapper.UserMapper命名空间下id="modifyUser"的元素,执行该元素中的SQL语句。

1
2
3
4
5
6
7
8
9
<mapper namespace="org.fkit.mapper.UserMapper">
......
<update
id="modifyUser"
parameterType="user">
update tb_user set name = #{name},sex = #{sex},age=#{age} where id = #{id}
</update>
......
</mapper>
  • update元素的属性:parameterType="user"表示该更新语句需要一个User对象作为参数。
  • update元素中的SQL语句是一条标准的update语句,该语句根据传入的User对象的属性更新表数据。

运行效果

运行UpdateTest类的main方法,我们将会看到数据库中的更新数据。控制台结果如下所示:

1
2
3
4
5
6
DEBUG [main] ==>  Preparing: select * from tb_user where id = ? 
DEBUG [main] ==> Parameters: 1(Integer)
DEBUG [main] <== Total: 1
DEBUG [main] ==> Preparing: update tb_user set name = ?,sex = ?,age = ? where id = ?
DEBUG [main] ==> Parameters: tom(String), 男(String), 25(Integer), 1(Integer)
DEBUG [main] <== Updates: 1

更新数据后数据库表数据如下图所示:
这里有一张图片

测试delete元素

DeleteTest.java

1
2
3
4
5
6
7
8
9
10
11
12
13
14
15
16
17
18
19
20
21
22
23
24
25
26
public class DeleteTest {
public static void main(String[] args)
{
// 定义SqlSession变量
SqlSession sqlSession = null;
try
{
// 1.创建SqlSession实例
sqlSession = FKSqlSessionFactory.getSqlSession();
// 2.删除id为1的User对象
sqlSession.delete("org.fkit.mapper.UserMapper.removeUser", 1);
// 3.提交事务
sqlSession.commit();
} catch (Exception e)
{
// 4.回滚事务
sqlSession.rollback();
e.printStackTrace();
} finally
{
// 5.关闭SqlSession
if (sqlSession != null)
sqlSession.close();
}
}
}

运行DeleteTest类的main方法,调用SqlSessiondelete方法。
delete方法的第一个参数是org.fkit.mapper.UserMapper.removeUser,MyBatis会找到org.fkit.mapper.UserMapper命名空间下的 id="removeUser"的元素,执行该元素中的SQL语句:

1
2
3
4
5
6
7
8
<mapper namespace="org.fkit.mapper.UserMapper">
......
<delete
id="removeUser"
parameterType="int"> delete from tb_user where id = #{id}
</delete>
......
</mapper>
  • delete元素中的parameterType="int"表示该删除语句需要一个int类型的值作为参数。
  • 元素中的SQL语句是一条标准的delete语句,该语句需要的参数id值是调用时传入的int值。

运行结果

1
2
3
DEBUG [main] ==>  Preparing: delete from tb_user where id = ? 
DEBUG [main] ==> Parameters: 1(Integer)
DEBUG [main] <== Updates: 1

删除后数据库表数据如下图所示:

image-20220814180400264

9.4 深入Mapper XML映射文件 9.4.4 参数 Parameters标签

前面的所有语句中所见到的都是简单参数的例子,实际上参数是MyBatis非常强大的元素。

传入简单参数

对于简单参数的使用,大多数情况下参数都很少,例如:

1
2
3
4
5
<select id="selectUser" parameterType="int" resultType="User">
select id,username,password
from users
where id=#{id}
<select>

上面的这个示例说明了一个非常简单的命名参数映射。参数类型被设置为int,这样这个参数就可以被设置成任何内容。原生的类型或简单数据类型(比如整型和字符串),因为没有相关属性,会完全用参数值来替代。

传入对象

但是,如果传入一个复杂的对象(比如User),行为就会有一点不同了。例如:

1
2
3
4
<insert id="insertUser" parameterType="User">
insert into users(id,username,password)
value(#{id},#{username},#{password})
</insert>

如果User类型的参数对象被传递到了语句中,如#{id}语句则会查找参数对象Userid属性,#{username}#{password}也是一样,然后将它们的值传入预处理语句的参数中。

9.4.3 sql标签

sql元素可以被用来定义可重用的SQL代码段,可以包含在其他语句中。它可以被静态地(在加载参数时)参数化。不同的属性值通过包含的实例发生变化。例如

1
<sql id="userColumns">${alias}.id,${alias}.username,${alias}.password</sql>

这个SQL片段可以被包含在其他语句中,例如:

1
2
3
4
5
6
7
<select id="selectUser" resultTyep="map">
select
<include refid="userColumns">
<property name="alias" value="t1"/>
</include>
from some_table t1
</select>

属性值可以用于包含的refid属性或者包含的字句里面的属性,例如

1
2
3
4
5
6
7
8
9
10
11
12
13
14
15
<sql id="sometable">
${prefix} Table
</sql>
<sql id="someinclude">
from
<include refid="${include_target}">
</sql>
<select id="select" resultType="map">
select
field1,field2,field3
<include refid="someinclude">
<property name="prefix" value="some"/>
<property name="include_target" value="sometable">
</include>
</select>

9.4 深入Mapper XML映射文件 9.4.2 insert,update和delete

insert,updatedelete元素用来映射DML语句,是MyBatis中最常用的元素之一。

insert update delete元素的属性

insert,updatedelete元素配置和select非常接近。例如

1
2
3
4
5
6
7
8
9
10
11
12
13
14
15
16
17
18
19
20
21
<insert
id="insertUser"
parameterType="domain.User"
flushCacher="true"
statementType="PREPARED"
keyProperty=""
keyColumn=""
useGeneratedKeys=""
timeout="20">
<update
id="updateUser"
parameterType="domain.User"
flushCache="true"
statementType="PREPARED"
timeout="20">
<delete
id="deleteUser"
parameterType="domain.User"
flushCache="true"
statementType="PREPARED"
timeout="20">

insert和update特有的属性描述

insertupdatedelete元素的属性大多和select的一致,它们特有的属性描述如下:

useGeneratedKeys

useGeneratedKeys,(仅对insertupdate有用)这会令MyBatis使用的JDBCgetGeneratedKeys方法来获取由数据库内部生成的主键(比如,像MySQLSQLServer这样的关系数据库管理系统的自动递增字段),默认值为false

keyProperty

keyProperty,(仅对insertupdate有用)唯一标记一个属性,MyBatis会通过getGeneratedKeys的返回值或者通过insert语句的selectKey子元素设置它的键值,默认为unset。如果希望得到多个生成的列,也可以是逗号分隔的属性名称列表.

keyColumn

keyColumn,(仅对insertupdate有用)通过生成的键值设置表中的列名,这个设置仅对某些数据库(像PostgreSQL)是必须的,当主键列不是表中的第一列时需要设置如果希望得到多个生成的列,也可以是逗号分隔的属性名称列表.

示例

下面是insertupdatedelete语句的示例

1
2
3
4
5
6
7
8
9
10
11
12
13
14
15
<insert id="insertUser">
insert into tb_user(id,username,password,email,address)
values(#{id},#{username},#{password},#{email},#{address})
</insert>
<update id="updateUser">
update tb_user set
username=#{username},
password=#{password},
email=#{email},
address=#{id}
where id=#{id}
</update>
<delete id="deleteUser">
delete from tb_user where id=#{id}
</delete>

自动生成列

而插入语句的配置规则更加丰富,因为在插入语句执行时很多时候是需要返回插入成功的数据生成的主键值的,所以insert元素里面有一些额外的属性和子元素用来处理主键的生成,而且根据数据库的主键生成策略不同,配置也有多种方式。
首先,如果数据库支持自动生成主键的字段(比如MySQLSQLServer),那么可以设置useGeneratedKeys="true",然后再把keyProperty设置到目标属性上就可以了(一般会设置到id属性上)。例如,如果上面的TB_USER表已经对id使用了自动生成的列类型,那么语句可以修改为:

1
2
3
4
<insert id="insertUser" useGeneratedKeys="true" keyProperty="id">
insert into tb_user(username,password,email,address)
value(#{username},#{password},#{email},#{address})
</insert>

不支持自动生成主键的情况

对于不支持自动生成类型的数据库(比如Oracle)或可能不支持自动生成主键的JDBC驱动来说,MyBatis有另外一种方法来生成主键。

insert元素写法

1
2
3
4
5
6
7
<insert id="insertUser">
<selectKey keyProperty="id" resultType="int" order="BEFORM">
select SEQUENCE_TB_USER.nextval as id from dual
</selectKey>
insert into tb_user(id,username,password,email,address)
value(#{id},#{username},#{password},#{email},#{address})
</insert>

在上面的示例中,selectKey元素将会首先运行,其通过查询SEQUENCE序列,TB_USERid会被设置,然后插入语句会被调用。

selectKey标签

selectKey元素描述如下:

1
2
3
4
5
<selectKey
keyProperty="id"
resultType="int"
order="BEFORE"
statementType="PREPARED">
  • keyProperty,selectKey语句结果应该被设置到目标属性(一般会设置到id属性)上。如果希望得到多个生成的列,也可以是逗号分隔的属性名称列表。
  • keyColumn,匹配属性的返回结果集中的列名称。如果希望得到多个生成的列,也可以是逗号分隔的属性名称列表。
  • resultType,结果的类型。MyBatis通常可以推算出来,但是为了更加确定,建议明确写出。MyBatis允许任何简单类型用作主键的类型,包括字符串。如果希望作用于多个生成的列,则可以使用一个包含期望属性的Object或一个Map
  • order,可以被设置为BEFOREAFTER。如果设置为BEFORE,那么它会首先选择主键设置keyProperty然后执行插入语句。如果设置为AFTER,那么先执行插入语句,然后是selectKey元素。
  • statementType,与前面相同,MyBatis支持STATEMENTPREPAREDCALLABLE语句的映射类型,分别代表StatementPreparedStatementCallableStatement类型。