12.5 Java7新增的Swing功能 Java7提供的重大更新就包括了对Swing的更新,对Swing的更新除前面介绍的Nimbus外观、改进的JColorchooser组件之外,还有两个很有用的更新:JLayer 和创建不规则窗口 。下面将会详细介绍这两个知识点。
12.5.1 使用JLayer装饰组件 JLayer的功能是在指定组件上额外地添加一个装饰层,开发者可以在这个装饰层上进行任意绘制(直接重写paint(Graphics g,JComponent c)方法),这样就可以为指定组件添加任意装饰。
JLayer一般总是要和LayerUI一起使用,而LayerUI用于被扩展,扩展LayerUI时重写它的paint(Graphics g,JComponent c)方法,在该方法中绘制的内容会对指定组件进行装饰。
实际上,使用JLayer很简单,只要如下两行代码即可
1 2 3 4 LayerUI<JComponent> layerUI = new XxxLayerUI (); JLayer<JComponent> layer = new JLayer <JComponent>(panel, layerUI);
上面程序中的XxxLayerUI就是开发者自己扩展的子类,这个子类会重写paint(Graphics g,JComponent c)方法,重写该方法来完成“装饰层”的绘制。
上面第二行代码中的panel组件就是被装饰的组件,接下来把layer对象(layer对象包含了被装饰对象和LayerUI对象)添加到指定容器中即可
程序 蒙版效果 下面程序示范了使用JLayer为窗口添加一层“蒙版”的效果
1
2
3
4
5
6
7
8
9
10
11
12
13
14
15
class FirstLayerUI extends LayerUI <JComponent> { private static final long serialVersionUID = 5993086002698144927L ; public void paint (Graphics g, JComponent c) { super .paint(g, c); Graphics2D g2 = (Graphics2D) g.create(); g2.setComposite(AlphaComposite.getInstance(AlphaComposite.SRC_OVER, .5f )); g2.setPaint(new GradientPaint (0 , 0 , Color.RED, 0 , c.getHeight(), Color.BLUE)); g2.fillRect(0 , 0 , c.getWidth(), c.getHeight()); g2.dispose(); } }
程序 主类 1 2 3 4 5 6 7 8 9 10 11 12 13 14 15 16 17 18 19 20 21 22 23 24 25 26 27 28 29 30 31 32 33 34 35 36 37 public class JLayerTest { public void init () { JFrame f = new JFrame ("JLayer测试" ); JPanel p = new JPanel (); ButtonGroup group = new ButtonGroup (); JRadioButton radioButton; p.add(radioButton = new JRadioButton ("网购购买" , true )); group.add(radioButton); p.add(radioButton = new JRadioButton ("书店购买" )); group.add(radioButton); p.add(radioButton = new JRadioButton ("图书馆借阅" )); group.add(radioButton); p.add(new JCheckBox ("疯狂Java讲义" )); p.add(new JCheckBox ("疯狂Android讲义" )); p.add(new JCheckBox ("疯狂Ajax讲义" )); p.add(new JCheckBox ("轻量级Java EE企业应用" )); JButton orderButton = new JButton ("投票" ); p.add(orderButton); LayerUI<JComponent> layerUI = new BlurLayerUI (); JLayer<JComponent> layer = new JLayer <JComponent>(p, layerUI); f.add(layer); f.setSize(300 , 170 ); f.setDefaultCloseOperation(JFrame.EXIT_ON_CLOSE); f.setVisible(true ); } public static void main (String[] args) { new JLayerTest ().init(); } }
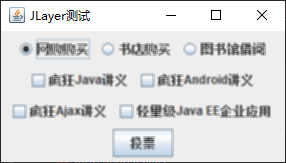
上面程序中开发了一个FirstLayerUI,它扩展了LayerUI,重写paint(graphics g, JComponent c)方法时绘制了一个半透明的、与被装饰组件具有相同大小的矩形。接下来在main方法中使用这个LayerUI来装饰指定的JPanel组件,并把JLayer添加到JFrame容器中,这就达到了对JPanel进行包装的效果。
运行该程序,可以看到如图12.23所示的效果
paint(graphics g, JComponent c)方法,因此获得对被装饰层的全部控制权——想怎么绘制,就怎么绘制!因此开发者可以“随心所欲”地对指定组件进行装饰。
程序 模糊效果 例如,下面提供的LayerUI则可以为被装饰组件增加“模糊”效果。程序如下
1 2 3 4 5 6 7 8 9 10 11 12 13 14 15 16 17 18 19 20 21 22 23 24 25 26 27 28 29 30 31 32 33 34 35 class BlurLayerUI extends LayerUI <JComponent> { private static final long serialVersionUID = -2386080677384858056L ; private BufferedImage screenBlurImage; private BufferedImageOp operation; public BlurLayerUI () { float ninth = 1.0f / 9.0f ; float [] blurKernel = { ninth, ninth, ninth, ninth, ninth, ninth, ninth, ninth, ninth }; operation = new ConvolveOp (new Kernel (3 , 3 , blurKernel), ConvolveOp.EDGE_NO_OP, null ); } public void paint (Graphics g, JComponent c) { int w = c.getWidth(); int h = c.getHeight(); if (w == 0 || h == 0 ) return ; if (screenBlurImage == null || screenBlurImage.getWidth() != w || screenBlurImage.getHeight() != h) { screenBlurImage = new BufferedImage (w, h, BufferedImage.TYPE_INT_RGB); } Graphics2D ig2 = screenBlurImage.createGraphics(); ig2.setClip(g.getClip()); super .paint(ig2, c); ig2.dispose(); Graphics2D g2 = (Graphics2D) g; g2.drawImage(screenBlurImage, operation, 0 , 0 ); } }
上面程序扩展了LayerUI,重写了paint(Graphics g,JComponent c)方法,重写该方法时也是绘制了一个与被装饰组件具有相同大小的矩形,只是这种绘制添加了模糊效果。
将JLayerTestJava中的②号粗体字代码改为使用BlurLayerUI,再次运行该程序,将可以看到如图12.24所示的“毛玻璃”窗口
给LayerUI增加事件机制 除此之外,开发者自定义的LayerUI还可以增加事件机制,这种事件机制能让装饰层响应用户动作,随着用户动作动态地改变LayerUI上的绘制效果。比如下面的LayerUI示例。
程序 探照灯效果 程序通过响应鼠标事件可以在窗口上增加“探照灯”效果。程序如下
1 2 3 4 5 6 7 8 9 10 11 12 13 14 15 16 17 18 19 20 21 22 23 24 25 26 27 28 29 30 31 32 33 34 35 36 37 38 39 40 41 42 43 44 45 46 47 48 49 50 51 52 53 54 55 56 57 58 class SpotlightLayerUI extends LayerUI <JComponent> { private static final long serialVersionUID = -5931810232610714874L ; private boolean active; private int cx, cy; public void installUI (JComponent c) { super .installUI(c); JLayer layer = (JLayer) c; layer.setLayerEventMask(AWTEvent.MOUSE_EVENT_MASK | AWTEvent.MOUSE_MOTION_EVENT_MASK); } public void uninstallUI (JComponent c) { JLayer layer = (JLayer) c; layer.setLayerEventMask(0 ); super .uninstallUI(c); } public void paint (Graphics g, JComponent c) { Graphics2D g2 = (Graphics2D) g.create(); super .paint(g2, c); if (active) { Point2D center = new Point2D .Float(cx, cy); float radius = 72 ; float [] dist = { 0.0f , 1.0f }; Color[] colors = { Color.YELLOW, Color.BLACK }; RadialGradientPaint p = new RadialGradientPaint (center, radius, dist, colors); g2.setPaint(p); g2.setComposite(AlphaComposite.getInstance(AlphaComposite.SRC_OVER, .6f )); g2.fillRect(0 , 0 , c.getWidth(), c.getHeight()); } g2.dispose(); } public void processMouseEvent (MouseEvent e, JLayer layer) { if (e.getID() == MouseEvent.MOUSE_ENTERED) active = true ; if (e.getID() == MouseEvent.MOUSE_EXITED) active = false ; layer.repaint(); } public void processMouseMotionEvent (MouseEvent e, JLayer layer) { Point p = SwingUtilities.convertPoint(e.getComponent(), e.getPoint(), layer); cx = p.x; cy = p.y; layer.repaint(); } }
上面程序中重写了LayerUI的installUI(JComponent c)方法,重写该方法时控制该组件能响应鼠标事件和鼠标动作事件。
重写processMouseMotionEvent()方法,该方法负责为LayerUI上的鼠标事件提供响应:当鼠标在界面上移动时,程序会改变cx、cy的坐标值paint(Graphics g, JComponent c)方法时会在cx、ey对应的点绘制一个环形渐变,这就可以充当“探照灯”效果了。
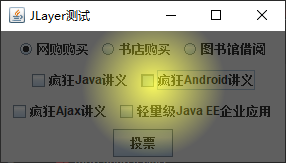
将JLayerTestJava中的②号粗体字代码改为使用SpotlightLayerUI,再次运行该程序,即可看到如图12.25所示的效果。
绘制动画 既然可以让LayerUI上的绘制效果响应鼠标动作,当然也可以在LayerUI上绘制“动画”,所谓动画,就是通过定时器控制LayerUI上绘制的图形动态地改变即可。
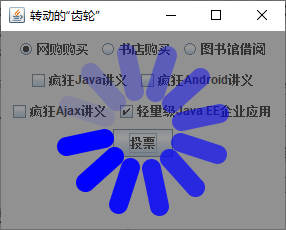
接下来重写的LayerUI使用了Timer来定时地改变LayerUI上的绘制,程序绘制了一个旋转中的“齿轮”,这个旋转的齿轮可以提醒用户“程序正在处理中”
程序 转动的齿轮 下面程序重写LayerUl时绘制了12条辐射状的线条,并通过Timer来不断地改变这12条线条的排列角度,这样就可以形成“转动的齿轮”了。
程序提供的WaitingLayerUI类代码如下。
1 2 3 4 5 6 7 8 9 10 11 12 13 14 15 16 17 18 19 20 21 22 23 24 25 26 27 28 29 30 31 32 33 34 35 36 37 38 39 40 41 42 43 44 45 46 47 48 49 50 51 52 53 54 55 56 57 58 59 60 61 62 63 64 65 66 67 68 69 70 71 72 73 74 75 76 77 78 class WaitingLayerUI extends LayerUI <JComponent> { private static final long serialVersionUID = -443302447858652985L ; private boolean isRunning; private Timer timer; private int angle; public void paint (Graphics g, JComponent c) { super .paint(g, c); int w = c.getWidth(); int h = c.getHeight(); if (!isRunning) return ; Graphics2D g2 = (Graphics2D) g.create(); Composite urComposite = g2.getComposite(); g2.setComposite(AlphaComposite.getInstance(AlphaComposite.SRC_OVER, .5f )); g2.fillRect(0 , 0 , w, h); g2.setComposite(urComposite); int s = Math.min(w, h) / 5 ; int cx = w / 2 ; int cy = h / 2 ; g2.setRenderingHint(RenderingHints.KEY_ANTIALIASING, RenderingHints.VALUE_ANTIALIAS_ON); g2.setStroke(new BasicStroke (s / 2 , BasicStroke.CAP_ROUND, BasicStroke.JOIN_ROUND)); g2.setPaint(Color.BLUE); g2.rotate(Math.PI * angle / 180 , cx, cy); for (int i = 0 ; i < 12 ; i++) { float scale = (11.0f - (float ) i) / 11.0f ; g2.drawLine(cx + s, cy, cx + s * 2 , cy); g2.rotate(-Math.PI / 6 , cx, cy); g2.setComposite(AlphaComposite.getInstance(AlphaComposite.SRC_OVER, scale)); } g2.dispose(); } public void start () { if (isRunning) return ; isRunning = true ; timer = new Timer (100 , e -> { if (isRunning) { firePropertyChange("crazyitFlag" , 0 , 1 ); angle += 6 ; if (angle >= 360 ) angle = 0 ; } }); timer.start(); } public void stop () { isRunning = false ; firePropertyChange("crazyitFlag" , 0 , 1 ); timer.stop(); } public void applyPropertyChange (PropertyChangeEvent pce, JLayer layer) { if (pce.getPropertyName().equals("crazyitFlag" )) { layer.repaint(); } } }
程序 主类 1 2 3 4 5 6 7 8 9 10 11 12 13 14 15 16 17 18 19 20 21 22 23 24 25 26 27 28 29 30 31 32 33 34 35 36 37 38 39 40 41 42 43 44 45 46 47 public class WaitingJLayerTest { public void init () { JFrame f = new JFrame ("转动的“齿轮”" ); JPanel p = new JPanel (); ButtonGroup group = new ButtonGroup (); JRadioButton radioButton; p.add(radioButton = new JRadioButton ("网购购买" , true )); group.add(radioButton); p.add(radioButton = new JRadioButton ("书店购买" )); group.add(radioButton); p.add(radioButton = new JRadioButton ("图书馆借阅" )); group.add(radioButton); p.add(new JCheckBox ("疯狂Java讲义" )); p.add(new JCheckBox ("疯狂Android讲义" )); p.add(new JCheckBox ("疯狂Ajax讲义" )); p.add(new JCheckBox ("轻量级Java EE企业应用" )); JButton orderButton = new JButton ("投票" ); p.add(orderButton); final WaitingLayerUI layerUI = new WaitingLayerUI (); JLayer<JComponent> layer = new JLayer <JComponent>(p, layerUI); final Timer stopper = new Timer (4000 , ae -> layerUI.stop()); stopper.setRepeats(false ); orderButton.addActionListener(ae -> { layerUI.start(); if (!stopper.isRunning()) { stopper.start(); } }); f.add(layer); f.setSize(300 , 170 ); f.setDefaultCloseOperation(JFrame.EXIT_ON_CLOSE); f.setVisible(true ); } public static void main (String[] args) { new WaitingJLayerTest ().init(); } }
上面程序中的①号粗体字代码定义了一个angle变量,它负责控制12条线条的旋转角度。程序使用Timer定时地改变angle变量的值(每隔0.1秒angle加6),如③号粗体字代码所示。控制了angle角度之后,程序根据该angle角度绘制12条线条,如②号粗体字代码所示。
提供了WaitingLayerUI之后,接下来使用该WaitingLayerUI与使用前面的UI没有任何区别。不过程序需要通过特定事件来显示WaitingLayerUI的绘制(就是调用它的start方法),下面程序为按钮添加了事件监听器:当用户单击该按钮时,程序会调用WaitingLayerUI对象的start方法。
1 2 3 4 5 6 7 8 orderButton.addActionListener(ae -> { layerUI.start(); if (!stopper.isRunning()) { stopper.start(); } });
除此之外,上面代码中还用到了stopper计时器,它会控制在一段时间(比如4秒)之后停止绘制WaitingLayerUI,因此程序还通过如下代码进行控制
1 2 3 4 final Timer stopper = new Timer (4000 , ae -> layerUI.stop());stopper.setRepeats(false );
再次运行该程序,可以看到如图12.26所示的“动画装饰”效果。
通过上面几个例子可以看出,Swing提供的JLayer为窗口美化提供了无限可能性。只要你想做的,比如希望用户完成输入之后,立即在后面显示一个简单的提示按钮(钩表示输入正确,叉表示输入错误)……都可以通过JLayer绘制。