17.4 第一个Spring MVC应用
本章的示例应用程序app17a展示了基本的Spring MVC应用。该应用程序同第16章学习的app16b应用非常相似,以便展示Spring MVC是如何工作的。app17a应用也有两个控制器是类似于app17b的控制器类。
17.4.1 目录结构
以下为app17a的目录结构
1
2
3
4
5
6
7
8
9
10
11
12
13
14
15
16
17
18
19
20
21
22
23
24
25
26
27
28
29
| E:\workspace_web\app17a
├─pom.xml
└─src
├─main
│ ├─java
│ │ └─app17a
│ │ ├─controller
│ │ │ ├─InputProductController.java
│ │ │ └─SaveProductController.java
│ │ ├─domain
│ │ │ └─Product.java
│ │ └─form
│ │ └─ProductForm.java
│ ├─resources
│ └─webapp
│ ├─css
│ │ └─main.css
│ ├─index.jsp
│ ├─META-INF
│ │ └─MANIFEST.MF
│ └─WEB-INF
│ ├─jsp
│ │ ├─ProductDetails.jsp
│ │ └─ProductForm.jsp
│ ├─lib
│ ├─springmvc-servlet.xml
│ └─web.xml
└─test
└─java
|
这是一个基于Maven的Java Web项目,依赖如下所示,注意,。特别需要注意的是spring-webmvc-x.y.z.jar文件,其中包含了DispatcherServlet的类。
1
2
3
4
5
6
7
8
9
10
11
12
13
14
15
16
17
18
19
20
21
22
23
24
25
26
27
28
29
30
31
|
<dependency>
<groupId>org.springframework</groupId>
<artifactId>spring-aop</artifactId>
<version>4.3.9.RELEASE</version>
</dependency>
<dependency>
<groupId>org.springframework</groupId>
<artifactId>spring-beans</artifactId>
<version>4.3.9.RELEASE</version>
</dependency>
<dependency>
<groupId>org.springframework</groupId>
<artifactId>spring-context</artifactId>
<version>4.3.9.RELEASE</version>
</dependency>
<dependency>
<groupId>org.springframework</groupId>
<artifactId>spring-expression</artifactId>
<version>4.3.9.RELEASE</version>
</dependency>
<dependency>
<groupId>org.springframework</groupId>
<artifactId>spring-web</artifactId>
<version>4.3.9.RELEASE</version>
</dependency>
<dependency>
<groupId>org.springframework</groupId>
<artifactId>spring-webmvc</artifactId>
<version>4.3.9.RELEASE</version>
</dependency>
|
还要注意**Spring MVC依赖于Apache Commons Logging组件,没有它,SpringMVC应用程序将无法正常工作**。可以从以下网址下载这个组件:
http://commons.apache.org/proper/commons-loggins/download_logging.cgi
或者使用Maven引入,如下所示:
1
2
3
4
5
| <dependency>
<groupId>commons-logging</groupId>
<artifactId>commons-logging</artifactId>
<version>1.1.3</version>
</dependency>
|
本示例应用的所有JSP页面都存放在/WEB-INF/jsp目录下,确保无法被客户端直接访问。
17.4.2 部署描述符文件和Spring MVC配置文件
部署描述符(web.xml)文件
1
2
3
4
5
6
7
8
9
10
11
12
13
14
15
| <?xml version="1.0" encoding="UTF-8"?>
<web-app version="3.0" xmlns="http://java.sun.com/xml/ns/javaee"
xmlns:xsi="http://www.w3.org/2001/XMLSchema-instance"
xsi:schemaLocation="http://java.sun.com/xml/ns/javaee http://java.sun.com/xml/ns/javaee/web-app_3_0.xsd">
<servlet>
<servlet-name>springmvc</servlet-name>
<servlet-class>
org.springframework.web.servlet.DispatcherServlet</servlet-class>
<load-on-startup>1</load-on-startup>
</servlet>
<servlet-mapping>
<servlet-name>springmvc</servlet-name>
<url-pattern>*.action</url-pattern>
</servlet-mapping>
</web-app>
|
这里告诉了Servlet/JSP容器,我们将使用Spring MVC的DispatcherServlet,并通过配置url-pattern元素值为“/”,将所有的URL映射到该servlet。由于servlet元素下没有init-param元素,所以Spring MVC的配置文件在/WEB-INF文件夹下,并按照通常的命名约定。
下面,我们来看一下清单17.2所示的Spring MVC配置文件(springmvc-servlet.xml)。
Spring MVC配置文件springmvc-servlet.xml
1
2
3
4
5
6
7
8
9
10
| <?xml version="1.0" encoding="UTF-8"?>
<beans xmlns="http://www.springframework.org/schema/beans"
xmlns:xsi="http://www.w3.org/2001/XMLSchema-instance"
xsi:schemaLocation="http://www.springframework.org/schema/beans
http://www.springframework.org/schema/beans/spring-beans.xsd">
<bean name="/product_input.action"
class="app17a.controller.InputProductController" />
<bean name="/product_save.action"
class="app17a.controller.SaveProductController" />
</beans>
|
这里声明了InputProductController和SaveProductController两个控制器类,并分别映射到/product_input.action和/product_save.action。两个控制器是将在下一节讨论。
17.4.3 Controller
app17a应用程序有InputProductController和SaveProductController两个“传统”风格的控制器,分别实现了Controller接口。代码如下.
1
2
3
4
5
6
7
8
9
10
11
12
13
14
15
16
17
18
19
20
21
22
| package app17a.controller;
import javax.servlet.http.HttpServletRequest;
import javax.servlet.http.HttpServletResponse;
import org.apache.commons.logging.Log;
import org.apache.commons.logging.LogFactory;
import org.springframework.web.servlet.ModelAndView;
import org.springframework.web.servlet.mvc.Controller;
public class InputProductController
implements
Controller
{
private static final Log logger = LogFactory
.getLog(InputProductController.class);
@Override
public ModelAndView handleRequest(HttpServletRequest request,
HttpServletResponse response) throws Exception
{
logger.info("InputProductController called");
return new ModelAndView("/WEB-INF/jsp/ProductForm.jsp");
}
}
|
InputProductController类的handleRequest方法只是返回一个ModelAndView,包含一个视图,且没有模型。因此,该请求将被转发到/WEB-INF/jsp/ProductForm.jsp页面。
SaveProductController类
1
2
3
4
5
6
7
8
9
10
11
12
13
14
15
16
17
18
19
20
21
22
23
24
25
26
27
28
29
30
31
32
33
34
35
36
37
38
39
40
41
42
43
| package app17a.controller;
import javax.servlet.http.HttpServletRequest;
import javax.servlet.http.HttpServletResponse;
import org.apache.commons.logging.Log;
import org.apache.commons.logging.LogFactory;
import org.springframework.web.servlet.ModelAndView;
import org.springframework.web.servlet.mvc.Controller;
import app17a.domain.Product;
import app17a.form.ProductForm;
public class SaveProductController
implements
Controller
{
private static final Log logger = LogFactory
.getLog(SaveProductController.class);
@Override
public ModelAndView handleRequest(HttpServletRequest request,
HttpServletResponse response) throws Exception
{
logger.info("SaveProductController called");
ProductForm productForm = new ProductForm();
productForm.setName(request.getParameter("name"));
productForm
.setDescription(request.getParameter("description"));
productForm.setPrice(request.getParameter("price"));
Product product = new Product();
product.setName(productForm.getName());
product.setDescription(productForm.getDescription());
try
{
product
.setPrice(Float.parseFloat(productForm.getPrice()));
} catch (NumberFormatException e)
{}
return new ModelAndView("/WEB-INF/jsp/ProductDetails.jsp",
"product",
product);
}
}
|
SaveProductController类的handleRequest方法中,首先用请求参数创建一个ProductForm对象;然后,它根据ProductForm对象创建Product对象。由于ProductForm的price属性是一个字符串,而其在Product类对应的是一个float,此处类型转换是必要的。第18章,我们将学习在Spring MVC中如何省去ProductForm对象,使编程更简单。
SaveProductController的handleRequest方法最后返回的ModelAndView模型包含了视图的路径、模型名称以及模型(product对象)。该模型将提供给目标视图,用于界面显示。
17.4.4 View
app17a应用程序中包含两个JSP页面:ProductForm.jsp页面和ProductDetails.jsp页面
1
2
3
4
5
6
7
8
9
10
11
12
13
14
15
16
17
18
19
20
21
22
23
24
25
26
27
28
29
30
31
32
33
34
35
36
37
| <!DOCTYPE HTML>
<html>
<head>
<title>Add Product Form</title>
<style type="text/css">
@import url(css/main.css);
</style>
</head>
<body>
<div id="global">
<form action="product_save.action" method="post">
<fieldset>
<legend>Add a product</legend>
<p>
<label for="name">Product Name: </label> <input
type="text" id="name" name="name" tabindex="1">
</p>
<p>
<label for="description">Description: </label> <input
type="text" id="description" name="description"
tabindex="2">
</p>
<p>
<label for="price">Price: </label> <input
type="text" id="price" name="price" tabindex="3">
</p>
<p id="buttons">
<input id="reset" type="reset" tabindex="4">
<input id="submit" type="submit" tabindex="5"
value="Add Product">
</p>
</fieldset>
</form>
</div>
</body>
</html>
|
此处不适合讨论HTML和CSS,但需要强调的是项目中的HTML是经过适当设计的,并且没有使用<table>来布局输入字段。
ProductDetails.jsp页面
1
2
3
4
5
6
7
8
9
10
11
12
13
14
15
16
17
18
19
| <!DOCTYPE HTML>
<html>
<head>
<title>Save Product</title>
<style type="text/css">
@import url(css/main.css);
</style>
</head>
<body>
<div id="global">
<h4>The product has been saved.</h4>
<p>
<h5>Details:</h5>
Product Name: ${product.name}<br /> Description:
${product.description}<br /> Price: $${product.price}
</p>
</div>
</body>
</html>
|
ProductDetails.jsp页面通过模型属性名“product”来访问由SaveProductController传入的Product对象。这里用JSP表达式语言来显示Product对象的各种属性。
17.4.5 测试应用
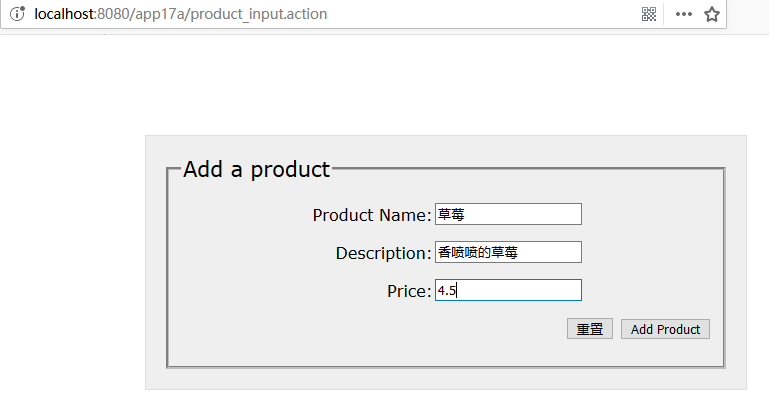
现在,在浏览器中输入如下URL来测试应用:
http://localhost:8080/app17a/product_input.action
会看到类似于下图所示的产品表单页面,在空字段中输入相应的值后单击Add Product(添加产品)按钮,
![这里有一张图片]()
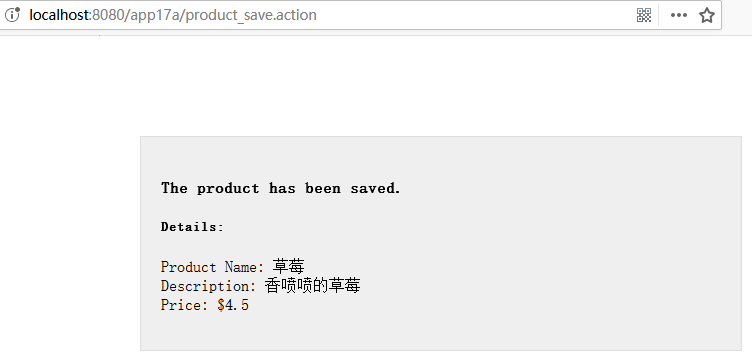
会在下一页中看到产品属性,如下图所示:
![这里有一张图片]()